Pinkfresh Studio: A Case Of The Blahs Blog Hop


Hi Creative Friends!

Welcome  to the Pinkfresh Studio: A Case of the Blahs Blog Hop!


How AWESOME is this new collection?!!
I couldn't wait to create with it - so honest, raw and real!
Our talented Design Team have created some incredible projects to inspire you with!
And there's a terrific prize pack up for grabs too!

If you've just arrived from the very talented Anna's blog, then you're in the right place!
If not, here's the blog hop order to help you find your way!

Blog Hop Order

6. Evelyn Pratiwi Yusuf
You are HERE ---------->  11. Amanda-Jayne Baldwin
12. Adrienne Alvis

***Commenting for the prize will close at 11.59pm CST on Thursday February 8th 2018.

The winners will be randomly selected and it's a requirement that they have to leave a comment on each Blog in the Hop***

Now, on to my project with A Case of the Blahs!
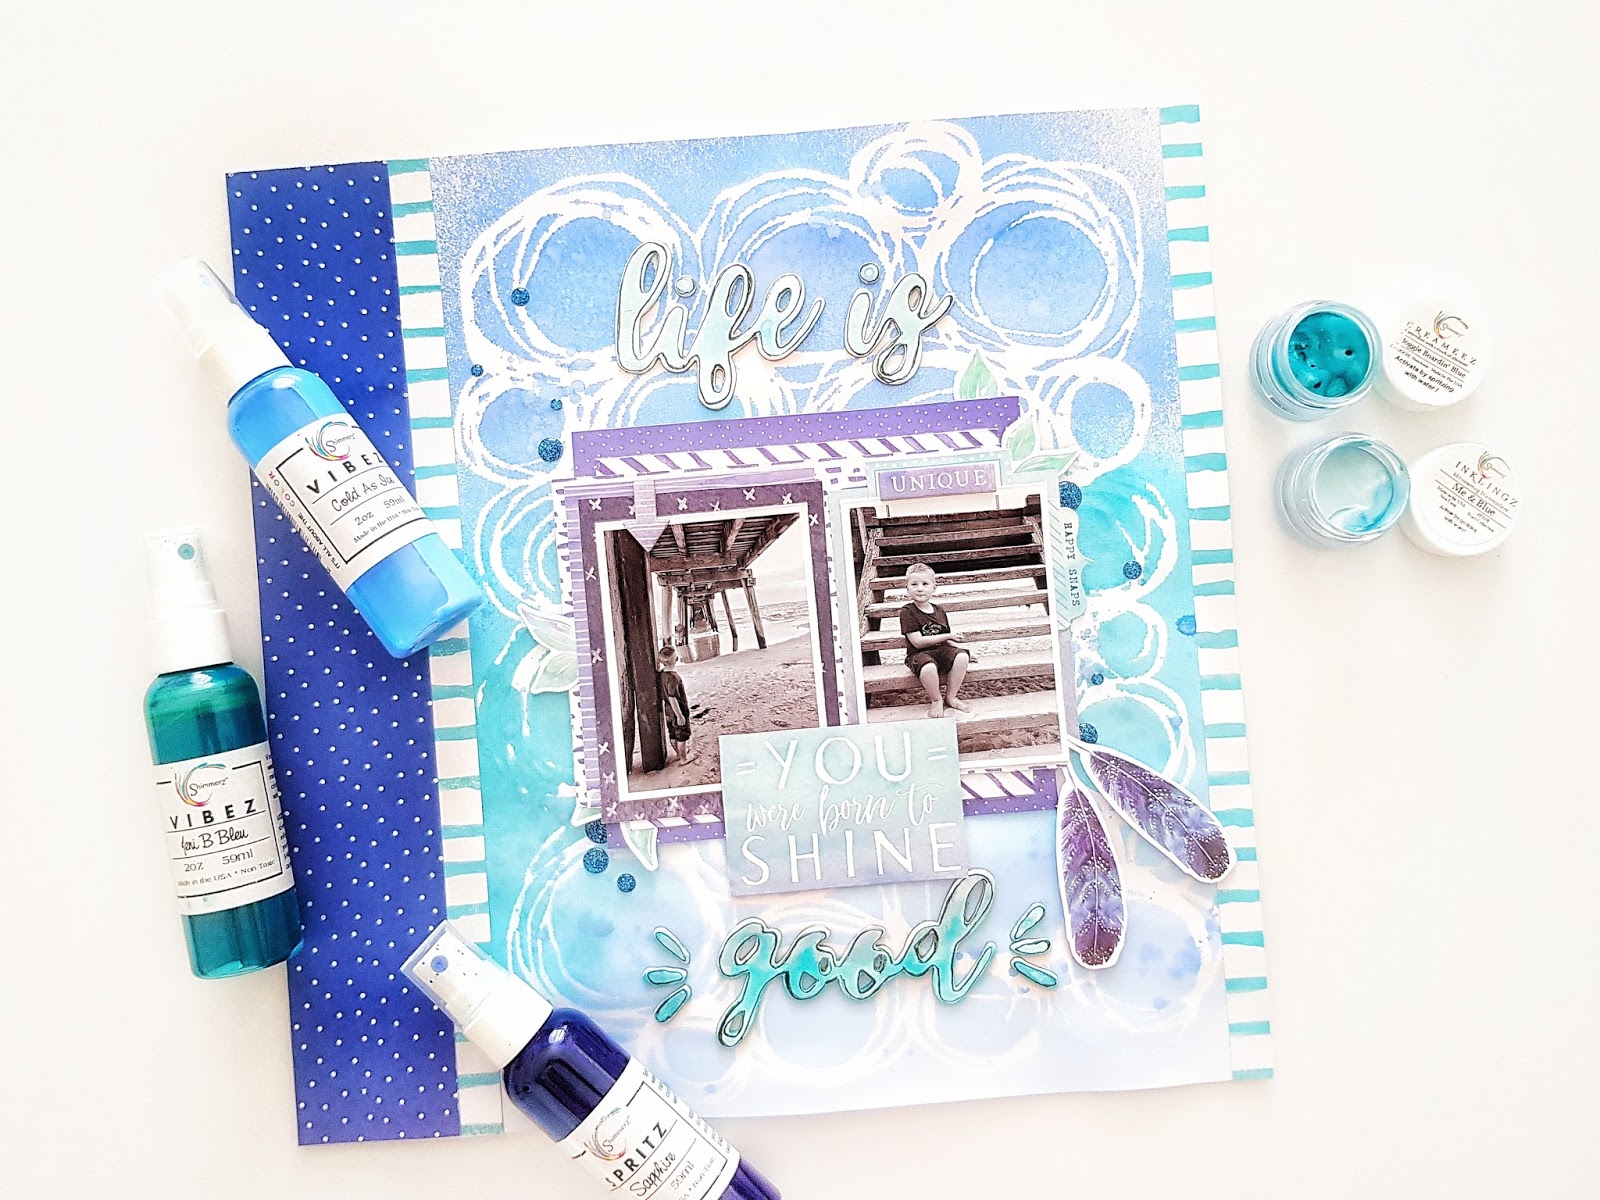
"Home Time"


Oh isn't this fun?!! Told you this line is all about the 'real' and 'raw' stuff! 
Love being able to document ALL the stories; not just the remarkable ones! 
He really was over it and oh so ready to go home - Bless!

I've used pattern papers, Flawsome and Blah to create the 'trims' on both sides of my layout. I've also cut up pattern paper, Messy and used it as ephemera on my page! 
Speaking of ephemera, there's quite a few pieces from the Ephemera Pack on this page!


And how about those Chipboard, Cardstock & Puffy Stickers?!! SO cool!
Loving the BLAH!
I've also included Enamel Dots, and Fabric Die Cuts too.....


So.much.awesome!!!

I hope I have inspired you to get creating with this 'everyday life' documented collection!
A Case of the Blahs is anything but Blah! 
It's so striking! LOVE it!

Before I send you on, please be sure to leave a comment to be eligible for the prize & good luck!

Time to hop on over to the final stop on the trail! 
See what the gorgeous Adrienne Alvis has in store for you HERE

Thanks so much for visiting!
til next time, 

Happy Arty Days, 
Amanda xo 

Elle's Studio: Stars in Sky


Hi Everyone!

Time for my first official post as part of the new 2018 Elle's Studio Design Team, 
and boy-oh-boy, am I excited!
The January Kit (plus extras) for 2018 have been nothing short of exceptional, and I just couldn't wait to create with them! 
I hope you will feel inspired by my 12 x 12 layout today,

"Stars In Sky"


Oh isn't this something?!!
Nothing like a large, bold title to make your pages 'pop'!
That incredible title, I Love You More Than All The Stars In The Sky, is from the Love You Die Cuts, and is a perfect sentiment for my sweet boy!
As my handsome subject is looking to the right, I have used a right alignment on my layout to ensure visual flow and 'ease on the eye' from a design aesthetic. 
You'll spy those gorgeous XOXO 6 x 6 Paper Stack papers lining the right side of my layout. 
To give the appearance of 12 inch papers, I have used the patterns where you don't really notice the 'join' at the 6 inch mark. Stripes and simple patterns are best for this option. I have also distracted away from the paper join by partially covering it with the cotton floss (from my stash) and paper layers from my photo cluster.  
And while we're talking papers, how good is that color combination?!! 

Here's a closer look......


Crisp, fresh and contemporary! 
The mint, red & white really allow that bold black title to be a standout feature. To add further emphasis, I applied foam tape to my title creating dimension & interest.
Awesome!

I use more of the 6 x 6 Paper Stack papers to layer beneath my photo, as well as cards, die cuts and labels from the January Kit. 


I embellish my photo cluster with Star Chipboard Stickers, Hugs & Kisses Puffy Stickers and a Love You Die Cuts subtitle, My #1. So many lovely layers and details here! 


As my layout is totally inspired by my darling and that title, it seemed only fitting to feature hearts and stars in my background. I took inspiration from Nursery decor, and created a 'mobile' look with sewn lines, Enamel Dots (Family Fun Collection), Star Chipboard Stickers and die cut hearts from the January Kit and Love You Die Cuts. 


I just love how this turned out! So simple and yet, oh so striking!


Beautiful photo, beautiful products = layout bliss!

And there you have it!
My inspirational layout you to get creating with our January Kit!
Need more Elle's Studio supplies? 
Visit the online store HERE

Thanks so much for stopping by today!
til next time, 

Happy Arty Days, 
Amanda xo 


Pebbles: Forever My Always, Valentine!


Hi Creatives!
My turn on the Pebbles blog, & today I am sharing some Valentine's Day card inspiration with the gorgeous Forever My Always collection! 
I just adore this holiday! 
Nothing more beautiful than proclaiming your love (or secret admiration) to that special someone! 
I am so blessed to have three very special people in my life; a loving husband, and two darling children! I have created a trio of Forever My Always cards to surprise them with....


Oh aren't they something?!  3 pattern papers, three very pretty cards!
Here's how to recreate them!
Start with trimming up pattern paper, XOXO Quotes. The 3x4 journal cards on this paper make card making a dream! Select which sentiments work best for your beloved - everything in this line coordinates beautifully, so any of the XOXO Quote cards will be perfect!


Tip: I even trim the reverse (pattern side) of the barcode strip, to use in my cards too!


My card 'planning' starts off by arranging pattern papers with the trimmed 3x4 journal cards, and a few pieces of ephemera....


I like to shuffle my pattern papers around and make sure I'm happy with my design before I start gluing.
I just LOVE the combination of the diagonal stripe paper, Follow Your Heart and floral print, Sprinkled Blossoms, so I decide to use them as my feature papers on all 3 cards.
Here's my first card which is for my One True Love, "I Think About You A Lot"....


SO pretty!
To recreate:
1.Trim pattern paper Follow Your Hear to 8 1/4" wide x 6" long. Score and fold in half to create your 4" x 6" card.
2. Trim pattern paper Sprinkled Blossoms to 4" wide x 3 1/2 " long.
3. Adhere pattern papers together ( as shown below)


4. Tape the journal card and ephemera into position. Use adhesive foam dots for the sentiment, to make it 'pop'.
5. Embellish with a sewn button, and some fabulous Forever My Always 6 x 12 Stickers. Voila!


Absolutely perfect, indeed!
Next up is this fun Valentine for my tween-age daughter, "Heart Mail".....


Still loved up and oh-so-pretty,  but much cooler for a young girl!
Here's how:
1. Trim pattern paper Sprinkled Blossoms to 8 1/4" wide x 6" long. Score and fold in half to create card base.
2. Trim pattern paper Follow Your Heart to 3 3/4" wide x 5 1/2" long.
3. Attach pink satin ribbon to Follow Your Heart Paper, & then attach the XOXO Quotes sentiment card. Using the same ribbon, add a bow to the top of the 3 x 4 card. (shown below)


Tip: To make this card less formal and more 'young 'n' fun', I use my Becky Higgins Project Life Corner Rounder Punch on my 3 x 4 card. Such a simple, but effective result!
4. Using thick foam tape, attach the Follow Your Heart embellished paper to the Sprinkled Blossoms card base.
5. Embellish with the Heart Mail 6 x 12 Sticker & a few buttons from your sewing kit.


Love it!
Last, but by no means least, is this lovely card for my darling Mister 5, "You're Pretty Much My Favorite Person"....


This is just gorgeous!
1. Trim white cardstock to 8 1/4" wide x 6" long. Score and fold in half to create card base.
2. Trim pattern paper Sprinkled Blossoms to 4" wide x 3 3/4" long.
3. Trim pattern paper Follow Your Heart to 3 1/2" wide x 5 1/2" long.


4. Tape the Sprinkled Blossoms paper to the bottom of the cardstock base. Attach satin ribbon to Follow Your Heart paper, and then tape this pattern paper over the top of the Sprinkled Blossoms and white cardstock base, as shown below.


5. Apply foam dots to the XOXO Quotes 3 x 4 card, and then position over the ribbon trim.
6. Embellish with lace trim, button & twine and another of those fabulous 6 x 12 Stickers.
   
Voila! Three papers, 3 very special Valentine's Day cards.
 

I hope I have inspired you to get creating with our beautiful Forever My Always collection!

Thanks for stopping by today!
til next time, 
Happy Arty Days, 
Amanda xo


Supplies:

Pinkfresh Studio: Let Your Heart Decide Blog Hop


Hi Pinkfresh Studio Friends!

Welcome to the Pinkfresh Studio: 
Let Your Heart Decide Blog Hop!

This fabulous new collection is just the prettiest!
The colours and patterns are so divine!


Awesome, huh?!

But enough chatter, let's get on to our hop!

If you've just arrived here from the super talented, Adrienne Alvis' blog,
then you're in the right place!
If not, here's the blog hop order for you......

Blog Hop Order

Start HERE---------> 1. Pinkfresh Studio
You are HERE-------> 3. Amanda-Jayne Baldwin
5. Ashley Horton
6. Beata Valint
7. Elsie Robinson
8. Evelyn Pratiwi Yusuf
9. Flora Monika Farkas
10. Kathleen Graumuller
11. Stephanie Dagan
12. Veera Saarivuo


Like all good blog hops, there's an awesome prize up for grabs!
The prize details can be found on the Pinkfresh Studio post at the START of the hop HERE
How fabulous!

Comments for prize eligibility will close at 11.59pm CST on Thursday February 1st 2018.
***Winners will be randomly selected and the requirement is that they need to leave a comment on each Blog in the Hop***

I had so much fun creating with this collection! Here's my layout,

"Explorer"


Oh isn't this something?!!
So fun and fresh! 
The colours are just the prettiest and I couldn't resist using all those stunning embellishments!
Here's a better look for you....


*sigh* 
Love this happy moment & Let You Heart Decide was perfect for documenting it! 
I've based my cardstock on pattern paper, Instinct. Such a pretty design and the colors worked so well with my beach explorer boy page! Cool and inviting - just like the water in the pictures! 
 I have two main clusters in my layout - let's take a look at the main one.....


Oh my heart! 
How divine are all those embellishments?!! 
My photo is layered on a tag, and adorned with lots of pretties from the Ephemera Pack. 
You'll also spot those stunning Wood Veneer Stickers too! 
That Epoxy Heart is so striking!!!

And here's a close up of the smaller photo cluster at the bottom of my page.....


I love the striking black and white, and gold foil accents with this otherwise calm and serene color palette. You'll spy more delightful embellishments here including Epoxy Heart Stickers, Leatherette Stickers, Cardstock Stickers, Washi Stickers and even Layered Stickers! 
This collection has it all! 
And I hope you can see why I am just LOVING Let Your Heart Decide!
I am certain you're going to love creating with it too!

 Time to send you hopping over to the incredibly inspiring Anna's blog HERE

Before you go, please be sure to leave a comment to be eligible for the prize.
Good luck! 
Thanks so much for visiting!
til next time, 

Happy Arty Days, 
Amanda xo 


Shimmerz Paints: All About the Blues!


Hi Creatives!

Welcome back for more Shimmerz Paints inspiration!
Instead of focusing on a particular Shimmerz Paint product,
today's post is all about my fave colour; blue!
Here's what I've created ......

"Life Is Good"


Awesomeness!
I took these sweet pics of my darling boy at the beach on Christmas Eve and couldn't wait to document them! So cute! And such happy memories too!
I've used the Cocoa Vanilla Studio: Bohemian Dream collection, and have drawn from all the blues in this line too!
With it being a coastal theme, ombre blues seemed a perfect choice for my background paper.


That Shimmerz Paints background is totally WOW!

Here's how I created it......


I used a scribbles circle stencil in a right alignment position. 
I wanted to create an ombre look with our awesome sprays.
Starting from the top, I misted a row of Spritz: Sapphire, followed by Vibez: Jeni Be Bleu, & lastly Vibez: Cold As Ice. I add a few flicks of paint from each spray nozzle too!
So cool!

While that was drying, I painted up my chippie title .....


I start with good wet coat of Creameez: Boogie Boardin' Blue, and before it dries, I blend in some Inklingz: Me & Blue. This adds more interest to the title, as well as more shimmer & shine! 
To make the title stand out a lil more, I outline the script with a fine line black permanent pen. 


Seriously good! 
I LOVE how effective this looks!

Here's a closer look at my completed page.....


That spritzed background is just so stunning! 
I hope you'll give creating your own Shimmerz Paints background a try!
I think you'll agree that the end result is so worth it!

Need some more Shimmerz Paints before you get started?
Visit the online store HERE
& REMEMBER: Type AMANDA in the comments section of your order (every time you order)
 and you'll receive a bonus shimmery gift! Yay for free paint! 

Thanks so much for stopping by today, 
til next time, 

Happy Arty Days, 
Amanda xo 


Paper Issues: January Swag Bag Spotlight!


Hi Creatives!

Welcome back for one of my absolute favourite shares of the Paper Issues calendar, 


Yay!!!

It's no secret that I love me a Swag Bag!
They're always stashed full of SO many awesome cards and embellishments - that despite trying I never seem to use them all up!
Well, starting from now I am determine to use them all up! 

Today's layout is made from the 2017 June Swag Bag.......

Here's what I've created, 

"Brave, Rad, Cool, Little Man"


Isn't this so  much fun?!!
La la LOVE this!

Apart from my cardstock, 12 x 12 Crate Paper pattern paper base, Thicker stickers & mixed media everything else you see here is from the Swag Bag! 
I know, crazy huh?! SO many 3 x 4 cards and cool embellishments! 
(especially when I made 2 other layouts with this mini kit last year - that's some serious good value!)
Swag Bags are only $9.99 USD but, they do sell out fast! 
Click HERE if you're feeling lucky about this month's awesome mini kit!
To avoid disappointment, I have a 6month subscription which you can read all about HERE

A few close ups for you.....


Lots of Crate Paper Cool Kid collection, and I just adore the cute buttons too!
The mixed media background is made from my stash of Shimmerz Paints. 
I applied Vibez in Jeni Be Bleu and Deep Blue Sea using the packaging technique. Very cool!


Loving the layered 3 x 4 cards beneath my photo and Wild Child sentiment!


Super cool! (A bit like my handsome subject in the photo! ;)  )
And there you have it!

Swag Bags are jam packed full of awesome!

Sometimes you just want a little bit of this and a little bit of that.
There's nothing wrong with sampling!
 You need a Swag Bag! 
Get yours in the Paper Issues store HERE
& REMEMBER: Use code AMANDA & you'll save 20% off your total spend! Yay!


See more Swag Bag inspiration from our talented team here

Thanks so much for stopping by!
til next time, 

Happy Arty Days, 
Amanda xo 


Pebbles: Getting Organised Using A Traveler's Notebook


Hi Friends!

I hope the New 2018 Year is bringing you much joy!
 If you're like me, and feeling a lil behind, overwhelmed or just needing to be more organized for the busy year ahead, then today's post is for you!

I don't know about you, but I certainly feel more organized and less stressed when I jot things down and make lists. Keeping a Traveler's Notebook handy in my purse means I can stay focused, and remember all those appointments too! #igotthis

As soon as I laid eyes on the gorgeous Pebbles: Forever My Always collection I just knew I had to use it for my TN journaling! 
Let's make the everyday ordinary things special too! 
Let's make ALL the pretty things! 
After all, it's a beautiful life!
Here's what I have created to help me conquer 2018!


How CUTE is this Pebbles Traveler's Notebook?!! 
If nothing else, my 2018 is going to be pretty!!!
Here's a sneaky peak inside too.....


Adore this! Being organized never looked so good! And the best part, it only takes a few minutes to create - perfect for this modern, busy world we live in!

Here's how to make your own TN:

  1. Start with your insert paper. I use a good quality A4 copy paper for my everyday lists. Trim to 8 3/4"wide x 8 1/4 long.
  1. Select pattern paper for cover,  (I use the sweet Love Labels for mine) and place the insert paper over it - as shown below. Ensure the cover is just the tiniest bit bigger to allow for full coverage of the inserts, and trim.


3. Score both the inserts and patterned paper cover, and fold in half. Sew, staple or hand stitch the spine to complete.


I sew mine with my machine on a larger stitch, slow speed.
Here's a closer look at how neat the stitching is.....


Super sweet! Use this technique to create as many Notebooks as you need!
Now to decorate!
A good page marker is always helpful - create a stunning rosette clip with the Forever My Always Rosette Stickers and a paperclip. Too easy!


For my TN spread, I use the reverse side of the pattern paper barcode strip, Date Night.
Tip: These sample strips at the bottom of 12 x 12 papers make an excellent alternative to washi tape!


A page marker and some faux washi make such a difference! So simple and yet so effective!
Next, I decorate with a couple of the Cardstock 6 x 12 Icons & Accents Stickers. 
That pencil is just perfection for this planner / notebook! 
I trim pattern paper, Sprinkled Blossoms to 2" wide x 2 1/2"long to create some full boxes. 
A great alternative to planner icon box stickers, and it really defines my TN layout.


I continue to define my TN spread with a few hand drawn boxes, as well as my check list to the left hand side. The typewriter sticker couldn't be any more adorable, and embellishes my long list. I add Puffy Stickers to my half boxes, serving as bullet points. 
Looking good!


For finishing touches, I embellish with more cute stickers, and Die Cuts!


And there you  have it! Super quick (and really pretty!)crafting to keep you organized! 
I hope I have inspired you to make your own Travelers Notebook with the beautiful Pebbles Forever My Always papers and embellishments!

Thanks so much for visiting,
til next time, 

Happy Arty Days, 
Amanda xo 


Supplies: