Pinkfresh Studio: Summer is....Simple & Sweet!


Hi Creative Friends! 
Welcome back to the Happy Arty Days blog!
Today I am super excited to share my first creations with the gorgeous new 
From it's soft pastel colors, to the florals and lemons, this collection is ALL the dreamy Summer vibes! I LOVE it all! 
Documenting those Summer Memories never looked so pretty!
But enough chatter, let's see what I am talking about,

Here's what I've created......
"Happy Thoughts"

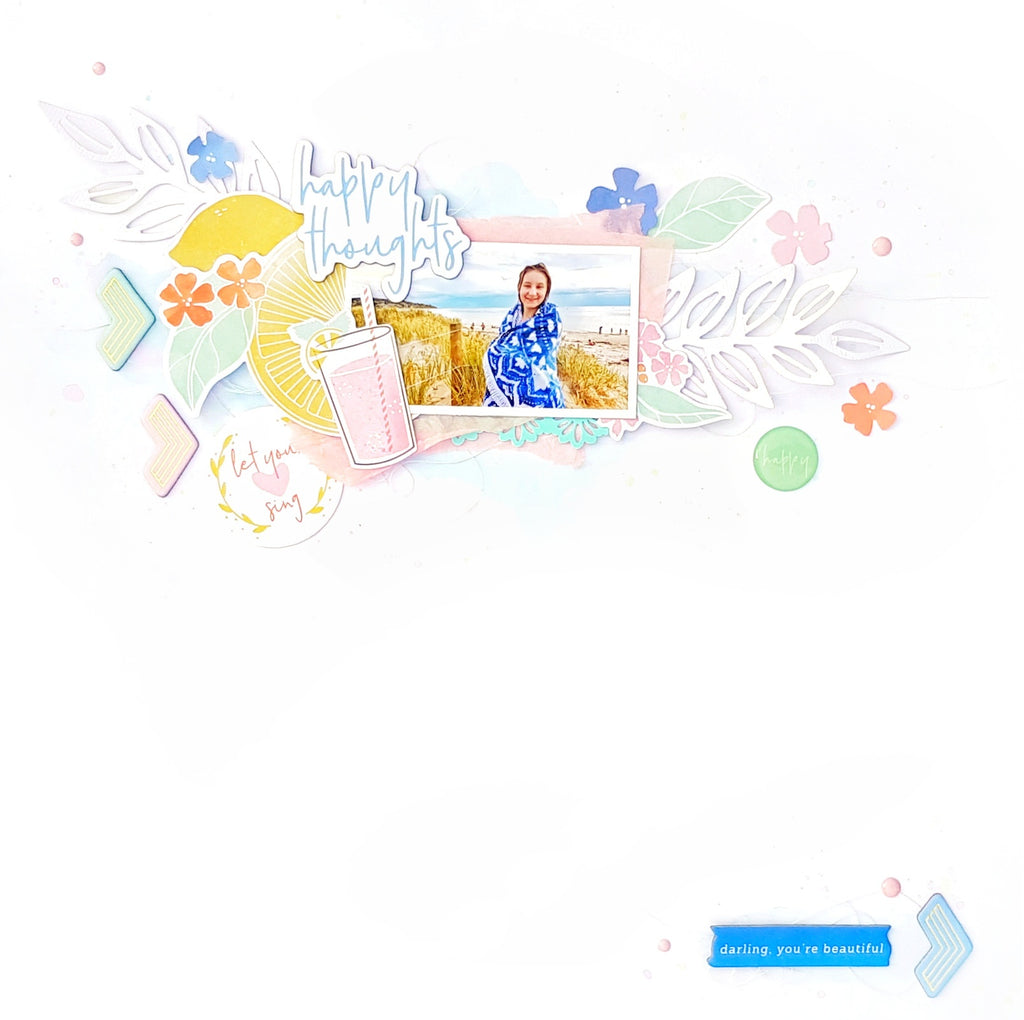
*Sigh* Isn't this dreamy?! 
Such a soft and pretty page to highlight those beach memories! All the Happy Thoughts for this moment - so precious! I adore pages that feature large amounts of white space and just a pop of color to draw you in! Inspired by both the blue in my photograph, and in the Simple & Sweet collection, I decided to create the softest blue color wash beneath my photo cluster. To do this, I start my layout with white watercolor cardstock and apply a very small amount of highly diluted Pinkfresh Studio Liquid Watercolors: Sky Blue with my paintbrush. I added the tiniest amount of diluted Bubblegum Pink droplets to this base and allow to dry. I love the subtly of this type of watercolor painting. It doesn't draw your attention away from my photo; instead it gently enhances! 
Here's a closer view for you......


SO pretty!!!
Once it's dry, I begin to build up my layers onto which my photograph will be positioned. I start with a couple cut file / die cut leaf flourishes in white cardstock. These are just an added textural element to my otherwise very clean design. Onto the leaves, I add a variety of EPHEMERA lemons and floral DIE CUTS. I also add a small section of border punched, hand colored (with Liquid Watercolors in Aquamarine) trim, as well as a few sheets of pink tissue wrap. I position my photo on top of the tissue layers, and continue to embellish. I use the CHIPBOARD STICKERS Happy Thoughts sticker as my title, as well as the CHIPBOARD chevron arrows to adorn my page. A few more pieces of EPHEMERA to decorate the photo cluster, as well as white cotton thread for more of that gentle texture!  


For a more polished look, I embellish with soft pink ENAMEL DOTS & that divine mint green happy EPOXY STICKER. So.much.prettiness!!!
To complete my page as well as add more balance to my design, I include a few page defining details to the bottom right hand side of my layout.....


The CHIPBOARD STICKER sentiment was the perfect lil spot of journaling, and the chevron, cotton thread & ENAMEL DOTS brought it all together! 
Simple. Sweet. Summer. 
Love it! 

My second layout is less simple and more about the sweet - the Summer sweet treats that is! 
"Sweet Memories"


Nothing more dreamy and delicious than Summer Gelati! 
And how divine is that cut file ice cream cone?!! Adore!
For this fun and fresh page, I use the reverse side of pattern paper GOOD THINGS for my 12" x 12" base. With such a bright and playful design, this paper is just perfect for my sweet subject! 
I trim white cardstock to 11" x 11" and machine stitch it onto the GOOD THINGS base. Next I create that super sweet ice cream feature.....


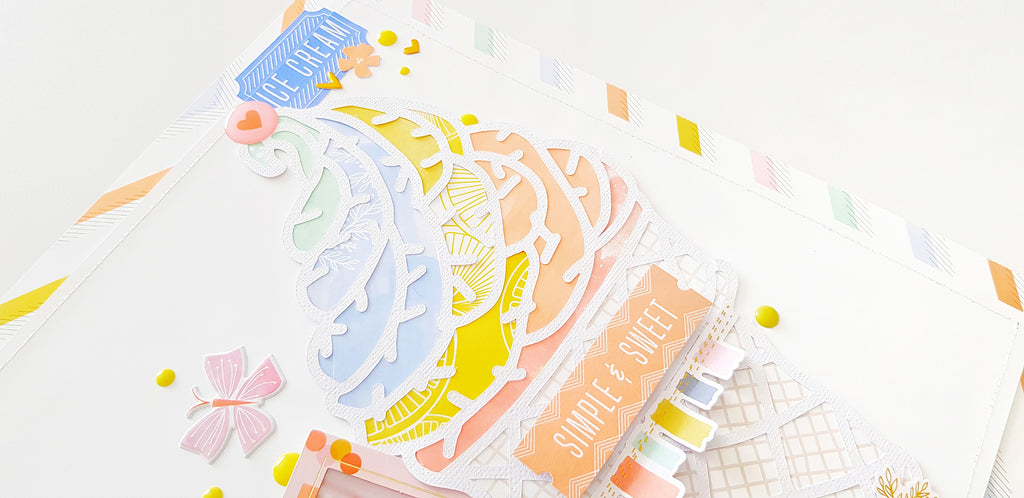
The cut file is called Ice Cream Cone & is from Paige Evans in the Silhouette Store, but there are plenty of ice cream digital cut files that would work for this type of layout (and if you don't have a cutting machine, you could simply draw your design on the reverse side of the paper & then fussy cut it out ;)  ) 
To back the cut file, I use the reverse side of pattern paper SWEET LIFE to create the appearance of a 'waffle style' cone. So cool! For the soft serve section, I use a mix of colors from pattern paper HAPPY LIFE.  I just love how this looks! 
I embellish the soft serve with a faux 'cherry on top' EPOXY STICKER, and trim the EPHEMERA ticket so it only reads ICECREAM , and glue it into place. Next, I decorate the cone with die cut EPHEMERA. I use foam dots to make my Simple & Sweet subtitle pop! Super cute!
I align my large cut file ice cream so it is positioned directly beneath the chevron arrow in the GOOD THINGS base. This subtle detail creates balance and harmony in my layout design, and compensates for the over sized, out of proportion ice cream. 
 

I use the fabulous STITCHED FRAMES with FOIL ACCENTS to highlight my sweet photograph, and embellish it with a few EPHEMERA blooms. I tuck my framed photo into the side center of my ice cream and then build the remainder of my layout around this focal focal point. 
With so much color already on the page, I opt for the White Mini Alpha PUFFY STICKERS for my project title. The white on white look is so clean and fresh, and it really creates such interest against all the pastel colors. Perfect! 


I complete the page with the EPHEMERA sentiment, and tiny die cut ice cream, a few GOLDEN ACCENTS PUFFY STICKERS, and a good sprinkle of yellow ENAMEL DOTS (cos sprinkles and ice cream are the perfect match!) 

And there you have it! 
My deliciously Simple & Sweet take on Summer! 
I hope my Summer themed pages have inspired you to get documenting those sweet moments! 

Thanks so much for visiting, 
til next time, 

Happy Arty Days, 
Amanda xo 

Shimmerz Paints: Pastel Pretties!!!


Hi Creative Friends!

Welcome back to the Happy Arty Days blog! 
Time for another awesome Shimmerz Paints share, and you guessed it - 
I'm still focusing on those gorgeous new Shimmerz colors
Yay! 
Today is all about the pastel pretties, and I have teamed up our Shimmerz with some of my favourite Dazzlerz pastes! 
Here's what I'm talkin' 'bout.....


*sigh!* pastel perfection right here! 
You'll spy that each Shimmerz color has it's own corresponding Dazzlerz - SO cool! 

What an amazing combination of colors! 
As you can see, I simply applied my Dazzlerz with a palette knife, in a horizontal fashion across my page. I then came in with the Shimmerz and applied lots of splatters and pretty color drops! 
Simple, but oh so effective! 

Here's how my scrapbook layout turned out.....

"Favorite" 


Oh isn't this preeeeeetty!?!! 
I just love this color scheme - so beautiful! 
Sweet & fun, like the subjects in my photograph ;) 
Aren't they gorgeous?! Love em to bits!


I have dived into my stash of gorgeous Elle's Studio products to complete my page. 
To compliment the color block stripes, I stamped the Icon Stamp star repeatedly, & in corresponding ink pad colors too! 
Such a pretty result! 
I then added a mix of Puffy Star Stickers and Star Chipboard Stickers  as well! 
Such a beautiful scrapbook background!

Here's a few close ups for you.....


Oh how divine is that lilac?!! 


Those Shimmerz colors are truly like liquid Dazzlerz! SO awesome!


Absolutely AMAZING colors! 

& remember: Type AMANDA in the comments section of your order to receive a FREE paint! 
(Offer is good every single time you order, but not valid with any other discounts or codes)
Yay for Free Paint!!! 

Thanks so much for visiting today! 
I hope I have inspired you to get a lil painty!

til next time, 

Happy Arty Days, 
Amanda xo 


Pebbles: Land That I Love Planner Pages


Hi Pebbles Friends & Fans!

Today I am sharing one of the most loved Holidays in the planner girls' calendar - the 4th of July!
"Oh say, can you see...." 
I'm singing as I type this post, and feeling all the Land of the Free feels right now!
This is such a wonderful holiday to celebrate, and I just love the Red, White & Blue adorning the pages of my weekly view planner! 
Forget functionality, this week is all about showing your stripes -  and plenty of them!
Here's how I've prepared my pages for this special occasion....


God Bless America!
As I'm quite the planner addict, you'll spot that this is yet another new planner in my stash! (Sssh! Don't tell Mr Baldwin - he doesn't need to know ;)  ) You'll note that this a much larger size and more 'boxed' style of planner (it's a MAMBI Happy Planner) compared to my previous planner & traveler's notebooks shares. The great thing is that regardless of planner size or type, you can take the ideas from this post and edit them to best suit your  daily organizer needs. Yay!
Here's how I created this patriotic spread....
First you'll need to gather up your Pebbles: Land That I Love supplies. As well as embellishments, you'll also need pattern papers Stars & Stripes Forever, Happy 4th! and Land That I Love.


I just LOVE those Puffy Stickers! Oh My Stars, indeed!


I start with creating the full size decorator boxes. For this specific project, that means trimming pattern paper Stars & Stripes Forever to size 1 1/2" wide x 2 1/2" long. One 2 1/2" x 12"strip will create exactly 8 boxes, with the choice of two patterns - stars and stripes OR blue with white stripes. Adhere to your pages as shown above.


Next, take pattern paper Happy 4th! and trim all the 'strips' to create faux washi tape.


Trim to size, and adhere with glue. This is already starting to look good!


Trim a 3" x 4" card from pattern paper Land That I Love, and create a 'flap' or two for hidden planning! I use a Printed Cardstock Shape flag as my second flap. I tape them into place with some red tape from my stash.


Decorate with a few Puffy Stickers! You'll see that I have cleverly positioned my puffy star stickers to double up as 'dot points' in my planner! Much more fun than asterisks or bullet points!


I add more Puffy Stickers, and embellish with the 6 x 12 Accent stickers too! You can never have too many stickers!


Next I create a few planner clips for the top of my page. To make, simply hot glue some of the Printed Cardstock Shapes to metal paperclips. For finishing touches, I tie a patriotic ribbon to the base of my planner to act as my page  marker. Love it!

Here's a closer look.....


I love the 'flaps' - such a fun way to decorate without losing all your pen space!


The Red, White & Blue speaks for itself!


I hope you're as excited as I am for the Fourth of July celebrations! I can't wait to see what your planners, organizers and notebooks will look like this week!
Thanks so much for stopping by today,
til next time,

Happy Arty Days, 
Amanda xo 


Pebbles Land That I Love Supplies:

Cocoa Vanilla Studio: Rad Boy!


Hi Everyone!
Welcome back for more Cocoa Vanilla Studio inspiration!
Today I am sharing a closer look on my take for the second CSI - Color.Stories.Inspiration challenge layout for June!
Yes, they have 2 cases for us to solve! How fun!
If you didn't already know, Cocoa Vanilla Studio is sponsoring CSI this month, so be sure to play along with the challenges to go in the draw to win a VERY cool prize! Yay!
Speaking of challenges, here's what the second one looks like....

Such a fun and playful image to draw inspiration from!
I have been inspired by the colours, the bold pops of black, the sense of adventure and the circles! Here's what I came up with,
"Rad Boy"


OH YEAH!!! Such a cool little mister; Rad Boy indeed! 
And what a fun design too!
When it comes to my boy, it's all about challenging those rules lately - so in true boy spirit, I am breaking some of mine! I am, wait for it, mixing collections & not using a white cardstock base! Eeesh! Talk about outta my comfort zone & yes, I know, totally living on the edge! Ha!

You'll spot that I have actually mixed my two fave Cocoa Vanilla Studio boy collections - You Rock and Boys Rule! I begin with Boys Rule pattern paper CV-BR009 GOOD TIMES (textured concrete print) as my 12 x 12 base. I love how rough, raw, & edgy this paper is! Perfect for masculine pages! I then turn to the You Rock collection, and in particular, pattern paper CV-YR001 STARSHINE. I use this paper for that awesome circular cut file called Geo Globe 
(get it from The Cut Shoppe HERE)  and then fussy cut out all the 'negative' left over stars to embellish this cut file with.


I layer my sweet boy photo onto a mix of DIE CUT EPHEMERA frames, as well as a couple 3 x 4 cards which I cut from paper CV-YR006 RANDOM. Inside these layers, I slide in a couple tabs from the Boys Rule DIE CUT EPHEMERA, as well as one more fussy cut star from STARSHINE. I adorn my photo with CHIPBOARD STICKERS, and that super cool Epic RUBBER CHARM. As my photo is my focal point, I position it in the center of my layout design but maintaining the angle of the cut file design too. I add one of the new Boys Rule CLEAR STICKERS (sentiment One Cool Kid) beneath it all. I just love that pop of black!


While I have the CLEAR STICKERS handy, I use a bunch of the stars, as well as the word Epic to embellish around my cut file. These stickers are so easy to use, and look SO effective! One of my new favourite embellishments for sure!


Looking above my photograph, you'll get a closer look at the embellishments I used on the cut file. I carefully positioned those fussy cut STARSHINE stars in rows, covering the intersecting points of the file. More noticeably though, I added my CHIPBOARD STICKERS title; Rad Boy. The striking black chippies have quite an impact! SO cool! (& the font on them is so rad!)


To the left of my photograph is that very cool camera, which I fussy cut from pattern paper CV-YR006 RANDOM. To make it stand out more, and to be in alignment with my photo, I mounted it on thick foam tape. I also add another pop of black beneath it with another CHIPBOARD STICKER. Boom! Yes, this kid has boom factor, lol!


I embellish a few of the fussy cut stars with RUBBER CHARMS & DIE CUT EPHEMERA, and add just a couple more of those CLEAR STICKERS stars for finishing touches. Love it! Simple, striking and oh-so cool!
I hope you have enjoyed seeing my take on the second challenge for CSI this month, and moreso, will play along with your fave Cocoa Vanilla Studio products too!
Thanks so much for visiting!
til next time, 

Happy Arty Days, 
Amanda xo 

CSI Challenge: Case File No.256!


Hi Everyone! 

Welcome back for more Cocoa Vanilla Studio inspiration,
 as we collaborate with the awesome team at

Color.Stories.Inspiration

CSI: Color, Stories, Inspiration

Cocoa Vanilla Studio are the sponsors for CSI for the month of June, 
& we just couldn't wait to play along with their super fun challenges! 

Here's what the newest  CSI Case File 
- No.256 - 
looks like.....


Such a cool case to solve! 

Here's my take on it....

"Epic" 


SO.much.FUN!!!!

I have been inspired by the colors, and circles within the image as well as the sense of adventure! 
You'll spy a mix of the You Rock collection with our newest line, Boys Rule!
That awesome cut file is called Geo Globe and is from The Cut Shoppe

You can see all the close ups and read all the details on this layout on the Cocoa Vanilla Studio blog from the 27th June. 
Until then,  I encourage you to visit the CSI blog HERE 
for more inspiration & to play along too! 

Thanks so much for stopping by today! 
til next time, 

Happy Arty Days, 
Amanda xo


Paper Issues: June: Put It On An Angle


Hi Everyone!

Welcome back for more Paper Issues awesomeness with my take on the 
Put It On An Angle challenge!


As the name suggests, this challenge is all about featuring a visual angle on your layout!
So super fun and easy to play along with; even the slightest tilt counts!

I couldn't wait to get creating for this!
Here's what I came up with to inspire you....

"Lovely" 


She's truly lovely at any angle! 
Sigh! Such a pretty page for my sweet girl!
You'll spy the beautiful Maggie Holmes Flouirsh collection, as well as Nuvo Drops in Bubblegum Pink and Gold, and that divine  6x6 Stencil from Carta Bella. 
Let's take a closer look......


So many gorgeous details, layers and pretty embellishments! 
I even machine stitched and stamped on this layout too! 
I am especially loving the vellum ephemera pieces, including my title Lovely


Seriously, you can hardly even tell it's vellum! So beautifully designed!
And while we're looking so closely, take a peak at those Nuvo Drops! 
Enamel dots for years! Absolutely loving them! 
I now need a bottle in every color - SO good! 


You'll also spy lots of pretty Die Cut Epemera pieces tucked in and around my angled photo cluster. 
Beneath it all is that fabulous gold stamped stencil, which I also applied on an angle to keep my design cohesive and easy to look at. 


All those Flourish pretties!!! 

And there you have it! 
My very feminine and pretty take on the Put It On An Angle challenge! 
I can't wait to see what you'll create! 

Need supplies before you get started?
Visit the Paper Issues store HERE 
*** Code AMANDA will always save you $$$ at checkout ***


Thanks so much for visiting today! 

Be sure to play along with all our super fun challenges in the 

Hope I've inspired you to get creative today!
til next time, 


Cocoa Vanilla Studio: Cherished Moments


Hi Everyone! 

Today I am finally sharing my layout for the Cocoa Vanilla Studio team up with CSI  - Color.Stories.Inspiration challenge blog!
If you haven't already read, Cocoa Vanilla Studio is sponsoring CSI for the month of June!
 Yay!
 So be sure to play along with the challenge to go in the draw to win an awesome Cocoa Vanilla Studio prize!
Here's what the challenge looks like....

Isn't this sweet?!
 As soon as I saw that image, I immediately thought of our gorgeous Bohemian Dream collection! I was also inspired by the ballerina, white background and those sparkles too!
Let's see how I solved the case! 
Here's what I created...
"You Are Amazing"


Beautiful, cherished moments indeed! Oh so pretty!
One of her first ever ballet performances; she was so magical!
I have used a Paige Evans cut file from the Silhouette Store, and backed it with some of my all time favourite Cocoa Vanilla Studio papers. I've positioned my photo and supporting layers in the center, keeping it as the focal point of my design. 
I tend to do this a lot. I believe that my layouts should always enhance my memories & photograph/s, not steal away from them.
 Let's take a closer look at it all....


How precious!
You'll spy that I have l created lots of pretty layers beneath my darling photograph, using up scraps from the 6 x 6 PAPER PAD, and even a left over 3 x 4" card from pattern paper CV-BD004 BEAUTIFUL MESS. I've also tucked in an ACCESSORY STICKER or three, and embellished my photo with DIE CUT EPHEMERA.  So pretty! Sparkle & Shine! 
If you look closely, you'll also spy those tiny star sparkles - they're actually left over sequins from her gorgeous tutu! Adding even the tiniest memorabilia element to a layout makes it super special for the recipient. I know my daughter will love this small but meaningful detail!
Here's a closer look at the top of that photo cluster, and those pretty pattern papers.....


Gorgeousness! 
I love the mix of patterns and the varying tones of blues and purples that I've used to back the cut file with. That divine polka dot outer layer is the reverse side of pattern paper CV-B001 ABUNDANT, and it's safe to say that it is an absolute favourite of mine!


Travelling towards the center, the next layer or ring of pattern papers is CV-BD002 GYPSY HEART. This paler blue softens the overall base appearance and adds a gentle touch. You'll also spy a little journaling in the top left hand corner, using a cut out word from pattern paper CV-BD006 BOHO BITS, CHIPBOARD ACCENT STICKER, & even some of those sweet typewriter font ACCESSORY STICKERS. A few carefully chosen words that best describe this cherished moment! Love it!


The pattern paper in the center of the cut file is the B side of CV-BD005 DREAMER, & is all kinds of purple prettiness!
Below my photograph I include a sweet sentiment, Live A Colourful Life, from the ACCESSORY STICKERS. I also use ACCESSORY STICKERS, CHIPBOARD ACCENT STICKERS  and even a fussy cut word from pattern paper, CV-BD006 BOHO BITS to continue journaling this special moment. To keep my design balanced, I apply these items to the bottom right hand side of my layout. Here's a last look for you.......


Oh so stunning!
I hope the 'clean' look not only compliments the challenge image, but enhances her youth and innocence too! Such a beautiful memory of my sweet girl!
And there you have it! 
That's how I solved the case (with a big help from the gorgeous Bohemian Dream) this month at Color.Stories.Inspiration! Be sure to play along and share your beautiful projects! You could just win an amazing prize ;) 

Thanks so much for visiting today,
til next time,

Happy Arty Days, 
Amanda xo