Citrus Twist Kits: Sunday Sketch!


Hi Creative Friends!


Welcome back to the Happy Arty Days blog!
Today I'm presenting this week's installment of the
Citrus Twist Kits Sunday Sketch feature!
This sketch is tons of fun, and I hope I can inspire you to play along!

So, without further ado, here's what this week's Sunday Sketch looks like...


Told you it was a fun one! Such a cool design, and really easy to take inspiration from!
Here's my twist on it...
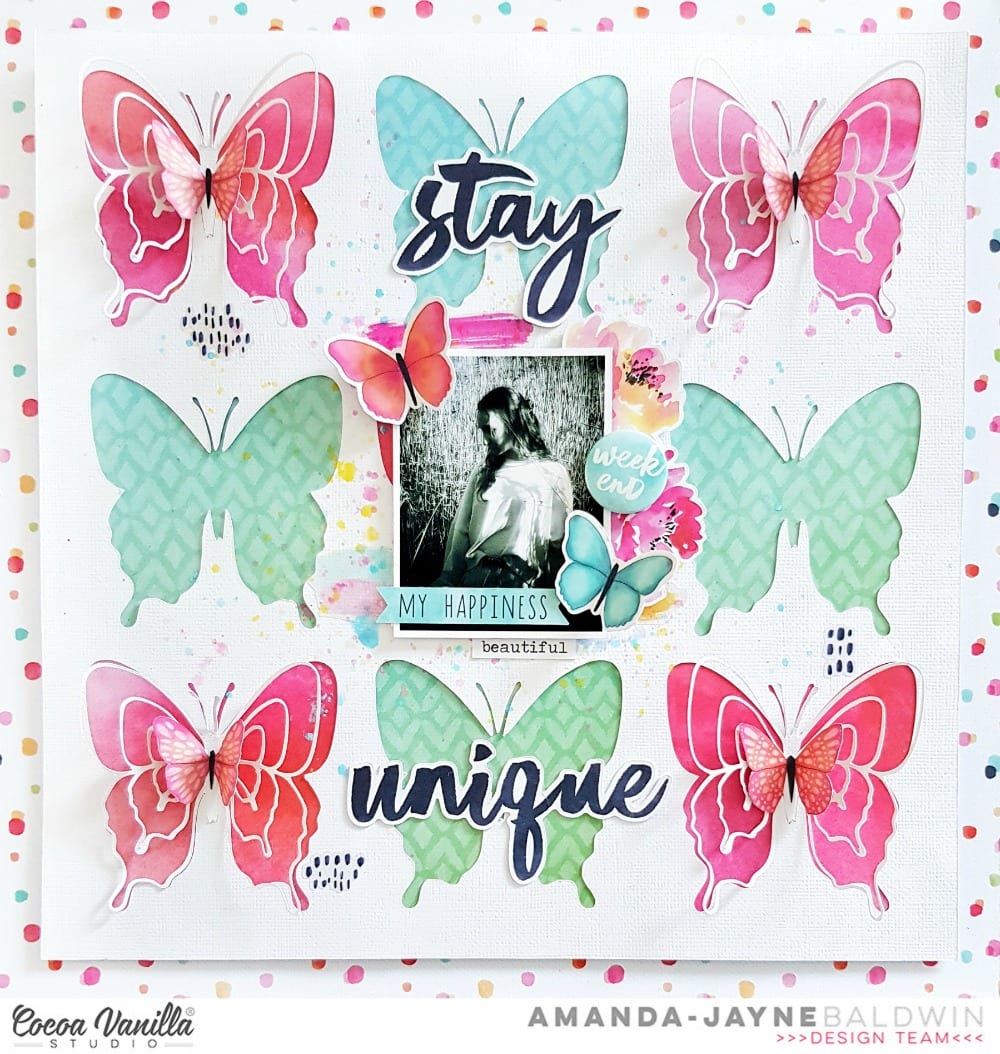
"Weekend Happiness"


Isn't this pretty?!! 
As you can see, I have altered the sketch (Or kinda trimmed the right hand side off) to create an 8" x 11" layout page. That's the wonderful thing about sketches, you can edit them to suit your creative style! 
Plus, after creating quite a few projects this month I really didn't have any 3"x 4" cards left over to 'perfectly' follow the sketch. Realistically, I could have cut my own 3" x 4" card from one of the Best Of This Life Pattern Papers, or used one of the July 2019 digital printable 3 x 4 Journaling Cards but I still needed to fit the sketch into a smaller page size. So, I decided to use the 2nd photo as the card, and replaced the paper clip with an embellishment or 4! 

Here's a better look at my page...


Happiness, indeed! Ain't nobody loves the weekend like my sweet girl! In her own words, "Mondays be like, Meh! & when FriYAY calls I'm like, so there!" Ummm... yeah, teen lingo and whatever that means, lololol! 
Seriously though, such a super fun and playful page! 

I've used the Best Of This Life July Life Crafted Kit, the Life Crafted July 2019 Digital Cut Aparts & the Joyful Day Phrase Stickers (Pinkfresh Studio) from the July 2019 Scrapbooking Add On Kit. 
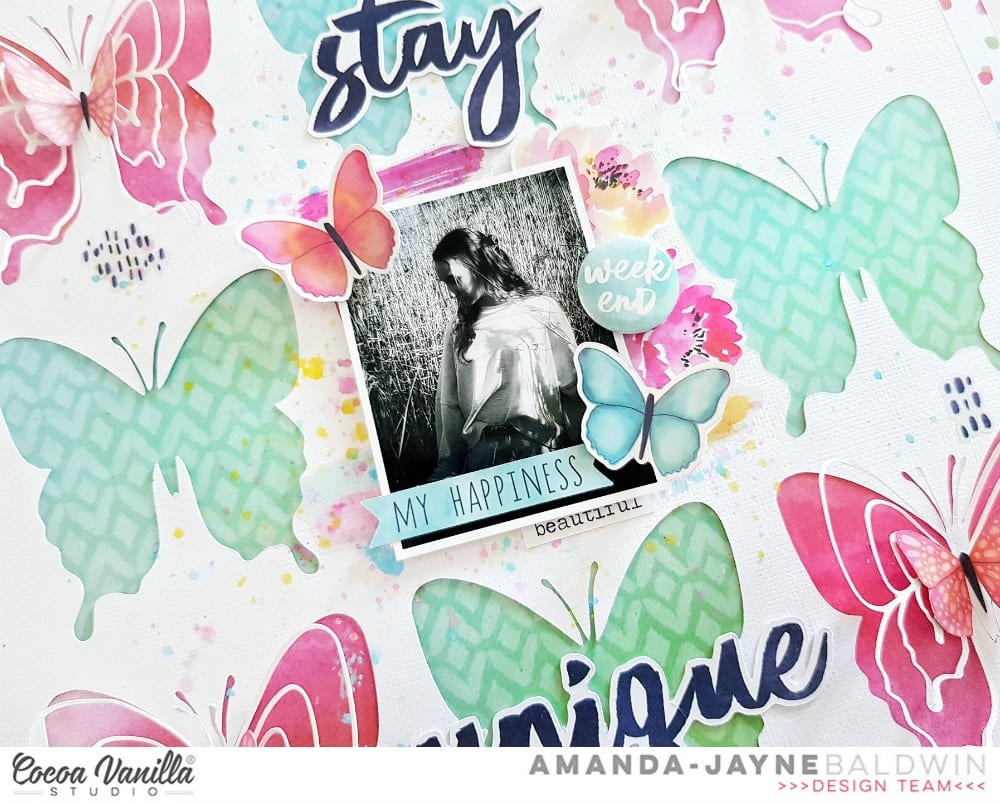
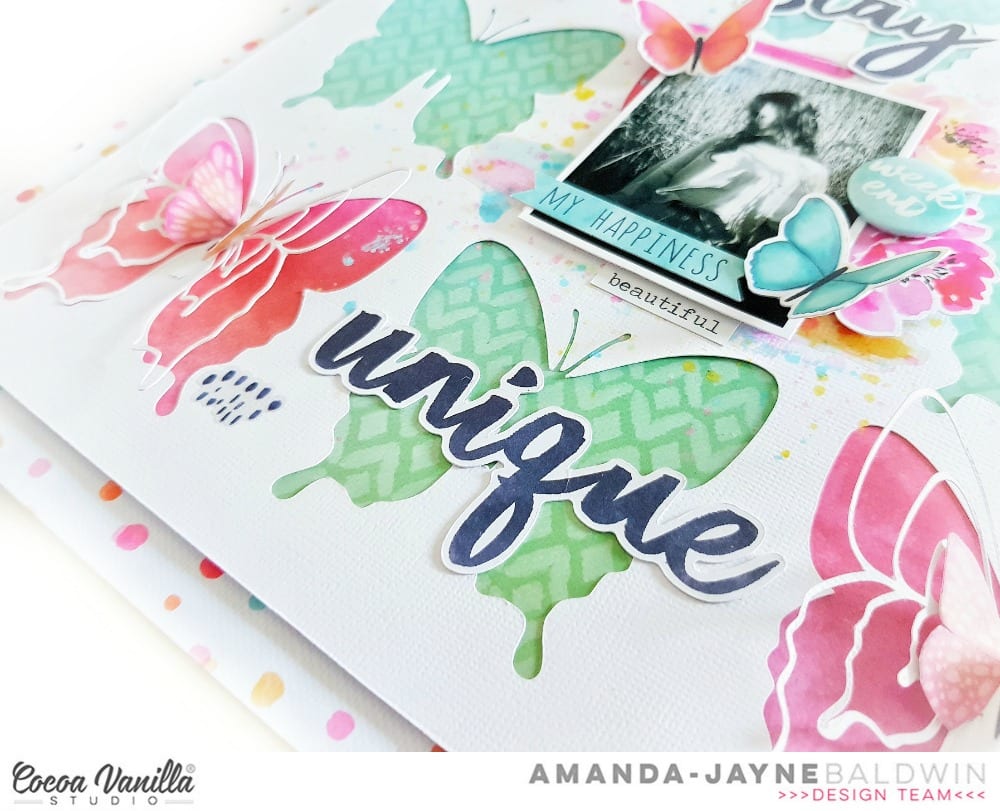
I have foam mounted the photo cluster to add a little more interest and some dimension to the design.

Speaking of clusters, how fantastic are all those embellishments in the top right of my photo?!


The puffy stickers in this month's kit are so fab! I'm loving the bright Summer colors and the sentiments are totally on point!
And let's not forget to mention my mixed title....


I have combined the bright colored WEEKEND ephemera with the Pinkfresh Studio Joyful Day phrase sticker, happiness to create my title. I love how effective this looks! 
You'll spy that I foam mounted the ephemera for added 'pop' against the phrase sticker. 
And there you have it!
Simple. Pretty. Lazy Sunday creating!

I wonder how you'll interpret this sketch?
Please be sure to add your projects to the Citrus Twist Kits Fan Page HERE so we can be inspired by your awesomeness too! 
We LOVE seeing what everyone creates with their Citrus Twist Kits! 

Thanks so much for stopping by today, 
til next time, 

Cocoa Vanilla Studio: Stay Unique!


Hi Crafty Friends!

Welcome back for more Cocoa Vanilla Studio inspiration!
Today I am sharing another butterfly theme layout with the gorgeous HAPPINESS collection. 
This time I've taken some inspiration from fellow teamie,
  Anna Komenda ('cos she's one awe-inspiring creative!) 
& I just love how it turned out - hope you like it too!

"Stay Unique"


Wow! Isn't this super pretty?!!
I love a good grid design, & when I saw Anna using butterflies for the 'boxes' I knew I'd have to lift her design! It's seriously SO cool! I've mixed mine up a bit though, & created a fun new look with our beautiful HAPPINESS pattern papers, LOVE!!!
I started with the fabulous polka dot pattern paper, CV-HA002 SPRINKLES as the 12inch base. I used my silhouette software to arrange the butterfly cut file ( Butterfly Wings courtesy of The Cut Shoppe) into a grid design. I cut out all 9 butterflies and saved the 'off-cut' negative to create my background with. I trimmed the white cardstock 'off-cut' to 11" x 11" and then proceeded to back all the butterflies. I selected pattern papers, CV-HA009 MEADOW & CV-HA004 FRAME OF MIND and alternated them throughout the white cardstock background. I love how pretty the pink and blue/green silhouettes look! Simply stunning!


Next, I used a sheet of 'fun foam' to back the entire 11" base, before gluing it onto the SPRINKLES base. This gave my layout a little lift and added some subtle dimension too! With the base of the layout completed, the rest of the layout was all about my sweet photo and embellishments!


On the pink butterflies, I layered one of the cut file butterflies, followed by a fussy cut pink butterfly from pattern paper, CV-HA008 BRIGHT & BEAUTIFUL.  
Here's a closer look for you....


Simple and yet, oh so effective! Beautiful!


I chose to leave the FRAME OF MIND butterflies free from embellishments, as the detailed design on the pattern is just too pretty to cover, don't you think? That said, I did end up covering two of them with my CARDSTOCK TITLES, Stay Unique, but I tried to keep that lovely pattern visible. 
Next, I applied a few painty splatters of color in the center of the page, spreading out towards the butterflies. This subtle hint of colour breaks up all the white and adds that extra point of interest. Once dried, I built my photo cluster over the center butterfly....


You'll spy that I used the brush stroke CLEAR STICKERS (complimenting the previously applied paint splatters) beneath the cluster, & then added in some DIE CUT EPHEMERA blooms. I foam mounted my sweet girl's photo, and then embellished it with a DIE CUT EPHEMERA sentiment label & 2 pretty butterflies. I tucked in the beautiful sentiment from the ACCESSORY STICKERS, and finished off with that awesome FLAIR BUTTON.  For final touches, I added a few more CLEAR STICKERS around the page.


And there you have it!
Super beautiful creating with the HAPPINESS collection!
I hope you have enjoyed seeing my project today, & feel inspired to get creating today!
Thanks so much for your kind comments & support!
til next time,

Shimmerz July Color Kitz & Process Video!


Hi Friends!

Welcome back for more Shimmerz Paints inspiration!
Today I am sharing a new process video with the fabulous  July Color Kitz!
SO.much.awesomeness!!!
I just couldn't wait to get creating with this amazing kit! 
But enough chatter, let's get straight into the good stuff!
Here's what I created with the July Color Kitz....

"Shine Bright"


Whoa! Talk about wow factor! 
This month's kit is simply spectacular! La la LOVE!!!

If you missed kit release day, you can check out The July Edition below....


Kit Contents:

Vibez Seas The Day - Exclusive New Color only available in this kit!
Shimmerz Royal Red
Blingz Pixie Dust
Inklingz Blue My Mind 
Spiegelmom Scraps Gold Stardust Sequins

Yay!!!

Told you it was awesome!
If you're super quick, there might just be one or two of these lovelies still left in the store!

Let's take a closer look at my layout....


Seriously so cool!
I've combined the July Color Kitz with the Elle's Studio July Kits & stamps as they're truly a match made in heaven! All the July 4th colors, and so many creative possibilities!
I opted for a messy mixed background & lots of luscious layers!

I started my layout by creating that divine blue base using both the Seas The Day and Blue My Mind paints. The golden shimmer in the Inklingz Blue My Mind took me by surpsise - it's completely phenomenal! Blew my mind is an understatement! 


I applied a few paint layers of these two colors, & then added in some Blingz Pixie Dust too! 
Gor-jus! 
I splattered all these colors throughout the layout for added interest.


Next came lots of paper lovelies and scrapbook supplies from the July Elle's Studio Kit & New Releases. I just love a good layered photo cluster - don't you?


I scattered lots of the Gold Stardust sequins throughout the page - they're so super tiny and the perfect amount of sparkle for my masculine design. Also, they're stars & stars are errrything! 
They're kind of my go to embellishment for boy layouts, & also perfect for documenting all your July celebrations. Stars for the win!   


For finishing touches, I added droplets of Shimmerz Royal Red, and lots of repeat stamping with the Elle's Studio: You Are My Sunshine Stamp. 
Both my title, Shine Bright, & subtitle, Fun Is Here, have been created with the Title Builder Vol.3 Stamp Bundle Set. Fabulous! 

Wanna see all the details? 
Please watch my process video of how it all came together here..... 


Thanks so much for watching!
I hope I have inspired you to get painting with the July Edition Kitz today! 


Thanks so much for visiting, 
til next time, 


Citrus Twist Kits: Best Of This Life Kit Inspiration!


Hi Creative Friends! 

Welcome back for some  Citrus Twist Kits Life Crafted Kit inspiration!
This month's kit is so gorgeous that I swooned when I opened my Best Of This Life Kit box! So.much.gorgeousness!!!
 But rather than rave about how amazing the Life Crafted Kits are, let's allow my projects to do all the talkin'....

First up is this fresh & fun Summer layout, "Summer Days"


So cool & refreshing! 
Summer Days documented to perfection with the Best Of This Life Kit!
Let's take a closer look....


The colors in the pattern papers, combined with those fabulous woodgrain alphas are simply the BEST for scrapbooking our fave Summer moments! From the mid blues to the aqua marines, this page takes me to the beach! 
And just look at all those amazing embellishments! The Life Crafted stamp, and the chipboard & puffy stickers are definitely my faves!!!


Speaking of chipboard stickers, here's a better look at them!  Best ever, for sure!
As usual the clear stamp sentiments are really crisp and add the right amount of journaling to your pages! With so many beautiful products in the kit, I just couldn't resist creating lots of luscious layers with both the papers, journal cards and labels. 
And for added interest, I fussy cut around the florals on one of the journal cards - see below....


Simple, subtle but so effective!


The shell die cut ephemera pieces are a cute adornment for my beachy page. Sometimes it's the smallest details that really add that finishing touch! Gorgeous!

For my second project, I am sharing this pretty layout, "LOVE"...


Sigh! Talk about ALL the pretty things!!! This is so super sweet! 
This time I am combining the Best Of This Life Kit with the July Traveler's Notebook Stamp and the Best Of This Life Cut Aparts. Love it!


Like my previous layout, I have created more luscious layers so that I could tuck in lots of ephemera and showcase those pretty papers, cut aparts & journal cards. Infact, it was the folk art style 6" x 4" journal card that inspired the color scheme for my page. You'll spy that I snipped the card in half, and butted it together to create the appearance of a 12" x 2" strip of paper. You'll spot two more cards in my photo stack too....


Swoon! Those layers are really somethin'! Florals always have my heart! And those Cut Apart labels (lovely & happy) are a sweet addition to the layered goodness!
Let's not forget the journal card that I snipped into three to create the fun 'love' tabs on my pattern paper strips - such a fun way to use this card if pocket pages aren't your thing!


With such a delightful color palette, I opted to repeat stamp my sentiments in similar color inks instead of the usual black. I love how soft & pretty this looks! The CTK stamps are always the best!

Did you see how I've incorporated the tiny kit name label card? I loved the sentiment on the kit name card and had to tuck it into my photograph layers. I snipped it into half so I could also include it in my paper strip feature. Perfect!

*Note: the sequins featured on my layout are from my personal stash*


Beautiful! Such a pretty page for my darling daughter! 

Next up is some Life Crafted Album love! 
Here's a super cute back to school page from my album with this month's kit....


How cute & fun is this?!
I just adore those woodgrain alphas - perfect for adding some warmth to my cool color scheme!
I also love the use of labels in this design too! 
Here's a better look at my page...


Super cool! The puffy stickers and enamel dots really add that extra something, don't they?


The mix of colors and patterns in the Best Of This Life exclusive papers is nothing short of awesome! I love the variety of designs, making the kit super versatile! 


And there you have it! 
My first few projects with the gorgeous July Life Crafted - Best Of This Life Kit! 
I hope I have inspired you to get creating with these stunning products!
Shop the latest Citrus Twist Kits HERE. 

Thanks so much for stopping by today!
til next time, 


Cocoa Vanilla Studio: Sweet Happiness Layout & Process Video!


Hi Creative Friends!

Welcome back for more paper crafting inspiration!
This week the Cocoa Vanilla Studio Design Team are being asked to Turn Old Into New again, and scraplift one of our very own older pages! 
Such a fun challenge to scraplift youself - but which layout to pick?! 
In the end I chose this pretty page from March of last year....

"Precious Moment"


Precious, indeed! 
Such a beautiful layout created with the divine MORE THAN WORDS collection. I just adore this page, and am especially taken in by the delicacy & softeness, the butterflies and all those pretty pattern papers! I simply couldn't resist recreating this layout with the HAPPINESS collection and twisting it to create a brighter and bolder edition!

Here's what I came up with....

"Sweet"


Whoa!!! How gorgeous is this?! 
Definitely bolder & brighter, but also super beautiful too!
I have tried to maintain the integrity of the original design, whilst giving the layout a completely refreshing and fun new look! 
Like the original page, I have kept with the pattern paper border, and large cut file butterfly with a layered focal photograph as the key design elements. 
You'll also spy a few additional butterflies scattered around the photo too....


My layout begins with that fabulous blue paper, CV-HA003 GOOD VIBES - such a stunning pattern paper! Next I trim the gorgeous wreath paper, CV-HA005 SO FRESH to 11" x 11" and layer over the pretty blue base. I use the 6 x 8 HAPPINESS PAPER PAD and CV-HA007 EXPRESSIVE pattern paper to back the butterfly cut file (cut file is called Butterfly Wings & is courtesy of The Cut Shoppe) & then layer this large butterfly through the center of the page. 
So lovely!


Similar to the original layout is my use of a single, black and white square photo. I foam mount this photograph, and position it through the center of the butterflies wings. I also fussy cut a few smaller butterflies from pattern paper CV-HA008 BRIGHT & BEAUTIFUL, and scatter them around my sweet photo.


Speaking of sweet, I use the sweet CARDSTOCK DIE CUT TITLE to both embellish my photo, & as my layout title.


For finishing touches, I add a couple more butterflies - this time from the ACCESSORY STICKERS sheet, and a sprinkling of sequins (Happy Vibes sequin mix from Spiegelmom Scraps). Gorgeous!


A really simple & sweet scrap lift of my Precious Moments layout!
You can see how it all came together in my process video HERE.


Thanks so much for watching!
I hope I have inspired you to get creating today!
til next time,