Altenew February 2020 Stencils/Decals/Stand-alone Dies Release Blog Hop + Giveaway


Hi Friends! 
Welcome to the Happy Arty Days blog! 
I am so super-dee-duper excited to be participating in the 

Altenew February 2020 Stencils/Decals/Stand-alone Dies Release Blog Hop + Giveaway

Yay! Such a fun and creative hop to be part of! 
If you've just arrived from the amazing Norine Borys blog, then you're in the right place! 
If not, or you feeling a lil confused, here's the full blog hop line up for you.....

Start here------>  Altenew Card Blog

Wow, what a line up! 
So many gorgeous projects for you to check out and be inspired by!
Plus there's some awesome prizes up for grabs too - 

To celebrate this release, Altenew is giving away a $30 gift certificate to 6 lucky winners! Please leave a comment on the Altenew Card Blog and/or Altenew Scrapbook Blog by 3/3/2020 for a chance to win.

Altenew will also draw a winner to receive a $15 gift certificate from the comments left on each designer’s blog from the blog hop list.
All winners will be announced on the Altenew blogs on 3/6/2020. 
Good luck!!! 

With the formalities taken care of, it's now time to share what I've created for this incredible hop! I have a lot of projects, so I'll try to keep my write up short.

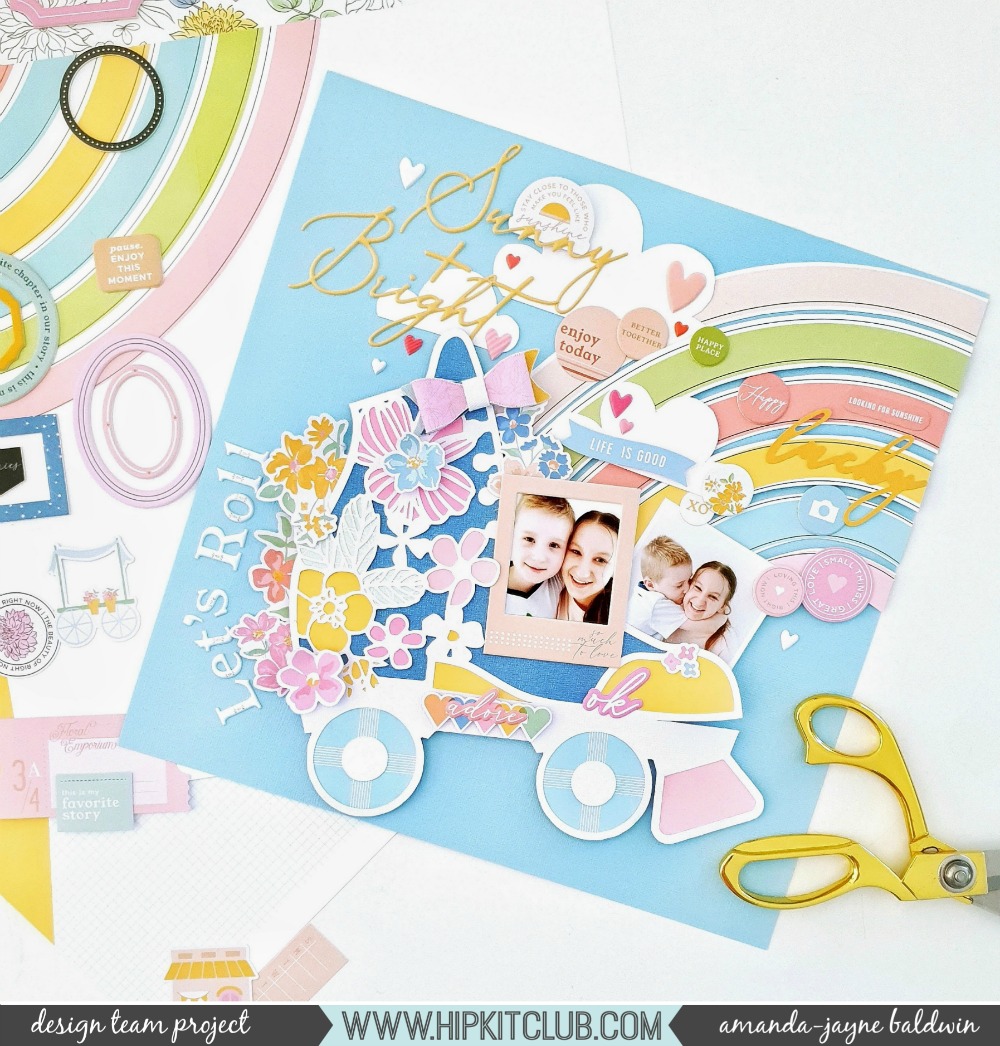
First up is this super pretty scrapbook page, 
"Totally Awesome"


Oh my heart! Isn't this the prettiest?!!


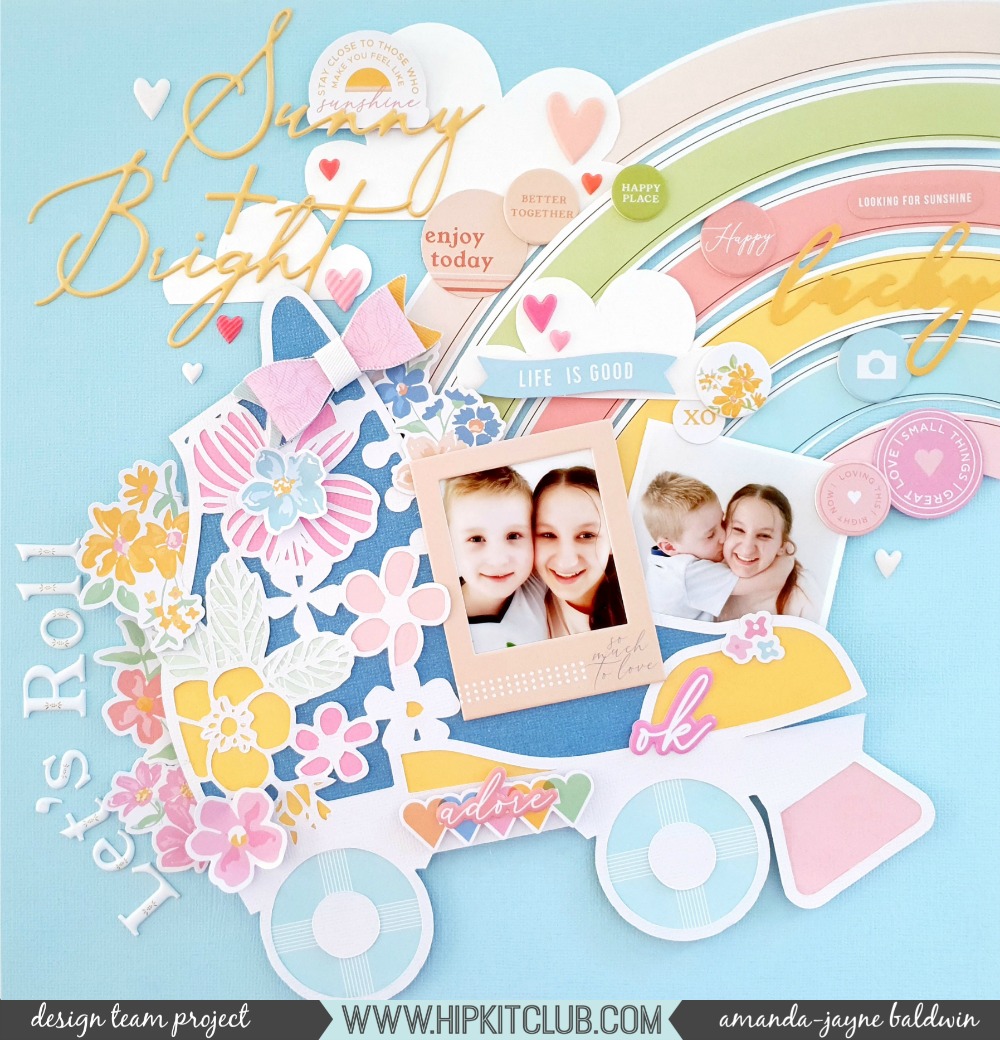
Let's take a closer look.....


*Sigh!* So divine!
I don't even know where to begin-,
there are just SO many beautiful new products & they all coordinate perfectly together! 
I instantly fell in love with the Open Blooms 3D Die Set, and couldn't help but feature a few of those blooms on my layout! 
But, rather than rave, please watch my process video below:


Or, watch it in full HD on my channel HERE. 
Thanks so much for watching! 
I hope you feel inspired by my layout! 

My second project is another scrapbook page and process video, 
"Hello You" 


Hello, indeed! 
What a striking page! 


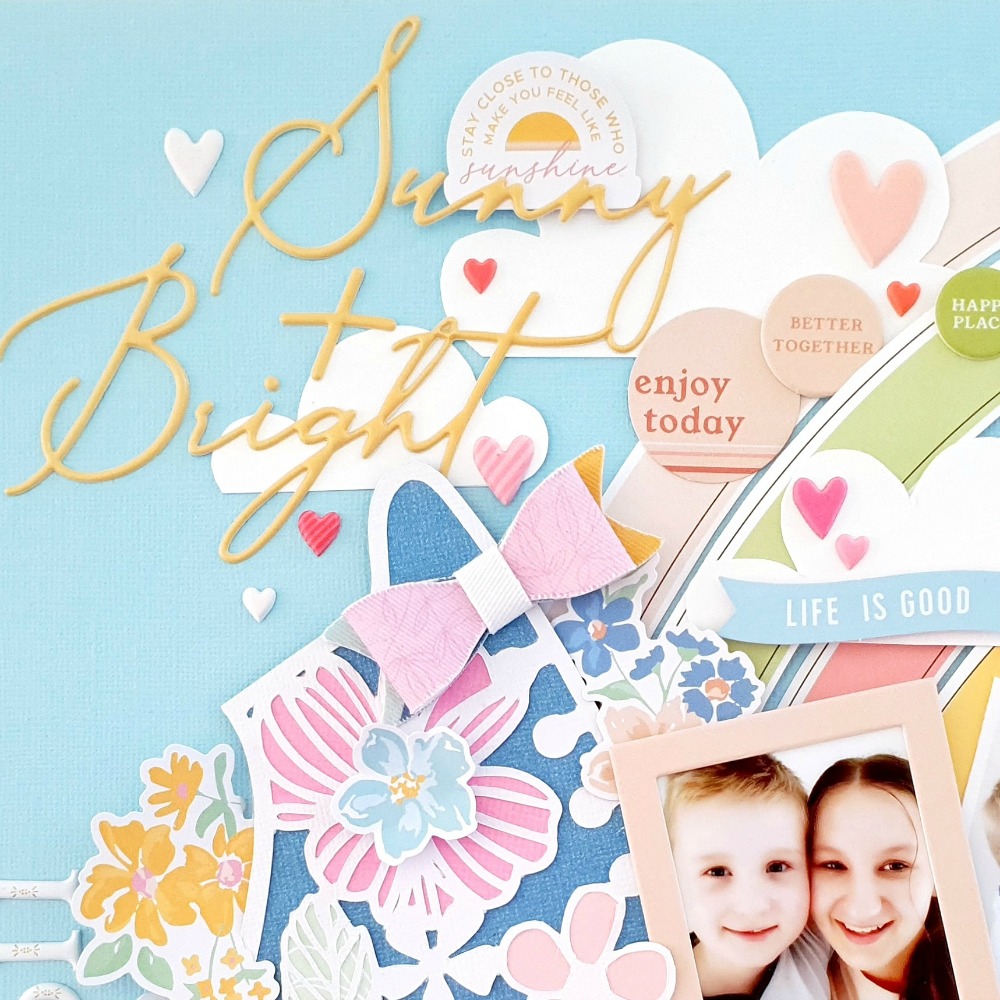
Here's a closer view....


All.the.pretty.details!!! 
I'm always my happiest when I'm creating with indigos and blue - and I think it may just show! 
Let's look at a few close ups of these amazing new release items! 


Absolutely breathtaking! 
Watch this scrapbook page being created in my short 5 minute process video below:


Or watch in Full HD on my channel HERE

Now for something a lil different, check out the fabulous Framed Foliage Decal Set - Medium. I just love how it has lifted this lil study nook of my guest room....


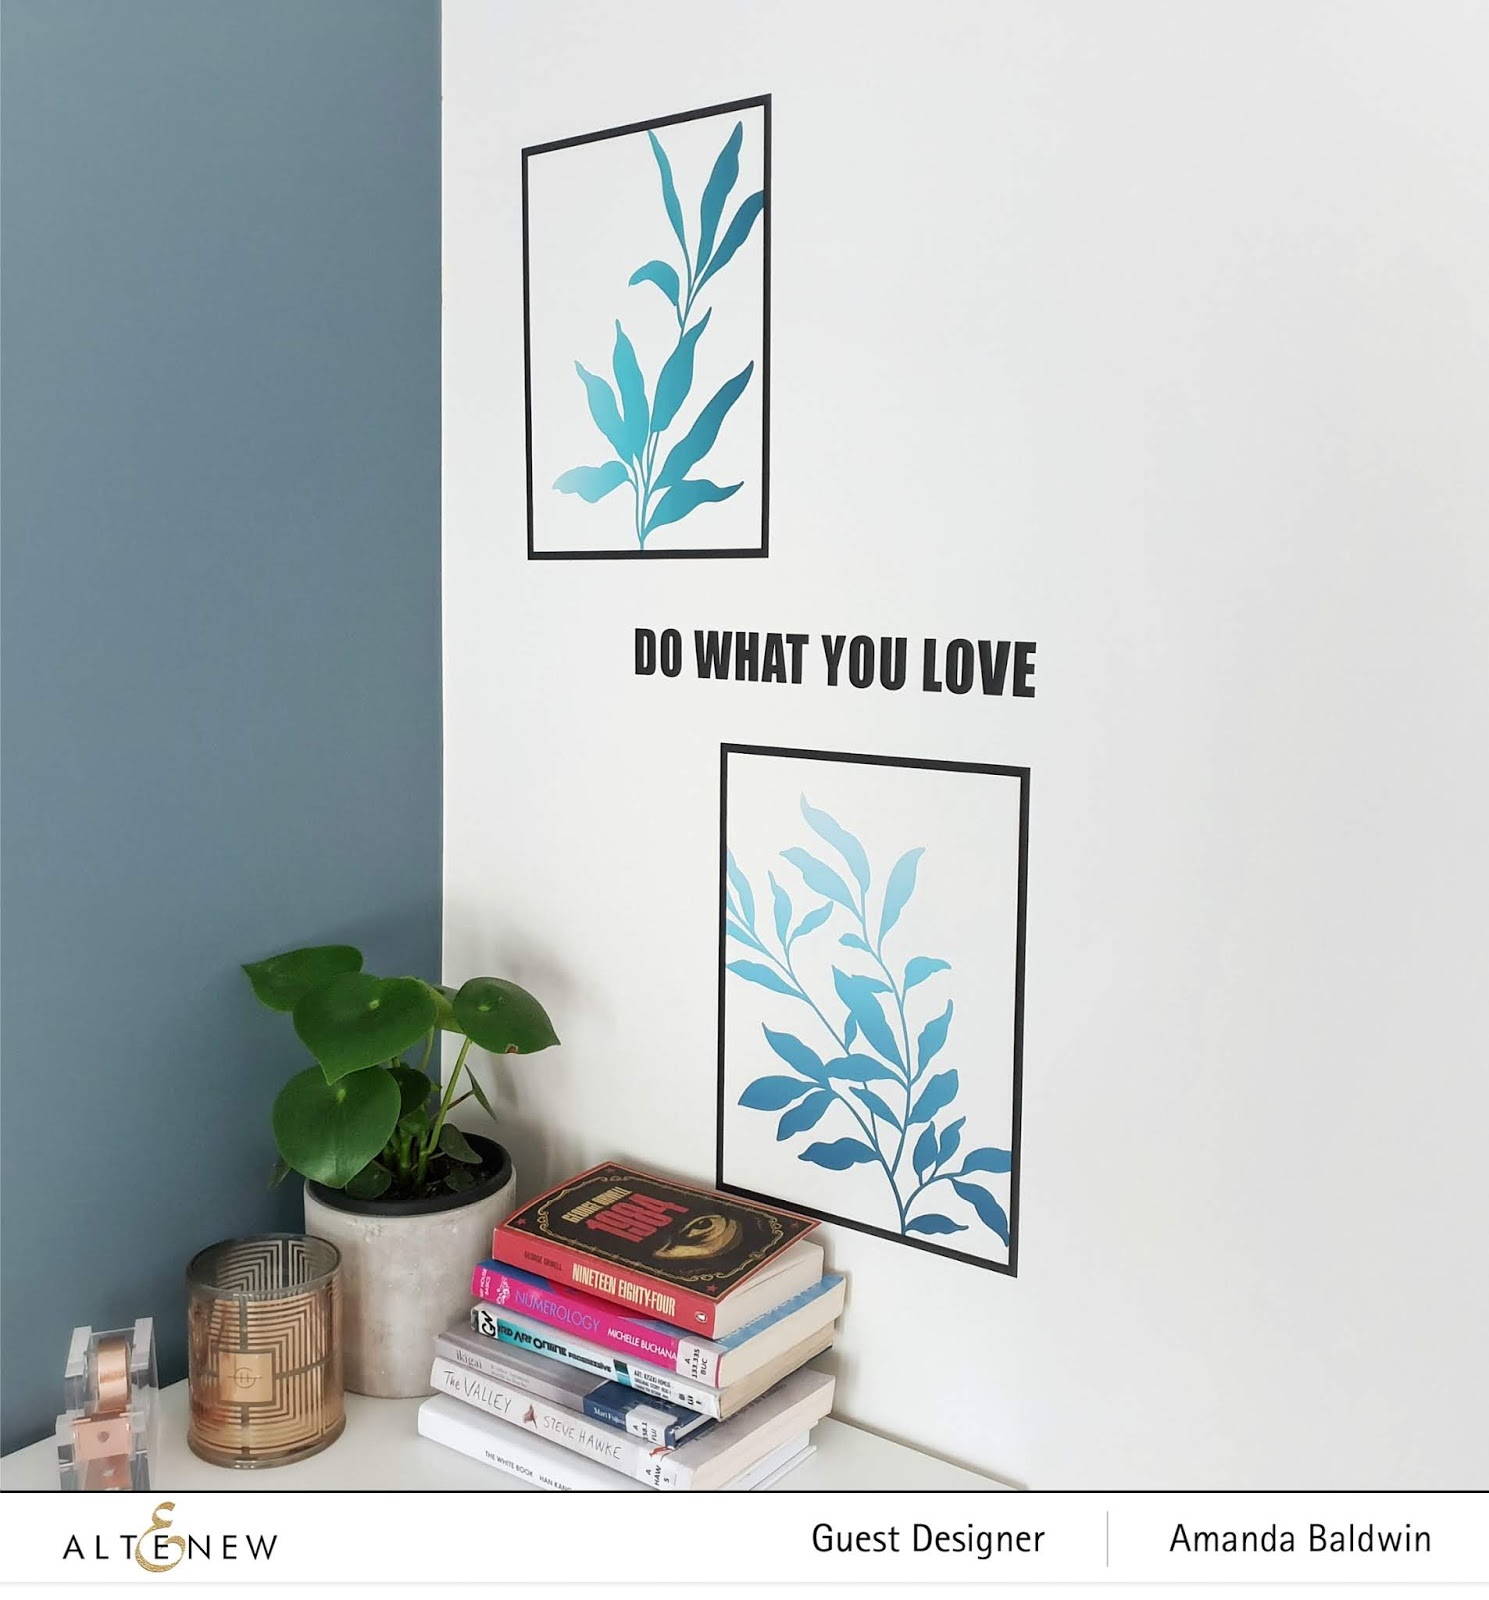
So pretty!!! The blue foliage is simply stunning!
Here's another view...


So beautiful!
& even better, the decals were really easy to apply too! Love it!
Shop these gorgeous Decals HERE

Now time for a few cards.....


Ooh La La!!! 
What a gor-jus card to give thanks with! 
I just love the ombre background created with the Altenew Candy Coated Mini Ink Cube Bundle! I used the hot embossing technique (in opaque white  powder) to apply the Hand Drawn Tile Stencil, before layering those pretty dies over the top. Simple, and yet so effective!


My second card has a more elegant and feminine feel to it....


Oh, that floral bloom is errrrrything!!!
Just divine!


My final card for today has a more contemporary vibe....

Oh how fun!!!
That Wild Leopard Stencil is purrr-fection! (sorry, I couldn't help myself!) 
Gor-jus!


And there you have it! My first creative play with these amazing new products!
I can't wait to create more - so much gorgeousness in this release!
I hope my projects have inspired you today!
Please remember to leave a comment on this post to go in the prize draw ;)
Time to send you hopping on over to the Altenew Scrapbook Blog now - there's some stunning projects waiting for you!

Thanks so much for visiting, and for all your encouraging comments!
Good Luck!!!

Til next time,
Happy Arty Days, 
Amanda xo 


Hip Kit Club: Rainbows, Rollerskates & a Process Video!


Hi Friends!

Welcome back for more Hip Kit Club inspiration! 
 I am SO super excited to be sharing my latest scrapbook layout (& process video) with the gorgeous 
Today I am being inspired by the February Mood Board, and in particular, the rainbows, florals, hearts & those rollerskates! You'll also spy the fabulous February HKC Subscriber Exclusive rollerskate cut file - but rather than rave, here's a quick look at my happy-go-lucky vibes page!

"Let's Roll"

HKC-AmandaBaldwin-Feb21st-Blog-02

Oh how fun, and whimsical! Such a bright and playful page for my two darlings! I just couldn't resist fussy cutting that rainbow paper from Pinkfresh Studio: My Favorite Story collection (courtesy of the HKC January 2020 Main Kit) and combining it with our amazing rollerskate HKC Exclusive Subscriber Cut File! I mean, rainbows and rollerskates go hand in hand, right?!
If you missed seeing the February mood board, it looks like this....

83086838_3691446797532946_74651127219486720_o

Wow! All kinds of pretty, huh?! You can interpret this board so many ways, and best part, it coordinates with both our January and February Hip Kits - Yay!!! I hope you'll see something that sparks some creativity and inspires you! But back to today's project, here's a better look at my layout.....

HKC-AmandaBaldwin-Feb21st-Blog-01

Sunny + Bright, indeed! So.much.fun!!!
I started my scrapbook page with the beautiful  Bazzill Starmist Cardstockfrom the January Cardstock Kit - such a pretty color for my background and base. Next I backed the fabulous rollerskate HKC Subscriber Cut File with two of the Pinkfresh Studio: My Favorite Story papers from the January 2020 Main Kit, as well as that stunning, sparkly Bazzill Prince Charming Bling Cardstockfor added wow factor! I can't even begin to tell you how ahh-MAY-zing that cardstock is!!!
I fussy cut that divine rainbow, Joyful Heart paper, also from theMain Kit, and layered it onto that fabulous Starmist base. For added interest, I foam mounted every second stripe in the rainbow and then adorned every stripe with tone on tone embellishments from both the January Main & Embellishment Kits. Such a pretty effect!


I framed my main photograph with one of the Pinkfresh Studio Chipboard Frames from the Embellishment Kit, and then positioned it onto that cute skate! To complete the rollerskate, I added lots of the Floral Die Cuts and a Fabric Bow (also from our Embellishment Kit) as well as a couple of the Puffy Phrase Stickers. I layered it all onto the end of the fussy cut rainbow and tucked in my second photo into this cluster. Love it!


I used the White Puffy Alphas (with gold accents, no less!) from the Embellishment Kit to form my title, and then added a subtitle - Sunny + Bright - with thePuffy Phrase Stickers courtesy of the Main Kit. I cut out and adhered a few fluffy white clouds from the Bazzill White Cardstock, and then finished off with a good sprinkling of the Pink Paislee Lucky Us Puffy Shape Stickers. 


Such a magical design! 
Please watch my process video for a much more detailed look at how my page came together:


Alternatively, you can watch it in Full HD on my channel by clicking the link HERE. 
Thanks so much for watching! 

I hope I have inspired you to get creating with the beautiful January & February 2020 Hip Kits- they really are divine!!!

til next time,


Technique Tuesday: Memory Keepers & Fresh Cut Studio: January - Sweet As Candy!


Hi Friends! 

Welcome back for more Technique Tuesday inspiration! 
Today I am sharing a scrapbook layout created with the fabulous January edition of the 
This month's release is Sweet As Candy & looks like this....
Oh how super sweet, indeed! 
Such a super cute stamp & coordinating die set!
Get this amazing bundle in the Technique Tuesday shop HERE
OR
Find out about becoming a Technique Tuesday Member HERE and save even more!

Here's what Technique Tuesday has to say about these delicious new products, 

"If you're like a kid in a candy store and want it all, this Sweet as Candy stamp set with matching craft dies is a dream come true! These coordinating stamps and dies with a candy jar can be filled with your favorite pile of sweet treat stamps. Children will love getting a Valentine you made featuring their favorite jar of sweets. Or make a colorful tag to go on a box of candies you're giving a friend. Use the small individual candy clear stamps and dies to scatter treats on cards or party decor, or create a whimsical candy border. These matching stamps and dies with a jar and candy will tempt every sweet tooth!"


Here's my super sweet 8.5" x 11' scrapbook layout created with these products....

"Love You"


Sigh! Could it get any sweeter?!

Other Supplies: Crate Paper Main Squeeze & La La Love You scrapbook collections, American Crafts - White & Gold Glitter Cardstocks, SpiegelMom Scraps Malibu Sunset sequins, Scrapbook.com ink pads.

Here's a closer look at my layout.....


February really does make everything sweeter!
How divine are those teeny stamped sweets?!! 
I just adore them! & the best part?
 Technique Tuesday clear stamps are always super crisp and a pure delight to work with! Love! 

Here's a closer look at those stamped wrapped sweets....

SO cuuuuute!
You'll also spy that I stamped one of the Sweet As Candy sentiments (You make everything sweeter) onto some white cardstock, and then used the Technique Tuesday Oval & Rectangle Stitched Labels Crafting Dies to cut it out and look all fancy! Such a fabulous lil label! 

But it's the sequin shaker, sweets jar that I am especially smitten with....

Oh how good is this?!! 
I can't get enough of that darling Candy Jar Crafting Die!!!
I cut mine out in golden glitter cardstock, (as well as the tiny hearts included in this set) and really made a feature of them! Gor-jus!

You'll see that I arranged the candy jar lid to be 'open' and have stamped an array of sweets sprinkling out of it.....

Gosh, it's just so darn cute!!! 
The perfect Memory Keepers & Fresh Cut Studio set for documenting my sweethearts!


Sweet As Candy Stamps & coordinating Crafting Dies are ideal for Valentine's gifts and cards!
But, I hope my project has inspired you to use this month's Memory Keepers & Fresh Cut Studio release for documenting your loved ones too! 


Thanks so much for stopping by today, 
til next time, 

Altenew Guest Designer: Fabulous Floral Frames Creativity & Process Videos!


Hi Friends! 

Boy oh boy, I am so super excited to announce that I am this month's 
Guest Designer for Altenew! Yayyyy!!!


What a dream come true! 
For my post today, I was very lucky to receive the 


 This kit contains the following items:


Floral Frame Stamp & Die Bundle
Watercolor 36 Pan Set
Permanent Black Crisp Dye Ink
Fenstone Decorative Element - Gold
Exclusive Fabulous Floral Frames Creativity Kit Inspiration Guide

I know, how amazing, right?! So much gorgeous product to create with! 
It's certainly a card maker's dream kit, but I wanted to showcase how perfect this kit is for scrapbook and memory keeping too! 
I have created 2 scrapbook layouts and process videos using the Fabulous Floral Frames Creativity Kit - I hope they'll inspire you! 

First is this super sweet page of my two darlings, aptly titled

"You Amaze Me"


Sigh! So beautiful! 
This kit is nothing short of magic!
Let's take a closer look at my layout.....


Talk about 'Fabulous Florals' - absolutely swoon worthy! 
What a wonderful stamp and die set for documenting your loved ones with! 
I just couldn't resist framing my treasured photograph with those fabulous florals, and I think it really created a beautiful focal point within my layout. 

I hand colored the florals and foliage with the totally amazing Watercolor 36 Pan Set, and was so impressed by the quality and pigment of these paints! I used a combination of Frayed Leaf and Forest Glades for the leaves, Purple Wine for the roses and buds, and the super pretty Sunkissed color for the orchids. Such a bright and beautiful result!
Here's a close up of these pretties framing my photograph....


Just divine! 
For maximum 'wow factor' and to further draw your attention into my photo, I foam mounted the framed photo in the center of my cardstock, and then embellished around it with more of the Floral Frame Stamp in the Permanent Black Crisp Dye Ink. 
*Please note: cardstock, cotton thread and clear gems were additional items from my stash* 

So effective!


You'll also notice that I used the gorgeous florals and foliage to trim the top of my scrapbook page. I foam mounted the florals for a lil extra somethin' and am so happy with how they enhanced the overall design. Really stunning details!

For the base of my layout I just couldn't go past that elegant gold Fenstone Decorative Element! It was the perfect adornment to complete the page with! 


I embellished beneath the Fenstone element with trimmed pieces of the Floral Frames leaves and some cotton thread from my stash. Over the top of the Fenstone, I added a fussy cut orchid and my stamped title. Simple, beautiful creating,  made easy with the Fabulous Floral Frames Creativity Kit! 
You can watch how easy it is to create this layout in my process video here:


My second guest designer project is a very pretty watercolor number called, 
"Beautiful You" 


Oh so pretty!!!
Such a different look to my previous scrapbook page, and yet oh so stunning!
Those Watercolors are really something!
Here's a better view for you....


Oh.my.heart!!!
Floral framed goodness at it's very best here! 

Like my previous layout, I stamped, hand colored and die cut the gorgeous floral and foliage pieces from the Fabulous Floral Stamps & Die Set. I used the same colors for the leaves, but this time I painted the rose & buds with the beautiful Grapevine color, and the orchids were painted with a combination of Caribbean Sky & Deep Iris. Stunning! 

On my white cardstock base, I painted that swirly circular design using the Ocean Waves & Lagoon colors, and added a few painty splatters too! 


This created the perfect base for my darling girl's photo, and gave me all the design guidance I needed to position my florals in the right spot!
I aligned my photo the left of the circle, simply because my daughter is looking across the page and then built the floral and leafy cluster in the 'C' design around her image. 


I used the lovely golden Fentstone decorative piece to enhance and support the photo, and essentially draw more attention to the image. I overlayed (and foam mounted) another of the stamped florals onto the Fenstone element for some added interest and then repeat stamped around the 'C' design. 

For finishing touches, I stamped two of the sentiments from the Floral Stamp Set on a separate piece of white paper, then fussy cut out the larger font words to create my title, 'Beautiful You'. 


A really clever and easy way to maximize your stamps and get them working for your designs! 
See more of how this pretty layout came together in my process video for you here:


Alternatively, you can view both videos in full HD on my YT channel HERE

Thanks so much for watching & to Altenew for having me as a Guest Designer this month!
I hope my projects have inspired you to get creating with this literally Fabulous kit! 


Til next time,