Showing posts with label May Kit. Show all posts

Elle's Studio: Product Focus: May Kit plus Knockout Words Die Set


Hi Creative Friends! 

Welcome back for more Elle's Studio awesomeness! 

Today I'm shining the product spotlight on one of my favorite, must-have items from the May release - the fabulous Knockout Words Metal Die Set! 

This metal die set is absolutely aaah-may-zing and perfect for all types crafty projects! 

The Knockout Words Metal Die is great for creating shaker pocket words & titles, card sentiments, making your own star and heart embellishments, and even decorating PL pocket pages with! But for today's post, I'm sharing how simple it is to incorporate this Metal Die Set into your everyday memory keeping pages! 

Here's what I've created with the Knockout Words Metal Die

"Favorite Moment" - 12x12inch scrapbook layout


Oh how sweet & fun! Favorite moment, indeed!

Other Supplies: White Bazzill Cardstock - Avalanche, & Sewing Machine Stitching.

Let's take a closer look at how I've used the Knockout Words Metal Die in three different ways on my layout...


1. Create a big title that packs some punch! 

I couldn't resist using the negative cuts from the Knockout Words Metal Dies to form my 'favorite moment' title with the Good Times Paper Stack. I used the deep blue pattern paper to make this punched out title look even more striking and effective! I could have also backed these die cut words with another pattern paper or even some clear acetate, but instead I opted to messily machine stitch through mine to compliment my overall page design. 


2. Create your own custom embellishments!

With such a loving theme to my page's story, it was an obvious decision to make my own heart die cuts from the heart shaped Knockout die. Again, I used a Good Times pattern paper with the die set, but cork, vellum and fabric would have been a terrific option for this too! The star die in the Knockout Words Metal Die set could also incorporated this way. 


In keeping with my distressed and messily machine stitched page, I also stitched my custom created hearts onto my layout. Repetition and continuity in design is everything to me! 


3. Use the Knockout Words alphas to create your own sentiments/journaling! 

Beneath my photo cluster is the machine stitched, & die cut sentiment 'love you more', which I created from combining the Love You, Favorite and Moment word dies. I rearranged the die cut alphas to make a phrase/sentiment that suited my story and needs - simple but such a great way to maximize this versatile metal die set! 


Simple, striking and really easy ideas to use the Knockout Words Metal Die set in your everyday scrapbook projects! 

I really hope my project has inspired you to get creating with this awesome die set today!

Thanks so much for stopping by today, 

til next time,

Happy Arty Days, 

Amanda xo 

Elle's Studio: May 2021 Kit Inspiration!


 Hey Friends! 

Welcome back for more Elle's Studio awesomeness! 

I can't believe it's time for our May 2021 Kit reveal already! Time really does fly! 

As always, the new releases and exclusive monthly kit are absolutely divine, so without further ado, here's what they look like...

Elle's Studio Exclusive May 2021 Kit


Told you it's divine! What a gorgeous array of bright and colorful patterns to get creative with! 

And the new releases are even more ahh-may-zing!!!


Oh.my.heart!!! So much gorgeousness - I.can't.even!!!

And let's not forget the wonderful digital products available this month...


Wow! 

Like always, this month's new kit and releases are stunning! 

Here's what I've created with them for today's post...

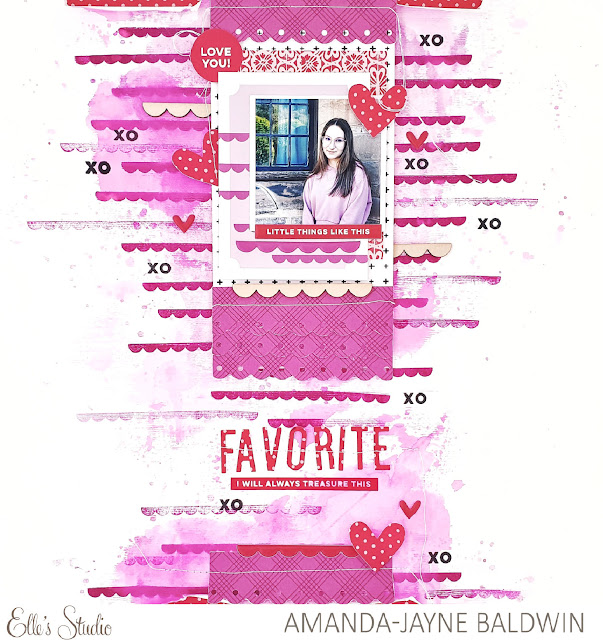
"Favorite" - 12 x 12inch scrapbook layout


Oh my heart!!! So many beautiful details here! From the inky mess, to the scalloped goodness and all the magenta & scarlet embellishments - it's a feast for the eyes! 

Other Supplies: Razzleberry Crisp Dye Ink, Permanent Black Crisp Dye Ink, & Machine Stitching. 

Let's take a closer look at some of those layered details...


Inspired by the magenta scallops in the 3x4inch pocket card, I couldn't resist repeating the pattern with the awesome Fun With Borders Stamp! 
Oh, and how awesome is the Knockout Words Metal Die? I used it to cut out the 'favorite' title as well as though cute polka dot hearts!


Scallops for the win!!!


I also repeat stamped the XO sentiment in black ink to cut through all that bright pop color!

Such a bright and beautiful mixed media page! 

My next layout has a much cleaner look...

"Boy Oh Boy" - 12x12inch scrapbook layout


How fun is this interactive, hidden journaling pocket page?!!
I love hidden journaling, and this cute flag pocket made from one of the 4x6inch cards is so fun!

Other Supplies: Permanent Black Crisp Dye Ink, Machine Stitching. 

Here's a better look at that cute, hidden journaling pocket...


So simple, and SO awesome!


To connect with my design, I trimmed the 4x6inch pocket card into a flag. I machine stitched it onto my cardstock base, leaving the top open to insert a 3x4inch pocket card for my journaling. Love it! 


Those super bright Yellow Parker Acetate Alphabet Stickers are pretty awesome too! 


And who can resist those fabulous printed Cork Words?
So.much.awesomeness this month! 

I hope my projects have inspired you! 
Be sure to keep an eye on my Instagram HERE for more Elle's Studio May Kit projects!

til next time, 

Elle's Studio: May Kit & New Releases Inspiration!


Hi Friends!

Welcome back for more Elle's Studio awesomeness! 
 The May Kit is all kinds of amazing - 
but rather than rave, have a look for yourself....


Told you it was amazing!!! 
And the new release items are pretty impressive too....


And let's not forget the May Digital Cut Files and Printables....


Yep! There's no denying it!
Another fabulous month of memory keeping with Elle's Studio!
***Shop ALL the new products HERE***

Here's what I've created with these fabulous products so far....

"Love You To The Moon & Back, And Then Some"


Wow! Such an awesome page for my darling boy's album! 

Other Supplies: Bazzill Cardstock - Avalanche & Lemonade

Let's take a closer look at my layout...


So.much.fun!!!
I just adore this sweet page! 
You'll spy that I used the label cut file from the May Digital Cut Files to create my title. I enlarged this label to 9 inches wide & backed it with the blue pattern paper from the Flourish 6 x 8.5" Paper Stack. I embellished this title with black pen outline, Puffy Heart Stickers and one of the Cerulean Blue Puffy Alphabet Stickers. 

SO cool! I love how effective this large title looks!


I used the same Elle's Studio Black Pen to draw the strings of stars on my background, and then embellished these 'strings' with more stars - die cut ephemera & fussy cuts, veneers, stamped stars and even Acrylic Stars to complete the look!


I positioned my darling boy & puppy's photo onto an array of layered note cards from the May 2020 Kit. I also tucked in a few pieces of coordinating Flourish papers too! 
I covered the large moon wood veneer (from the To The Moon And Back Wood Veneer pack) with smooth yellow cardstock, and placed it onto my photo so that it appeared to 'cradle' my son. 
For finishing touches I added that amazing mirror Acrylic Star, and a few more Puffy Stickers. Awesome! 
Simple. Striking. Perfect for my boys!

And now it's time for something for my sweet girl!
Here's the layout I've created for her album, 

"Story"


Wow!
So light, fresh & contemporary - love it!!!

Other Supplies: Bazzill Cardstock - Avalanche, Staz On - Black, Tissue Wrap, Pom Pom Trim, Sewing Machine & threads. 

Here's a closer look at my layout....


Grid designs are always for the win, but combined with stacked note cards from the May 2020 Kit, and embellished with all.the.things - well, it's a guaranteed recipe for success! 
To add a point of interest, and bring the quadrants closer, I distressed the left hand side of the page and machine stitched in a few of the Flourish 6 x 8.5" papers
I even tucked in a few die cuts and an Icon Chipboard Sticker to enhance this feature! 
But its the grid quadrants that have my heart - there are just so many pretty details in each stack!


Life is good, indeed!
Each stack is positioned onto a peach watercolor base, and contains a mix of layered May Kit note cards, & tissue paper. I have embellished with Puffy Heart Stickers, Icon Chipboard Stickers, Die Cuts and even a few Printable elements! So cute!


How amazing is that Hello Sunshine Wood Veneer?!! 
So impressive that I had to give it it's own stack, lol! 
Adore this veneer! It would look amazing on cards or pocket pages too!


Such pretty details, and loving this color scheme to no end!


La la love this note card! 
From that incredible Story Acrylic to the fabulous stamping - it's truly taking journaling & story telling to a whole new level!

Ahh-MAY-zing!!!


There are SO many possibilities with this month's kit and new release items.
Please be sure to check back here a lil later in the month for many inspirational ideas! 

Thanks so much for stopping by today!
til next time, 

Citrus Twist Kits: May Life Crafted Kit


Hi Friends! 

Welcome back to the Happy Arty Days blog! 
I am so excited to be sharing my first layout with this month's Life Crafted Kit 
from Citrus Twist Kits! 
The 'May' kit is called Excursions and is all kinds of loveliness! 
If you haven't seen it yet, here's a quick peek....


So gorgeous, huh?! 
If you're fast, you might be lucky enough to snare this beautiful kit in the CTK store HERE. 

And here's the layout that I created with Excursions....

"You Two - Besties Since Like Forever"


Sigh! Isn't this the prettiest?!
Soft, fresh and very feminine! 
All the pastel pretties for these darling girls!

Let's take a closer look.....


I just adore the pattern papers and vintage book paper in this month's kit - so gorgeous!
The floral die cut ephemera is totally divine too! 
I used the bonus subscriber cut aparts to create more of these blooms for my page, and tucked them into that fabulous butterfly heart cut file. 

And speaking of cut files, how beautiful are those butterflies?


I've backed them with those gorgeous pattern papers, then layered ephemera hearts over the top - so sweet! 
That amazing cut file is a freebie one but again, it is an exclusive to all the CTK subscribers. 
Yet, another great incentive to start a subscription today!


I should add that the sequins are from my stash, but everything else you see on my page is from the May Life Crafted Kit & subscriber exclusives. I know, so much loveliness in one kit! 
Check out those awesome puffy alphas and my favorite, the monthly Life Crafted Stamp! 
So much goodness in one divine lil kit! Love, love, LOVE!!!!


I hope you enjoyed seeing my first layout with this month's kit. 
Thanks so  much for visiting, 
til next time, 


Elle's Studio: Stashbusting the May Kit & Add-ons!


Hi Everyone! 

Today I am sharing how I use up the left overs of my Elle's Studio kits! 
Stashbust, kill your kit - call it what you want! 
The point is to use it all & be creative while we wait for our next kit to arrive!

The May Kit was an absolute stunner, and I made some truly pretty pages from it. 
But now what???
When I looked at what I had left over as a whole, there wasn't a commonality between anything!
I had a few 3 x 4 cards & one 4 x 6 card, and some Die Cuts left from the exclusive May Kit. 
I also had remnants of the Puffy Hearts & Play All Day Phrase Stickers, some of the Labels, as well as the Hazel Stamp!
 I had a bit of this and bit of that.... until I grouped everything by color!
Here's what I came up with.....

"Weekend"


How fun is this?!! 
Inspired by party banners, I decided to suspend my color blocked scraps together! 
I used some baker's twine & ink from my personal stash, but otherwise everything else is from the May Kit and Add Ons.  
Here's a closer look for you....


How did I get SO many pieces?
Lots of clever cutting from the May Kit 3x4 cards.

I used the negatives from the May Kit Die Cuts as a stencil and drew the hearts, stars and tabs on the left over 3 x 4 cards. I then fussy cut them out to reveal 'more' embellishments than I actually had on hand. 


While I had my trusty scissors handy, I also fussy cut the arrows from the 3 x 4 card that featured 5 arrows on it, as well as the left over labels. I also trimmed up the 4 x 6 card into smaller squares to matte beneath my photo. 
 I added the Play All Day Phrase Stickers to many of these embellishments, and then strung them along the twine in color blocks. 
To keep the design more cohesive, I kept the color blocks in rainbow order. 
Tip: Having analogous colors together is more orderly and pleasing on the eye!


To strengthen the color block feature, I repeat stamped the plus sign symbol from the Hazel Stamp. I stamped at varying angles to create a confetti appearance, and used coordinating inks. This stamping works beautifully with the banner design, and brings it all together!  


I position some of the Puffy Hearts onto the twine, and scatter others around the banner in their color block. 
To ensure my photo is the true hero of my layout, I place it in the center of my final banner. 


And there you have it! 
Kill your kit with a lil creative fussy cutting, stamping and color blocking! 
Hope this inspires you to use up the last of your May Kit! 

Thanks so much for visiting, 
til next time

Happy Arty Days, 
Amanda xo 


Elle's Studio: Sketch Inspiration


Hi Everyone!

Welcome back for more gorgeous inspiration with the Elle's Studio May Kit & Add-Ons!

For today's post I am creating a layout from this month's sketch inspiration.
 It's based on the 'Yes Please' layout in our April Gallery & is by the super talented Susan Brochu.
Here's what the sketch looks like....


Awesome, huh?!

 I've followed the sketch pretty closely, 

but I'm adding my 'twist' to it by using super bright colors, & adjusting all the proportions. 

Here's my take on it,

"Good FUN"


Good FUN, indeed! 
This is my two darlings on Easter morning eating chocolate bunnies, for breakfast, no less! 
Living the (chocolate) dream for sure! 
The bright, playful colors in this month's kit were perfect for documenting this happy moment!
And nothing says fun better than an over sized FUN wood veneer title, right?!
That veneer is just awesome, and the woodgrain contrasts beautifully against the rainbow of tags and labels! 
I love Susan's clever use of flags in her design.  I twist this idea, by arranging tags and labels into the flag style. I coordinate mine into similar color groups, and align each group with the veneer title, for maximum impact!
You'll also spy a few pretties from our new Noteworthy collection, including that super happy, yellow stripe, pattern paper base. Possibly a new fave o'mine! 
**The typewriter font journal trim beneath my photo cluster is actually the reverse side of the barcode strip from that same pattern paper** 


I should note that the 'good' veneer is from our Title Builder Vol. 2 Veneer set, and coordinates beautifully with our May kit! 
That FUN veneer title is a such a stand out feature!  
Stretching it across the page and adding the Puffy Heart stickers between the letters really adds emphasis to this already BIG impact title! So cool! 


Speaking of Puffy Heart stickers, you'll also spot the Gold Shapes and Dots adorning my layout too! 


 My photo cluster and layers are created from the 3 x 4" and 6 x 4" tags in the May kit, and embellished with some pretty Add-Ons, including those fabulous Play All Day Phrase Stickers.  Beneath these layers, I add a little tissue wrap from my stash to create dimension, texture & interest. 


And there you have it! 
My fun take on this fabulous sketch using the gorgeous May Kit, Add-ons & Noteworthy collection. 
I hope I have inspired you to get creating with these beautiful products! 
Thanks so much for visiting!
til next time, 

Happy Arty Days,
 Amanda xo