Showing posts with label May. Show all posts

Elle's Studio: Stashbusting the May Kit & Add-ons!


Hi Everyone! 

Today I am sharing how I use up the left overs of my Elle's Studio kits! 
Stashbust, kill your kit - call it what you want! 
The point is to use it all & be creative while we wait for our next kit to arrive!

The May Kit was an absolute stunner, and I made some truly pretty pages from it. 
But now what???
When I looked at what I had left over as a whole, there wasn't a commonality between anything!
I had a few 3 x 4 cards & one 4 x 6 card, and some Die Cuts left from the exclusive May Kit. 
I also had remnants of the Puffy Hearts & Play All Day Phrase Stickers, some of the Labels, as well as the Hazel Stamp!
 I had a bit of this and bit of that.... until I grouped everything by color!
Here's what I came up with.....

"Weekend"


How fun is this?!! 
Inspired by party banners, I decided to suspend my color blocked scraps together! 
I used some baker's twine & ink from my personal stash, but otherwise everything else is from the May Kit and Add Ons.  
Here's a closer look for you....


How did I get SO many pieces?
Lots of clever cutting from the May Kit 3x4 cards.

I used the negatives from the May Kit Die Cuts as a stencil and drew the hearts, stars and tabs on the left over 3 x 4 cards. I then fussy cut them out to reveal 'more' embellishments than I actually had on hand. 


While I had my trusty scissors handy, I also fussy cut the arrows from the 3 x 4 card that featured 5 arrows on it, as well as the left over labels. I also trimmed up the 4 x 6 card into smaller squares to matte beneath my photo. 
 I added the Play All Day Phrase Stickers to many of these embellishments, and then strung them along the twine in color blocks. 
To keep the design more cohesive, I kept the color blocks in rainbow order. 
Tip: Having analogous colors together is more orderly and pleasing on the eye!


To strengthen the color block feature, I repeat stamped the plus sign symbol from the Hazel Stamp. I stamped at varying angles to create a confetti appearance, and used coordinating inks. This stamping works beautifully with the banner design, and brings it all together!  


I position some of the Puffy Hearts onto the twine, and scatter others around the banner in their color block. 
To ensure my photo is the true hero of my layout, I place it in the center of my final banner. 


And there you have it! 
Kill your kit with a lil creative fussy cutting, stamping and color blocking! 
Hope this inspires you to use up the last of your May Kit! 

Thanks so much for visiting, 
til next time

Happy Arty Days, 
Amanda xo 


Paper Issues: May Swag Bag Spotlight!


Hi Everyone! 

Welcome back for more Paper Issues awesomeness with one of my favourite shares,
 Swag Bag Spotlight!


Today I am creating with the April Swag Bag, called "Yay! Let's Celebrate"


Isn't this such fun! 
So many cute embellishments and 3 x 4 cards! 

Each mini kit slightly varies, and mine had quite a few pieces from the My Mind's Eye,  Good Vibes collection!
The pink foil and bright colors in this line partnered perfectly with my left over pieces from the February Swag Bag. 
Here's what I created with them.....

"Yay!"


Isn't this the sweetest?!!
I had so many left over hearts from the February Swag Bag, this was a perfect way to use them up!
Everything on my layout is from these two Swag Bags, 
except for my 12 x 12 paper, and the Nuvo Drops in Bubblegum Pink. 
 That super cool Amy Tangerine Hustle & Heart  12 x 12 pattern paper for my base was a perfect match with all the hearts too! 
Such a happy girl page! Love it!

Here's a few close ups for you.....


The April Kit also included those super fun Shaker Stickers from Shimelle's Glitter Girl, and some cute 2 x 2 squares from Paige Evans: Pick Me Up collection. Perfect for this sweet page! 


Loving the playfulness of the MME Good Vibes line!


Beautiful! 


Swag Bags - a little bit of this and a sampling of that! 
Perfect when you just want to try it all! 
Love 'em!


& REMEMBER: Code AMANDA will always save you $$$ at checkout! 


Thanks so much for visiting today!
til next time, 

Happy Arty Days, 
Amanda xo 

Pinkfresh Studio: Mixing It Up for May!


Hi Creative Friends & Fans!

Today I am mixing it up for May with my Pinkfresh Studio creating!
I have two layouts that use all three of their current collections; 
The Mix No.1, Dream On & Live More!
 I know, how fun & inspiring!!!

First up is this super sweet page, 
"You Can Do Amazing Things"


Isn't this delicate and divine?! Such a pretty page for my pretty girl! 

*Please note: The tassel and sequins are from my personal stash, and not from  Pinkfresh Studio*

To create this layout, I took the pattern paper "FOCUS" from the LIVE MORE collection and fussy cut the chevron design. I repeated this with the same paper in the 6 x 6 Paper Pad. I then layered the fussy cuts together on white cardstock to create a new, more unique design. I used foam tape on the largest chevron to create dimension and more interest. This 'focal' chevron also directs you to my sweet photograph - love how this looks! So bold in intention, and yet so soft and pretty! 

Here's a closer look...


Wow! That foam tape really does make all the difference! 

You'll spy a much smaller, less obvious FOCUS chevron beneath my photo cluster. However, this one points in the same direction as that stunning arrow Paperclip 'Today'. That stunning embellishment is also from the LIVE MORE collection and is one of my fave go-to items from this line! But there's also a few pretty items from the Dream On collection adorning my photo too....... 


I used the minty "MARVEL"  pattern paper (6 x 6 Paper Pad size)  from the DREAM ON line for the bottom layer of my photo cluster. It's so fresh and light, & it coordinates beautifully with the LIVE MORE items! I've also used a few Die Cuts from this range. I included them as embellishments for those delicious photo layers! I could seriously do with a whole packet of just those leaves - just awesome!!! That stunning title is also from the DREAM ON Die Cuts packet, and again, the colours partner so perfectly with the LIVE MORE products it's incredible! 
For finishing touches, you'll spy a DREAM ON Layered Chipboard Sticker heart in a soft coordinating pink, as well as those fabulous Puffy Sticker hearts from The Mix No.1 collection. I love these bright embellishments; the matte finish on them is just so classy!!!
Such a simple, but oh so delicate and divine layout!
I hope you liked this one as much as I do! 

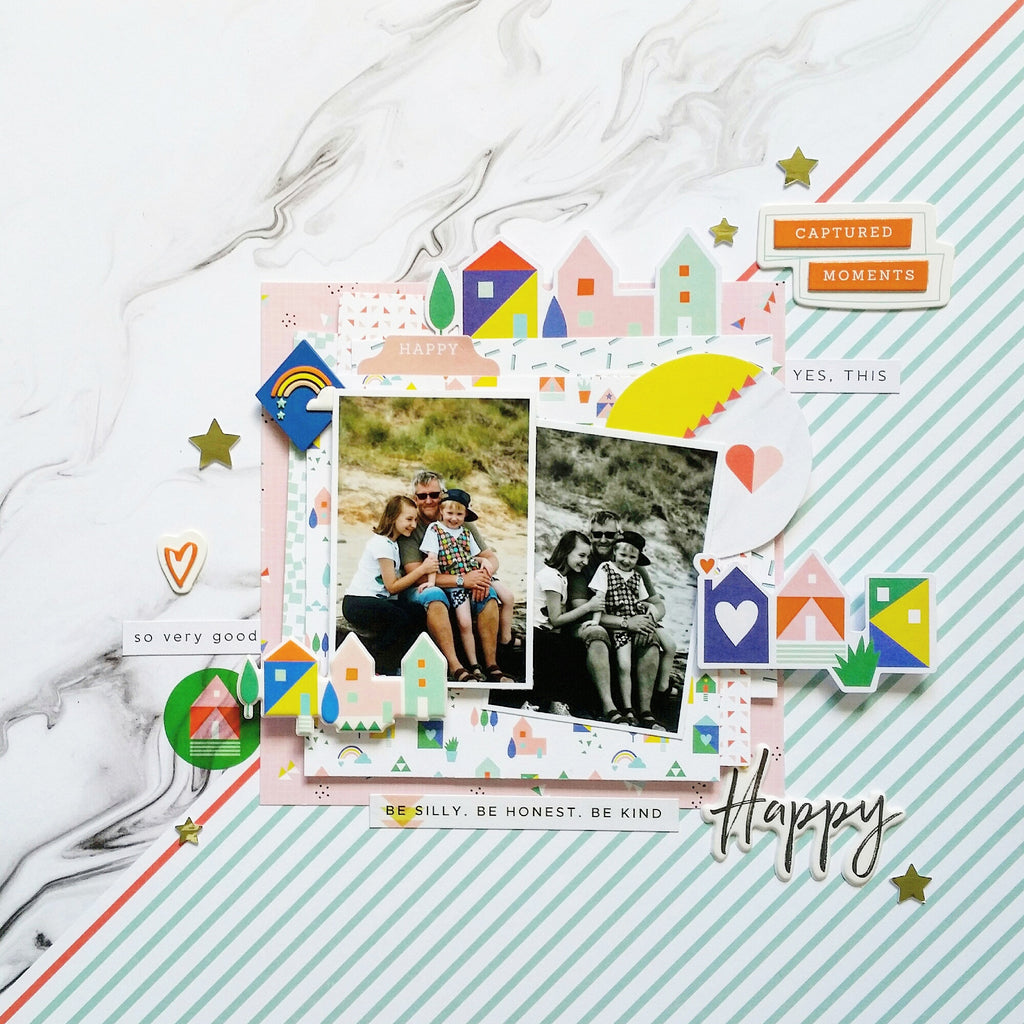
My second layout is all about my beautiful family and our special moments together, 
"Happy"


Love how fun and playful this is! Truly happy! 
Lots of bright, eclectic embellishments on this page too!
I have used the LIVE MORE pattern paper, "HONEST" as the base for this scrapbook page. I love that diagonal design, and used that orange line as an anchor for centering my photos! 
I wanted to showcase the fabulous 6 x 6 Papers for this layout, so I created quite larger layers beneath my photos, starting with the DREAM ON 6 x 6 paper, "DAYDREAM", and then "MARVEL". You'll also see the LIVE MORE "EMBRACE" and  reverse side of "FOCUS" papers tucked in there too! The layer directly beneath my happy photos is created from DREAM ON pattern paper, "MARVEL" but I've used the reverse side. I love the bright colours, and those cute little homes! Nothing says family like a happy home ;)
Infact, you'll notice I followed through with the homes theme in my embellishing! 
But enough chattering, here's a closer look at those lovely 6 x 6 paper layers....


Oh those layers are just divine! 
You'll notice that I used a layer of cardboard beneath the final layer to really make it 'pop' and add more dimension! There are a few Die Cuts from both LIVE MORE & DREAM ON layered with my photos - really building up that larger photo cluster! Love that small photos can feel large too! 
How cute are those Die Cuts and Puffy Sticker homes from DREAM ON?!! There's even a cute Washi Tape house too! Adorable!
Talking all things adorable, how about that rainbow Rubber Chip - so super cute!!!
And I am just loving how effective the Layered Chipboard Stickers look! 
Here's another view, check out that 'Captured Moments' layered chipboard.....


Totally awesome! 
I've used a DREAM ON Puffy Sticker for my title, "Happy". I love the whimsical font! 
I also love the sentiments in the LIVE MORE Phrase Stickers, and have used them to journal around my photo cluster. Perfect! 
For finishing touches, I've used The Mix No.1 collection again! This time I'm using the Gold Foam Shapes (the stars specifically) to add a lil bling & to keep with the playfulness of the layout.

And there you have it!  
My two layouts that mix up the gorgeous Pinkfresh Studio collections!
I hope they've inspired you to get creating! 
And using those 6 x 6 paper pads too!

& REMEMBER: Use my code AMANDA & you'll also receive 20% off your cart total! 


Thankyou so very much for visiting!
til next time, 

Happy Arty Days, 
Amanda xo