Showing posts with label stars. Show all posts

Elle's Studio: Product Spotlight: My Star Stamp & Die Set


Hi Friends! 

Welcome back for more Elle's Studio inspiration!

Today I am shining the product spotlight on the amazing My Star Stamp & coordinating Die Set! 

So awesome, right?
It's no secret that I love to get inky, but this stamp and die set really has my heart! 

For today's post I wanted to share a few different ways you can use this awesome set in your story telling & memory keeping - all in the one layout! 

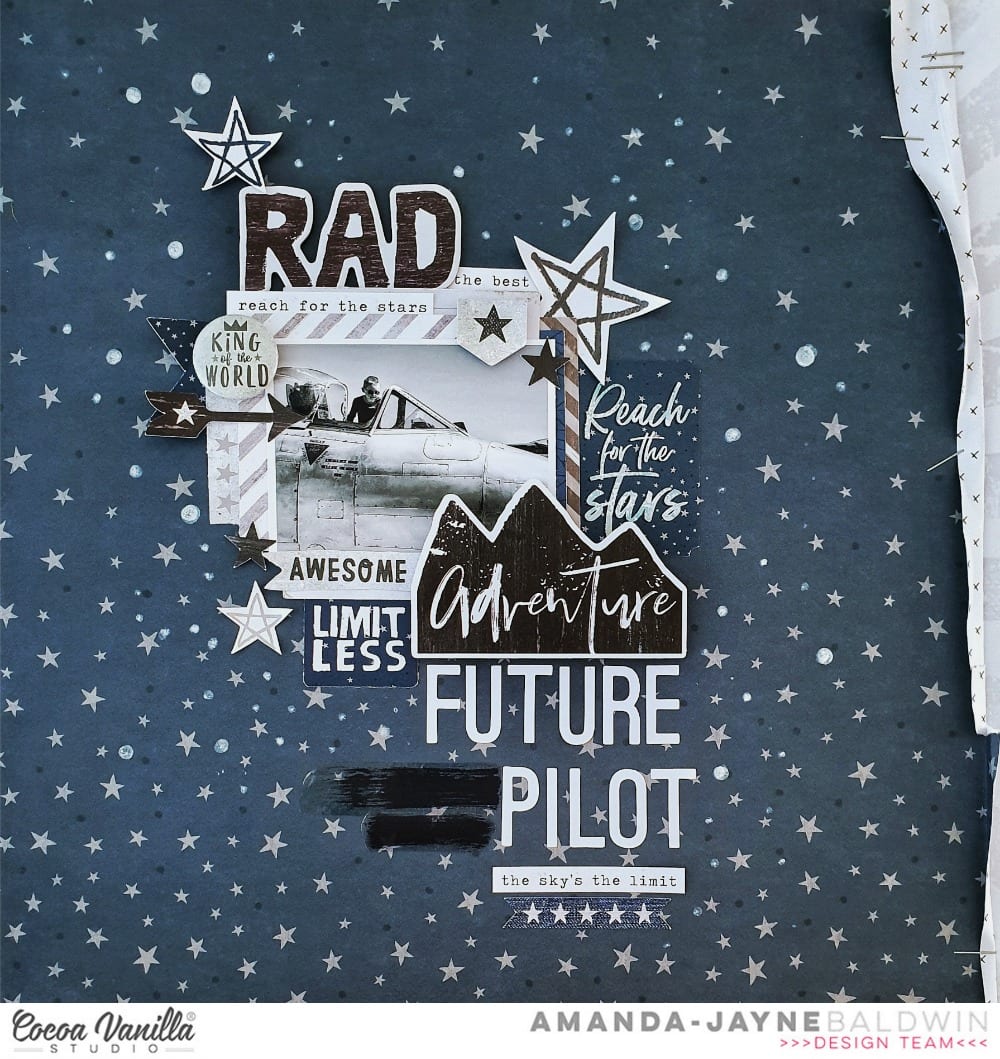
Enough, said! Here's what I created, 

"Twinkle"


Wow! So bright & fun for my two superstars!

Other: Bazzill - Smooth White Cardstock, Stamping inks - black, aqua, pink, dark blue & orange. 

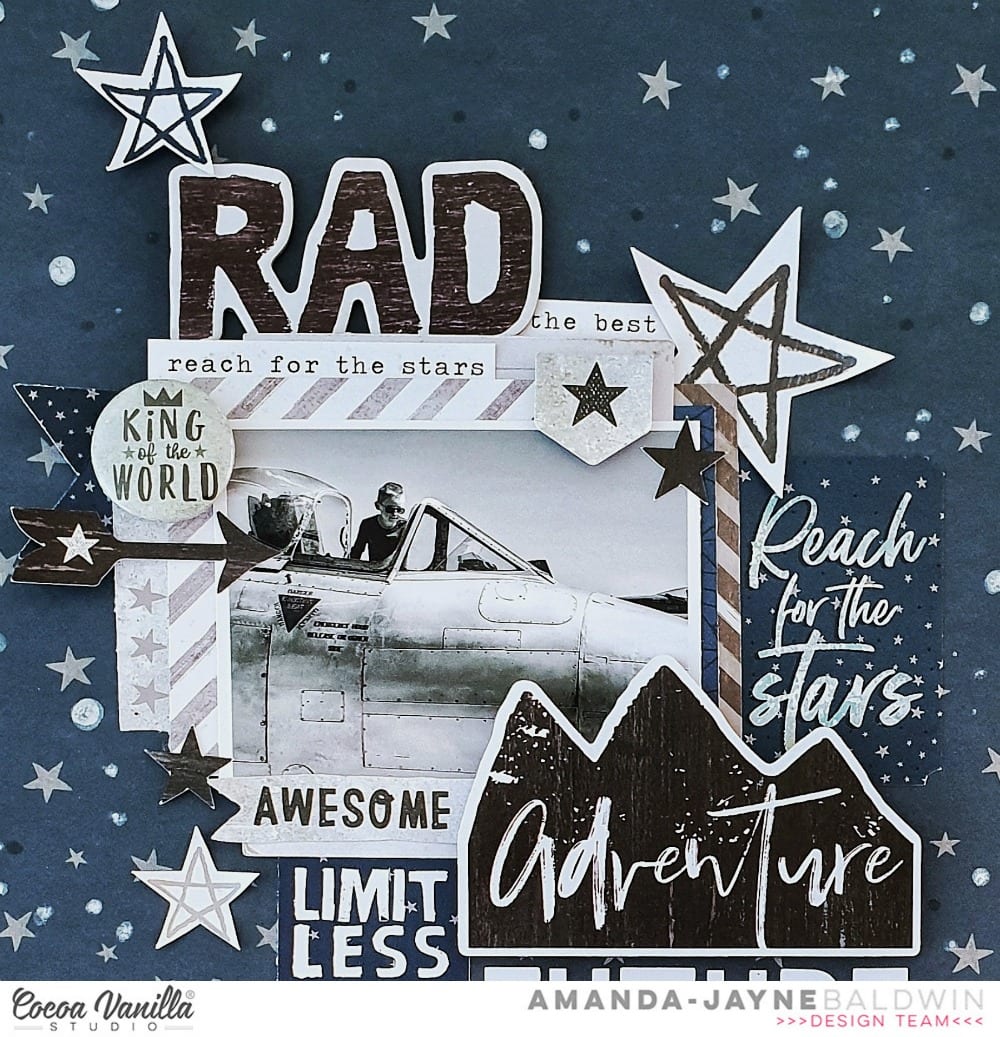
This really is a happy & joyful page! Let's take a better look at it....


Gosh, so many beautiful details and layers created with the one stamp & die! My Star is really somethin'! 
Here's a few simple ideas on how I incorporated the My Star Stamp & Die;


1. Use them as intended! Stamp & die cut til you heart's content! 
Tip: Choose a color scheme that flatters your photo/s and emanates 'the feel' of your story. 

2. Use the My Star Die with your paper scraps -even the smallest pieces can be cut into tiny stars!
Tip: Color match inked and pattern paper die cuts to create a tone on tone effect, for a more layered and detailed look.


3. Use the negative die cut space as a stencil, template or mask! I used gel pens for my example, but this would also work well with an ink blending tool or texture paste too!
Tip: Paper stencils don't last long, so replace them regularly or, if using wet media, die cut with a sturdier material like acetate or card.


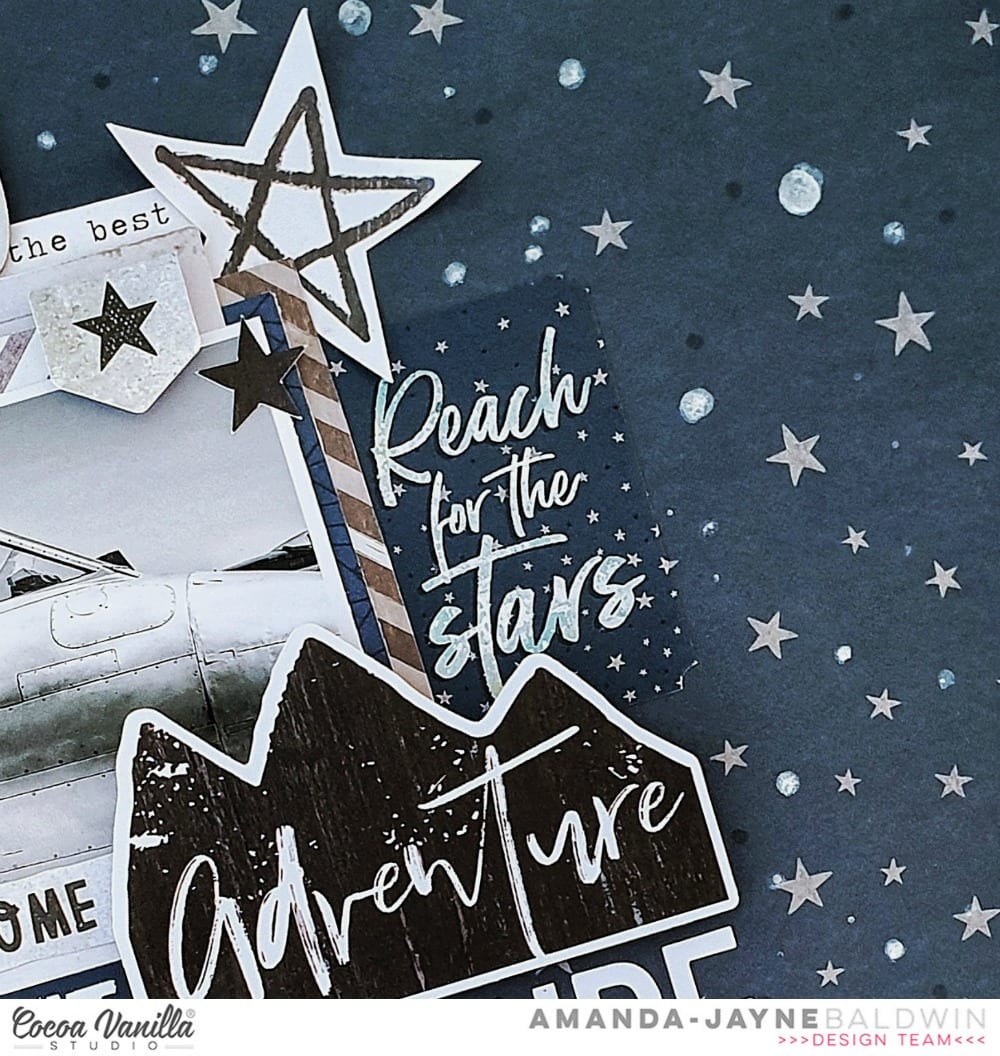
4. Create more interest by stamping the My Star Stamp as a base to layer onto!
Tip: Use the Elle's Studio Acrylic Stamp Blocks for greater control & precision. I used the Elle's Studio Acrylic Stamp Block - 3 x 4inches for my layout. 


5. Mix and match different sized stars and layer them onto one another for greater effect!
Tip: Mixing colors or patterns will also make the stars 'pop'!


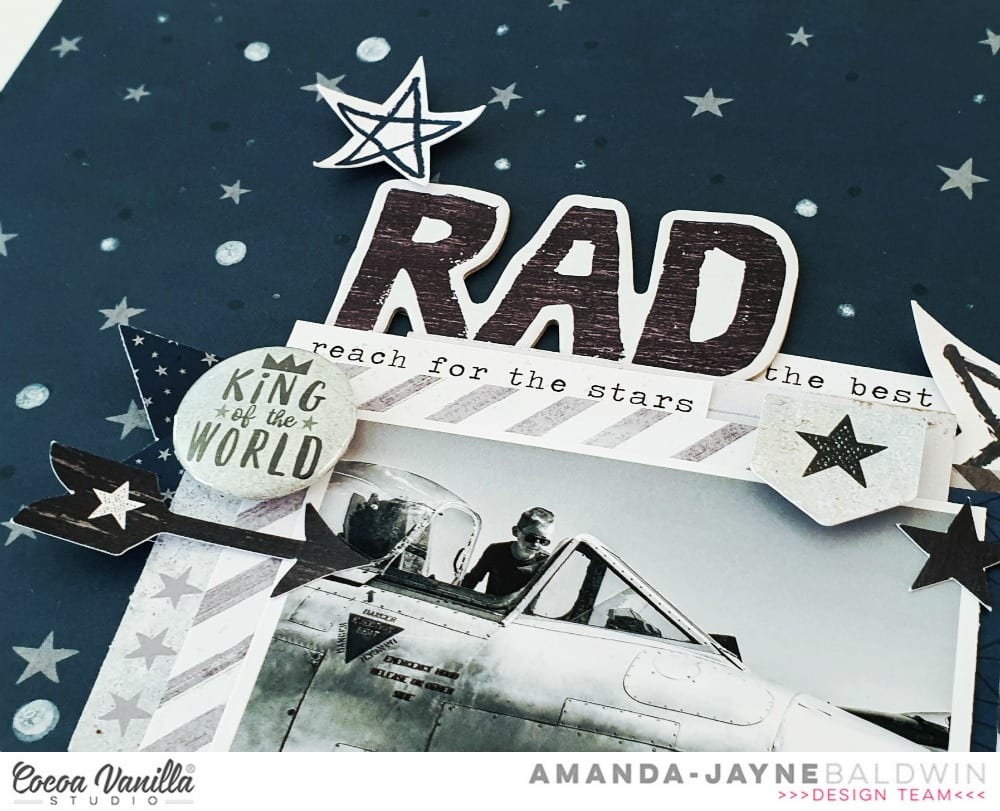
6. Use repeat stamped sentiments to add emphasis to both photo & embellishment clusters!
Tip: Black stamping ink is easier to see and read, and it can also create balance by cutting through a colorful page!


7. Use the My Star Stamp to decorate other embellishments! I used the tiny open star over the Joyful Chipboard Sticker title, 'Twinkle' to really make it shine!
Tip: Always test the quality of stamping inks on the surface they are intended for first, before applying to embellishments. Lesser quality inks bleed when applied to veneers & chipboards. 


So bright, so beautiful & tons of fun to create! The My Star Stamp & Die are definitely in my 'Craft Essentials' kit!
I hope you feel inspired by my project, & are able to get creating today! 
Please be sure to share your top tips and crafty creations with us in the 
Elle's Studio Facebook Group HERE - we love seeing what everyone makes!  

Thanks so much for stopping by!
til next time, 

Cocoa Vanilla Studio: Boys Rule Inspiration!


Hi Friends!

Thanks so much for stopping by!
Today I am sharing a super cool  Cocoa Vanilla Studio scrapbook page with their super awesome BOYS RULE line! 
This collection is seriously cool & just rocks when it comes to scrapping the boys!  
But enough chatter, here's my scrapbook layout,

"Future Pilot"


Whoa!!! How awesome is this?! 
RAD, indeed!
I have featured the stunning CV-BR007 STAR FALL paper as my layout background, distressed & folded the right edge of this paper and stapled a trim of CV-BR009 GOOD TIMES behind it. This created a really raw, and edgy look which enhanced the masculinity of the overall design. The use of metal hardware (staples) not only attached the two papers, but also emphasized the rawness. 
Simple, but so effective!


I backed my sweet boy's photograph with a few cool layers of the MISCELLANY frames and die cuts, as well as some fussy cut labels from CV-BR006 BOY STUFF paper. To these layers, I inserted in a few ACCESSORY STICKER stars and words/phrases, and then attached this photo cluster to my page. With my focal point in place, I then tucked my CHIPBOARD PIECES title 'RAD' into the top of the photo layers.


Over my treasured photograph, I foam mounted a couple more ACCESSORY STICKERS that featured stars, plus added I that awesome 'king of the world' FLAIR BUTTON. So cool!!!


To the right side of the photo cluster, I tucked in the 'reach for the stars' ACCESSORY STICKER - both the print and the sentiment coordinated perfectly with my page design.


More ACCESSORY STICKERS are used to adorn the bottom left of my photo cluster, as well as a few die cuts. To complete the photo cluster I foam mounted & overlapped that fabulous 'adventure' CHIPBOARD PIECE. Awesome!
For my title to be noticed on such a dark paper, I dove into my COCOA VANILLA STUDIO: COLOUR ME HAPPY stash and used the plain white ALPHABET STICKERS. I embellished around my title with more of the ACCESSORY STICKERS as well as two of the brush stroke CLEAR STICKERS. A few dots of white paint completed the page.


Simple, and yet so epic!!!
Scrapping the boys is made super easy (& totally awesome) with the fabulous 
BOYS RULE collection!
Thanks so much for visiting - I hope I have inspired you to get creating today!
til next time,

Elle's Studio: More January Kit Inspiration!


Hi Everyone!

Welcome back for more Elle's Studio inspiration! 
I just can't stop creating with the gorgeous January Kit & new releases!
  I know I say it every month, but honestly, this month's products are just incredible! 
The proof is that this is my 5th scrapbook layout that I've created with these supplies!
 Yes, 5th! It's that good! 
And before you ask, you bet I used the Happy Heart Stamp! 
I've stamped all.the.things this month! I la la LOVE this stamp! 

I created a lot of loved up Valentine's inspired projects, but today I want to demonstrate the versatility of these awesome products! 
So enough of the chatter, here's my latest layout to inspire you with.....

"#Besties 4 Eva"


Wow! Isn't this fun! Besties forever, indeed! 

Other Supplies: White Bazzill cardstock, machine stitching, staples, Umbrella Crafts Premium Dye Ink in Sunshine Yellow & Black. 

For this layout, I was totally inspired by my sweet photograph of my daughter & niece. The great mix of  colors and designs in the January kit allowed me to draw on the near black of my niece's hair, the gray of my daughter's tee, & that golden butterflies filter! The movement of the butterflies in the photo also influenced the flow and movement of my design. 
Let's take a closer look.....


I started this layout with the fabulous yellow striped pattern paper from the Noteworthy collection. I layered a sheet of torn white cardstock over it, inserted a couple of 3 x 4 cards into the layer, and stitched & stapled it all into place.  


I featured the dominant yellow stripes on the left, to encourage your eye to move across my layout, left to right. The Happy Heart stamped yellow base adds to the directional flow, and further guides you across my page. I selected all the yellow acetate hearts & stars from the Heart & Star Acetate Die Cuts pack and aligned them with the stamped base also.  


To complete the base, I embellished with lots of stickers, die cuts and veneers! I love the layered Wood Veneers Hearts over the acetate hearts - so cool! I also loved the confetti style look of the stamp, so I tried to arrange my embellishments in a similar fashion. For a more interesting & striking effect, I added a few black icon stamps as well. The pops of black balance the bright yellow perfectly!

For my photo cluster, I layered more of the 3 x 4 journal cards from the January Kit, and then tucked in a few labels, stickers and even one of the acetate hearts. I embellished my photo with a Sweetheart Puffy Sticker & that divine Wood Veneer Heart! 


For finishing touches, I included a few sentiment die cuts and the Happiness Found Stickers. Last but by no means least, I added my mixed alphas title! 
I used the extremely versatile and everyday essential, black Jane Alphabet Stickers for the #Besties part. Love these stickers! 
And for the remaining title, I used the super cute Black & White Polka Dot Alphabet Puffy Stickers. Perfect! 

The January Kit is jam packed with all kinds of awesomeness!
I hope my layout has shown you it's versatility for creating, & inspired you to take some inspiration from your photographs too! 

Thanks so much for joining me today!
til next time, 


Elle's Studio: Spooky Halloween!


Hi Creatives! 

Welcome back for more Elle's Studio awesomeness!
Have you got some Boo-tiful photos and memories to document? 
Well this month's kit and new releases are perfect for all your spook-tacular Halloween projects!

***Shop ALL the Elle's Studio New Releases HERE***

Here's a little Happy Haunting inspiration for you.... 

"Trick Or Treat"  


Other Supplies: White & Black Bazzill Cardstock, Umbrella Crafts Dye Ink in Sunshine, & organza ribbon. 

All the happy haunts here! Such a fun layout! 
You'll spot that I trim the moon & stars pattern paper (from the Sweater Weather pack) into one inch strips. I connect the strips together to create the appearance of 12 inch paper at both the top and base of my layout design. Such a great way to maximize your six inch papers! 


To enhance the spooky starry background, I fussy cut the stars & moon journal card from the October Kit, and add a star die cut or two. I further add to this look with the inclusion of the Puffy Star & Dot Stickers - so cool! 
I feature the Halloween Wood Veneer in the top corner of the layout, & coat the OCT 31 in yellow ink. The colored veneer really pops! 


I use the same ink to hand color the Trick Or Treat Wood Veneer in the opposite corner at the base of my  page, and add more of those fabulous stars!
Here's a closer look for you....


That title is errrrything!!! Whether you use it on layouts, pocket pages or even cards - the Trick Or Treat Wood Veneer is a must-have!
And when it comes to Halloween, we need a pumpkin or two, right?! 

 
The Jack-O-Lantern novelty veneer is super cute! A perfect embellishment for my two trick or treaters in the photo! (And yes, they sure do love candy!) 
The second pumpkin is one which I drew, & cut out from black cardstock. I back it with more of the Sweater Weather 6 x 6 Papers and position my layered photo onto it. 


The layers beneath my photo are created with the Autumn Shipping Tags, October Kit, and more of the Sweater Weather papers. Wood Veneer & Autumn Fun Stickers complete the photo cluster, and add that extra BOO! factor. 
For finishing touches, I add the Happy Haunting subtitle with the black Jane Alphabet Stickers and fussy cut some bats from my left over one inch pattern paper strips.....


Totally Spook-tacular!!!

I hope I have inspired you to document your Halloween memories with Elle's Studio!
Happy Haunting Friends!

Thanks so much for visiting, 
til next time, 

Happy Arty Days,
Amanda xo 

Paper Issues: July Swag Bag


Hi Lovelies!

It's time for the July edition of Paper Issues 


It's no secret that I LOVE me a Swag Bag or three! 
Here's what the awesome June kit looks like.....

No automatic alt text available.

Pretty awesome, huh?! 
I had quite a few left over pieces with the May Swag Bag, 
so I decided to combine the two to create a very girly and feminne page!

Here's what I created, 
"Love You To The Moon & Back"


Isn't this the sweetest?!!
Who would have thought that such a masculine looking Swag Bag could be so pretty and delicate?!!
Just divine!

The 12 x 12 papers & the doily are from my stash, 
(Pink Paislee's Fancy Free & Dear Lizzy: Saturday collections by memory), 
the acetate moon title and layered 3 x 4 card are from the May Swag Bag, 
& everything else you see is from the June Swag Bag!
I know, so much pretty!!!

Here's a closer look.....


Love that die cut and floral tag!!!


It's a lil hard to see, but check out the clear glass star pin behind my photo! 
Such a delicate embellishment!

And there you have it!
My take on this month's Swag Bag share! 
I can't wait to see what you create with your Swag Bag!

Missed out on the current Swag Bag? 
& get yourself a 6 month subscription to avoid disappointment!
& REMEMBER: Use my code AMANDA & you'll save 20% off your total!


Looking for more Swag Bag inspiration?
See what our incredible team has created here

Thanks so much for stopping by!
til next time, 

Happy Arty Days, 
Amanda xo 

Paper Issues: July Free File Friday #1


Hi Creative Friends!

Welcome back for more Paper Issues awesomeness with Round 1 of....


For this round, we are asking you to create a layout using any of the Free STAR Cut Files in the Paper Issues store! 
Yay, how fun!

Here's what I came up with.....

"Adventurer"


How awesome is this?!!! Such a cool lil adventurer, indeed!
I have used Photo Play Paper's Freestyle collection and teamed it up with the Geo Star cut file.

It looks like this....

Geo Star Free Cut File

And it's totally FREE!!! Yayyyyy!
Get yours in the Paper Issues store here

Here's a few close ups of my layout......


SO RAD!!! 
Love how super cool this boy line is!
That woodgrain paper is just incredible!!!


The element stickers are spot on too! Totally awesome!
I should add that the fabulous flair is actually from the June Swag Bag, 
& the veneer stars are Studio Calico. 
The rest is Freestyle & if you have boys, you NEED this line!!!

Get your in the Paper Issues store here
& REMEMBER: Use my code AMANDA & you'll save 20% off your total spend! Yay!!!


Want to see more Star cut file inspiration?
Check out what our talented team has created here

Tahnks so much for stopping by today, 
til next time, 

Happy Arty Days, 
Amanda xo