Pebbles: Documenting Summer - Patio Party Style!


Hi Creative Friends!

Welcome back to the Happy Arty Days blog!
 Today I am sharing the Pebbles love, and a little tutorial on how I am documenting our Summer memories with the gorgeous Patio Party collection from Jen Hadfield!
 It's no secret that I am an enormous fan of Jen's designs, and Patio Party has my heart! 
All those bright colors just scream Summer FUN!
Here's what I've created for today's post.....

"Hello Sunshine"


Oh isn't this sweet for Summer?!! 
Hearts, tropical colors, flamingos and pretty blooms! 
Summer Lovin' at it's best! 
And better still, it's really easy for you to recreate!
Here's how....


To get started you'll need pattern paper, Citrus Sweet (reverse side, with the stripes) , white cardstock, Patio Party Thickers,  and a heart cut file or die cut. 
The one I've used today is called Hello Hearts from The Cut Shoppe (get it HERE) , but you could even fussy cut your own hearts out. 
You'll also need pattern paper Panels, and the 6 x 6 Paper Pad.


Trim your white cardstock to 11" x 11" and attach to that gorgeous striped paper. 
The stripes on the reverse side of Citrus Sweet are so bright and just give me that happy Summer vibe!
Back your heart cut file with papers from the 6x6 Paper Pad, and the pattern paper called Panels.
 It's important to include the woodgrain paper, as it compliments the Patio Party Thickers and creates balance on the page.


Glue your paper pieced cut file to the center of you layout, and then position the Thickers title into place - as shown above.
 As I am documenting a Summer memory of my darling girl, Hello Sunshine was a perfect title choice. However, if this doesn't suit your needs, don't worry! There are so many other words and title options in this set of Thickers I'm sure you'll find something that works best!


Now it's time to prepare your Summer photograph! 
For this layout, I've used a 2 1/2" x 3 1/2" photo. 
Using papers from the 6 x 6 Paper Pad, I trim two patterns to 2 3/4" x 3 3/4", and layer them beneath my photograph. 
I attach a flamingo and blooms ephemera, before adhering it to my page.


Time to have some fun with embellishing! 
I start by adding that Best Day Ever Wood Sticker to the top left hand side of my page, and popping a 6 x 12 Accent Stickers bloom beneath it. I also create a few embellishment clusters around my photo, using Ephemera, Accent Stickers and Dimensional Stickers. I add 2 more flamingos, to adorn the Sunshine element of my title, and a few more blooms scattered on my hearts. Oh, and don't forget those 3 super cute buzzy bee stickers - So cute!
If you love a really 'clean' layout, then this is complete! 
But if you just need a lil more pop color for your Summer themes, then see below....


With a fine brush & steady hand, apply hot pink watercolor to your layout focal points.  
Add a few splatters for good measure! 
I even added a few tiny droplets of that sky blue to balance the colors in my design.
And there you  have it! Summer memories beautifully documented with Patio Party!

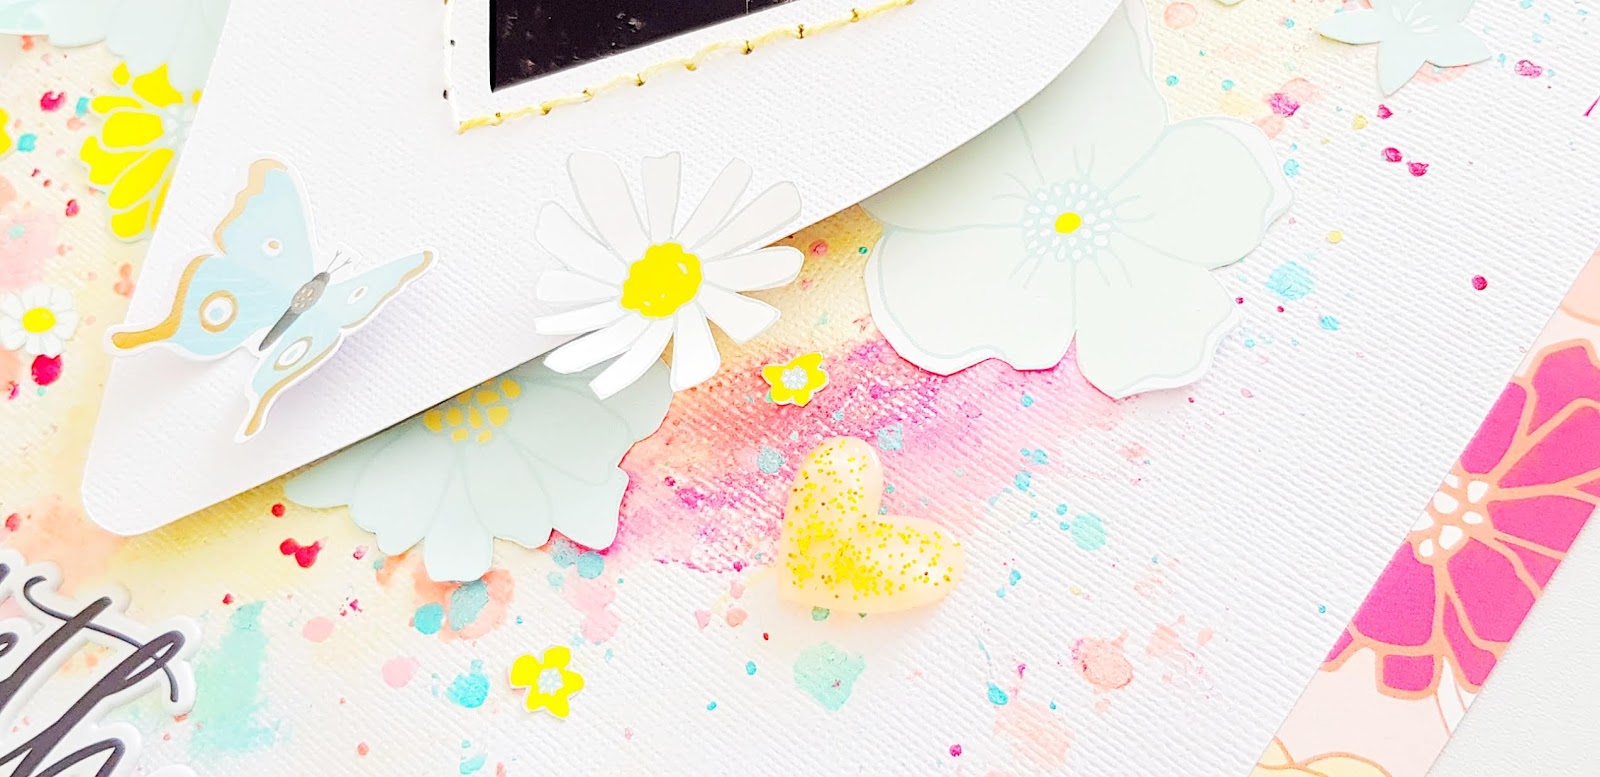
Here's a few close ups for you....


Such a gorgeous color scheme! And those flamingos are just perfection!


Loving that woodgrain element, especially with the pops of hot pink!


I just adore the blooms in that embellishment cluster!


SO very beautiful!
I hope I have inspired you to start documenting your favorite Summer moments too!
Thanks so much for visiting today!
til next time, 

Happy Arty Days, 
Amanda xo

Pebbles Supplies Featured:

Elle's Studio: June Kit & New Releases!


Hi Everyone! 

Welcome back!
I absolutely LOVE reveal day at Elle's Studio & today's 
 June Kit and New Releases are all kinds of awesome! 

***Shop ALL the Elle's Studio new releases HERE***


Here's what the June Kit looks like....


Bright, bold and Summer-tastic! Loving it! 

And the Add Ons are equally as desirable.....

Yessss! How awesome is it all!?!!
And as you'll spy on the clear stamp, 
 we've teamed up with Geralyn Sy from In A Creative Bubble for this month's kit! Yay!
Could it get any cooler for Summer?! 

I couldn't wait to get creating with our new kit and embellishments!
I've created two layouts to share with you for today's reveal, here's the first one....

"Fun In The Sun Shine"

Wow! 
Its no secret that I love playing with color, but the Summer brights in the new 6 x 6 Shine Paper Stack truly called to me! So gorgeous! 
I mounted my sweet photograph onto the rainbow stripe 6 x 4 card from the kit, and then created the other layers with the Shine Paper Pack. I also embellished my photo with some of the Die Cuts. 

I've also used a color block trim down the sides of my page, incorporating the 3 x 4 cards, Labels, Die Cuts, Let's Relax Stamp, and a few embellishments from our Noteworthy collection. 
Here's a close up....


How fabulous are the Let's Relax Stamps?!!! LOVING them! 
They are seriously Cool with a capital C!

Let's take a closer look at the rest of my page.....


Just look at that title!!!
I've combined the Fun In The Sun Hello Happy Puffy Words with that colorful Shine Acrylic, and I've trailed the Bright Hand Drawn Acrylic Hearts through the center of it all! 
It's so impressive!   
Loving the addition of the sun Die Cut and the fussy cut clouds! Super fun and playful! 


Gor-jus!!!

For my second layout, I have gone for a cooler color scheme and created an 8.5 x 11 layout....

"Hello Summer"


OH! I love this! 
I have been so inspired by our pocket page team members, that I couldn't resist giving it a go - AJ style!
 I machine stitched that divine 6 x 4 mint chevron card onto my cardstock base, to create an instant pocket! I've filled it with stamped & journalled cards about this special moment and our Summer memories....


Love!
And how good is that Summer Vibes stamping?! 
I said it before, and I'll say it again, the Let's Relax Stamp set is fabulous! 
And speaking of fabulous, the Summer Wood Veneer Frames are just amazing! 
The warmth of the veneer adds balance to this otherwise cool page. 
I have positioned my Hello Summer frame onto the front of the pocket, to ensure it makes my photo the feature of my layout!


My subtitle (You Are Awesome) is created from the Hello Happy Puffy Words, and wraps itself around the pocket. I just adore the white on white look - so crisp! 


I embellish with Labels, Die Cuts, and yes another of the Let's Relax Stamps!
You'll also spy Puffy and Epoxy Stickers from the Noteworthy collection. 


Can't Get Enough Of This, indeed! 
June is all about documenting those Summer memories - I hope I have inspired you to do so! 


Thanks so much for stopping by today!
I'll be back a lil later in the month with more Elle's Studio inspiration!
til then ,

Happy Arty Days, 
Amanda xo 

Elle's Studio: Stashbusting the May Kit & Add-ons!


Hi Everyone! 

Today I am sharing how I use up the left overs of my Elle's Studio kits! 
Stashbust, kill your kit - call it what you want! 
The point is to use it all & be creative while we wait for our next kit to arrive!

The May Kit was an absolute stunner, and I made some truly pretty pages from it. 
But now what???
When I looked at what I had left over as a whole, there wasn't a commonality between anything!
I had a few 3 x 4 cards & one 4 x 6 card, and some Die Cuts left from the exclusive May Kit. 
I also had remnants of the Puffy Hearts & Play All Day Phrase Stickers, some of the Labels, as well as the Hazel Stamp!
 I had a bit of this and bit of that.... until I grouped everything by color!
Here's what I came up with.....

"Weekend"


How fun is this?!! 
Inspired by party banners, I decided to suspend my color blocked scraps together! 
I used some baker's twine & ink from my personal stash, but otherwise everything else is from the May Kit and Add Ons.  
Here's a closer look for you....


How did I get SO many pieces?
Lots of clever cutting from the May Kit 3x4 cards.

I used the negatives from the May Kit Die Cuts as a stencil and drew the hearts, stars and tabs on the left over 3 x 4 cards. I then fussy cut them out to reveal 'more' embellishments than I actually had on hand. 


While I had my trusty scissors handy, I also fussy cut the arrows from the 3 x 4 card that featured 5 arrows on it, as well as the left over labels. I also trimmed up the 4 x 6 card into smaller squares to matte beneath my photo. 
 I added the Play All Day Phrase Stickers to many of these embellishments, and then strung them along the twine in color blocks. 
To keep the design more cohesive, I kept the color blocks in rainbow order. 
Tip: Having analogous colors together is more orderly and pleasing on the eye!


To strengthen the color block feature, I repeat stamped the plus sign symbol from the Hazel Stamp. I stamped at varying angles to create a confetti appearance, and used coordinating inks. This stamping works beautifully with the banner design, and brings it all together!  


I position some of the Puffy Hearts onto the twine, and scatter others around the banner in their color block. 
To ensure my photo is the true hero of my layout, I place it in the center of my final banner. 


And there you have it! 
Kill your kit with a lil creative fussy cutting, stamping and color blocking! 
Hope this inspires you to use up the last of your May Kit! 

Thanks so much for visiting, 
til next time

Happy Arty Days, 
Amanda xo 


Shimmerz Paints: More New Colors FUN!


Hi Creative Friends!

Welcome back for more Shimmerz Paints inspiration! 
Today I am shining the spotlight on our gorgeous new Shimmerz colors!
These colors are perfect for documenting those Summer memories with!
  Here's what I've created with them today....

"Together"  


Oh, isn't this pretty?!! 
Gorgeous, shimmering colors & fussy cut blooms = Summer perfection! 
Loving this pretty combination!
Here's a closer look for you...


I've combined my Shimmerz colors with Dear Lizzy's Stay Colorful line and the
 Let's Go free cut file from Paper Issues. 
You'll spy Shimmerz in the following colors:


 I used these shimmering delights to create that gorgeous mixed media base......


You'll see that I start by penciling just inside where my cut file will be positioned. 
This really just guides me on where to apply the color. 
Next, I take the fabulous Limoncello and apply it around the Let's Go free cut file shape using the packaging technique. 
I smear a little of the Magenta & Going Peach Side into the Limoncello, while it's still wet. 
I love how these complimentary colors interact!
I splatter all these colors, plus Pink-O-De Mayo around the cut file shape then dry it all off before adding It's Mint To Be and Pool Me Closer. 
I just love how this turns out! 


The vibrancy and shimmer in these colors is aaaah-mazing! Love, love, LOVE!
The rest of my layout is a mix of embellishments and fussy cut flowers. 
I mount my cut file and photo onto a thick layer of cardboard to really make it pop and stand out on the page. 


I even hand stitch the cut file heart with hand colored twine! 


So, so gorgeous! 
Such a beautiful Summer moment to document too! 


My title is a Puffy Sticker from the Elle's Studio Family Fun collection. Isn't it divine?!


Just look at all that shimmery goodness !!! 


No matter which way you look at it, these new Shimmerz colors are to die for!


I hope my layout today has inspired you to try our newest Shimmerz colors! 
You can get yours in the Shimmerz Paints store HERE
& REMEMBER: Type AMANDA in the comments section of your order to receive a FREE paint! 
Yay for freebies! 

Thanks so much for visiting today! 
I really hope you enjoyed seeing my project! 
til next time, 

Happy Arty Days, 
Amanda xo 


Pinkfresh Studio Liquid Watercolor Blog Hop


Hi Creatives! 

Welcome to the Happy Arty Days blog! 
I am so excited to be participating in the

Pinkfresh Studio Liquid Watercolor Blog Hop

Yay!


These colors are simply divine!
So vibrant and intense!

Like all the fabulous Blog Hops with Pinkfresh Studio there are a few awesome giveaways!

Pinkfresh Studio are giving away 1 set of Liquid Watercolors on their Blog, Facebook & Instagram.
PLUS
Every blog in the hop line up is also giving away a $25 gift card! 


How awesome are those prizes?!!

As per usual with blog hops, the winners will be randomly selected from the comments on each blog.
Winners will be posted on May 10th on the Pinkfresh Studio GIVEAWAY PAGE here, and it is your responsibility to check the page and claim your prize within 2 weeks.
***Be sure to leave a comment on every blog to go in the draw to win***

Now, onto the good stuff!

Here's what I've created with the Liquid Watercolors for today's hop.....


His & Hers double page layout that is designed to work as individual layouts too!

Wow! Aren't they sensational?!! 
Told you the colors are divine!

Let's take a better look at each individual layout....


Stunning color!!!
I have used the gorgeous Key Lime, Sunshine, Emerald City, Aquamarine & Sapphire colors for this layout. 
Here's a better look at that background.....


So vibrant! 
To recreate this background, use the wet on wet technique. 
Simply apply a generous amount of water where you wish to have color. Using the dropper from the Pinkfresh Studio colors, add one droplet at a time to the water. It will create 'rings' and begin to swirl and react with the water. When using more than one color, be sure to add analogous colors to avoid a muddy brown result. 
Once dry, I also add quite a few paint brush splatters using undiluted 'pure' color. 

I also paint a few white card scraps in the coordinating colors. 
Once dry, I used an old border punch to create the pretty trim...


I can't even! The color intensity speaks for itself!
I also used the hand colored trim beneath my photographs too.....


So gorgeous, huh?!
I've featured the stunning Let Your Heart Decide collection to compliment the photos and that background! Perfect!!!


Love, love, love!


Next is my super star girly page.....


W.O.W!!!
So magic, indeed!

Just like the previous layout, I have used the wet on wet technique to achieve this incredible background.....


I used the colors Bubblegum, Sapphire, Aquamarine & Lavender to achieve this look.
Once dry, I get a lil inky with the Escape The Ordinary Stamp set......


Such a fun background! 
Pinkfresh Studio stamps are always a joy to play with!
In keeping with my previous layout, I also create the border punch trim pieces & position beneath my photo. This creates a sense of unity between the two pages despite being so very different. 


Those punched trims are really pretty! 
What a fun way to bring an old tool back to life! 


All the embellishments for this layout are from our The Mix No.2 collection, and as you can see, they are so versatile and work perfectly with these pop colors! 


Loving all the star elements here!


SO magic, SO awesome!!!

I absolutely LOVE the new Liquid Watercolors!
If  you NEED these pretties NOW visit the Pinkfresh Studio shop today - there are 2 ways to purchase....
Option 1 - Purchase colors individually at full retail price of $6.00 USD + shipping
Option 2 - Purchase the full set of 12 colors & receive 10% discount +shipping

Please Note: watercolors will start shipping on June 15th, 2018

Don't forget to leave a comment on my post to go in the draw to win the $25 gift card too! 

Time to send you hopping! 
These talented creatives have some Aaaaaah-mazing projects to share with you! 

Here's the full line up & link list for you.....


<!-- end InLinkz script →

Thanks so much for visiting today! 
I really hope I have inspired you to try these amazing new Liquid Watercolors!

til next time, 

Happy Arty Days, 
Amanda xo