Cocoa Vanilla Studio: Sweet Thing Layout!


Hi Friends! 

Welcome back for more Cocoa Vanilla Studio inspiration!
For today's Design Team post, I am sharing a super pretty stamped layout with the lovely  MORE THAN WORDS collection....

"Sweet Thing"


Oh my heart! Sweet thing, indeed!
So many beautiful details to this pretty page of my darling girl! And who said old couldn't be made new again?! I am LOVING creating with this soft and romantic collection again!

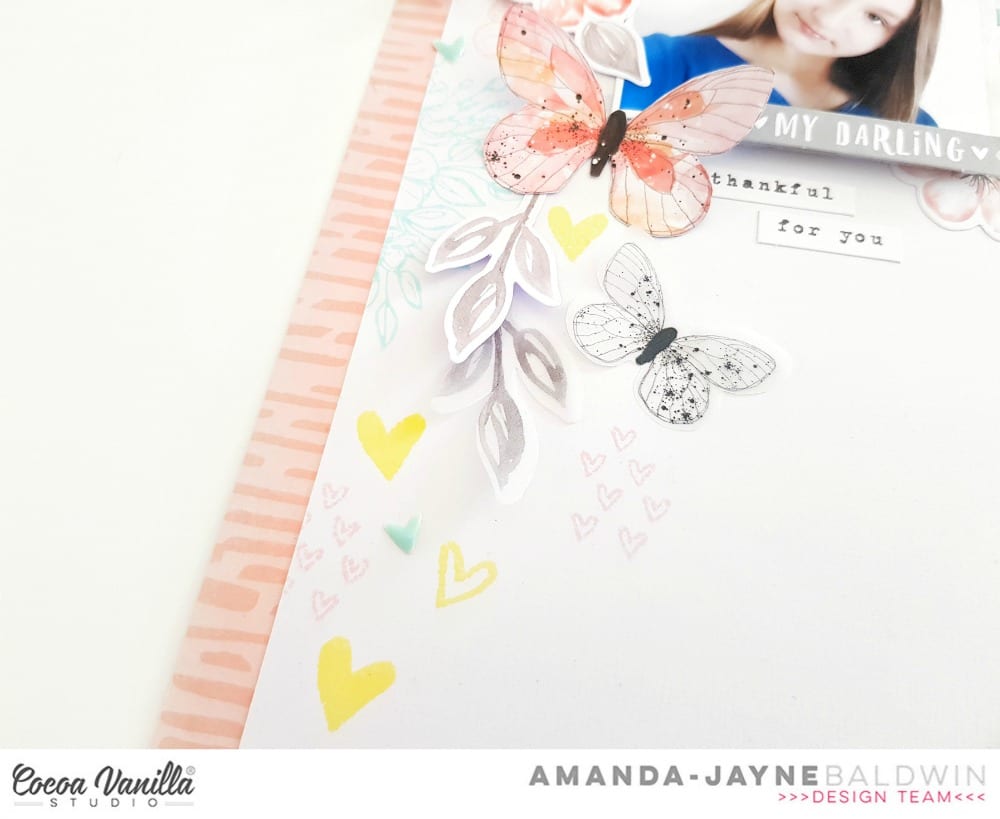
To begin, I trim one inch off the side of my 12 inch white cardstock, so that I can layer it onto the reverse side of pattern paper, CV-MT009 SKETCHBOOK. I just love the soft peach tone of this pattern paper, and it frames my layout beautifully! Next, I stamp up the top left and bottom right corners of my cardstock base with the amazing MORE THAN WORDS CLEAR STAMP. To maintain a soft and delicate look, I use a mix of soft blue, pink and yellow inks. So pretty!!! That stamp is all kinds of wonderful!

Here's a closer look....


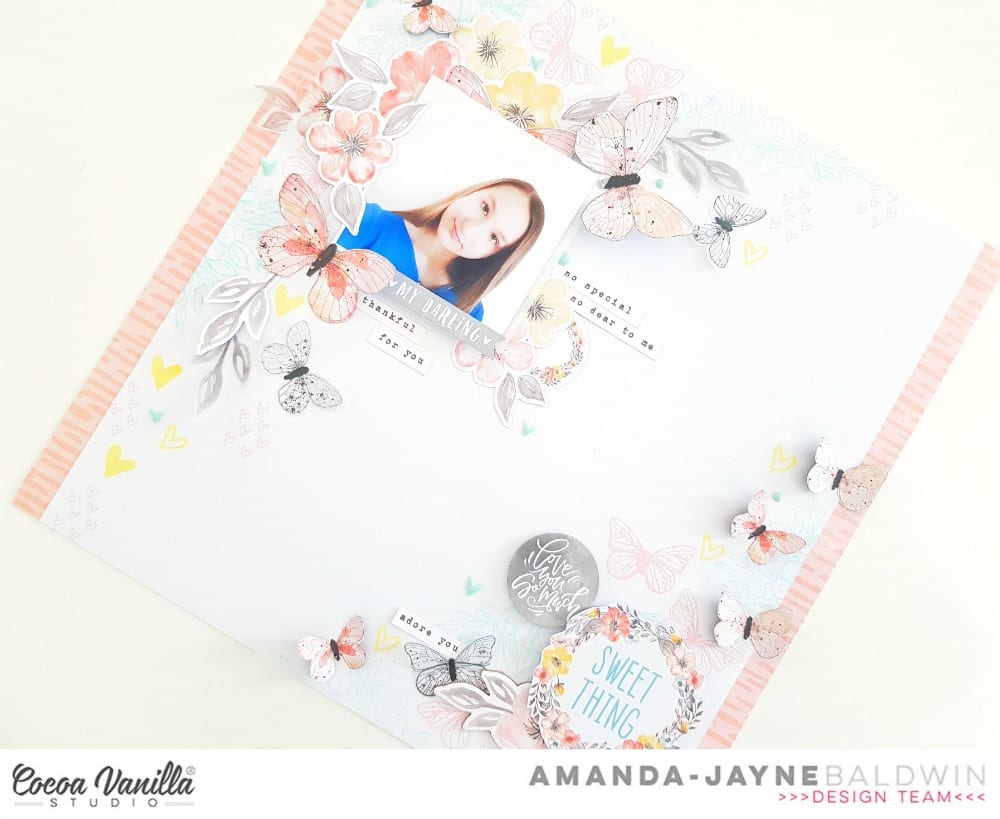
The stamped base really breaks up the white space, and adds that 'extra' point of interest to the main embellishment clusters.
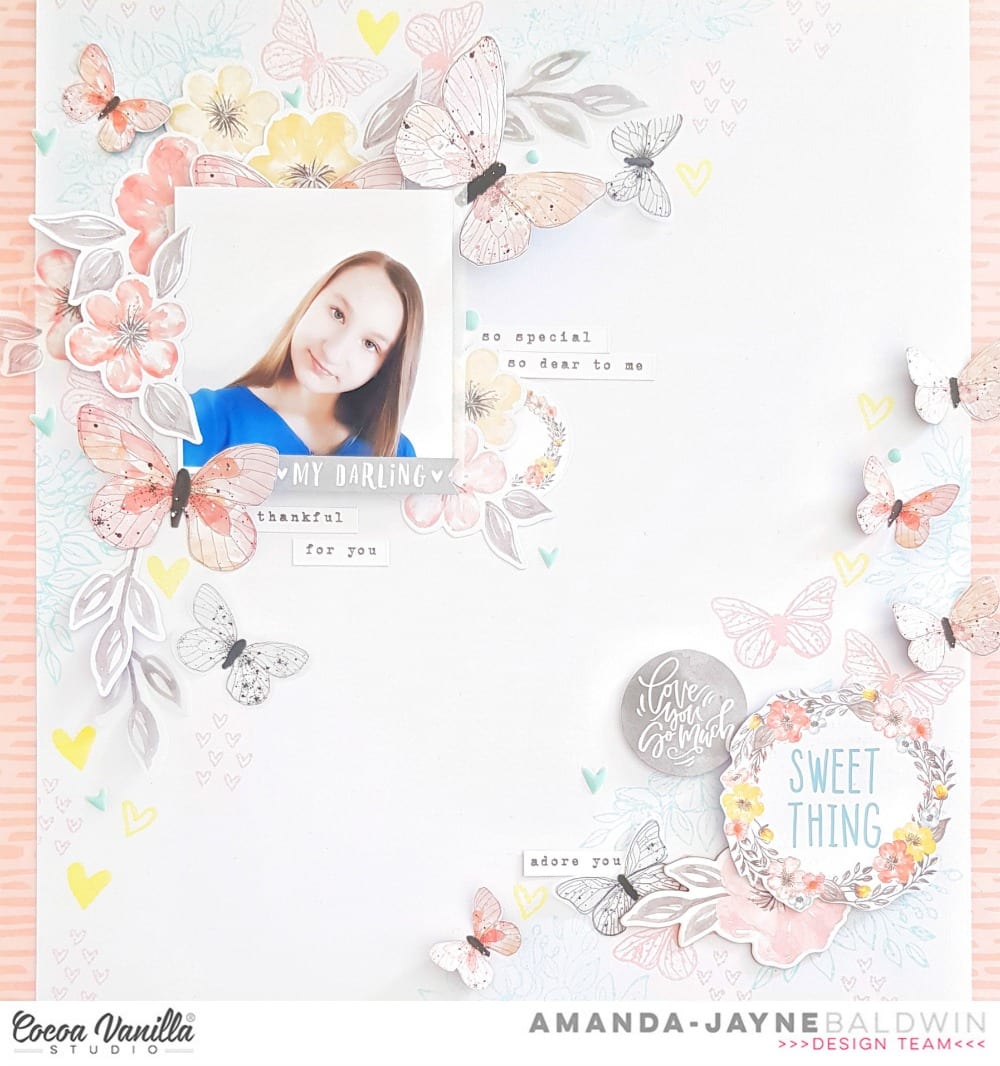
Next, I create a layer of DIE CUT EPHEMERA blooms, and fussy cut butterflies from pattern papers CV-MT003 GOSSAMER and CV-MT006 TREASURE in the top left corner. Onto this bed of blooms, I position my sweet girl's photo, which I have backed with a small piece of white tissue paper. I embellish her photo with the sentiment, "My Darling" from the DIE CUT EPHEMERA pack. I tuck a few more DIE CUT EPHEMERA blooms beneath my photo, as well as the wreath sticker from the ACCESSORY STICKERS sheet.
Here's more detailed look for you....


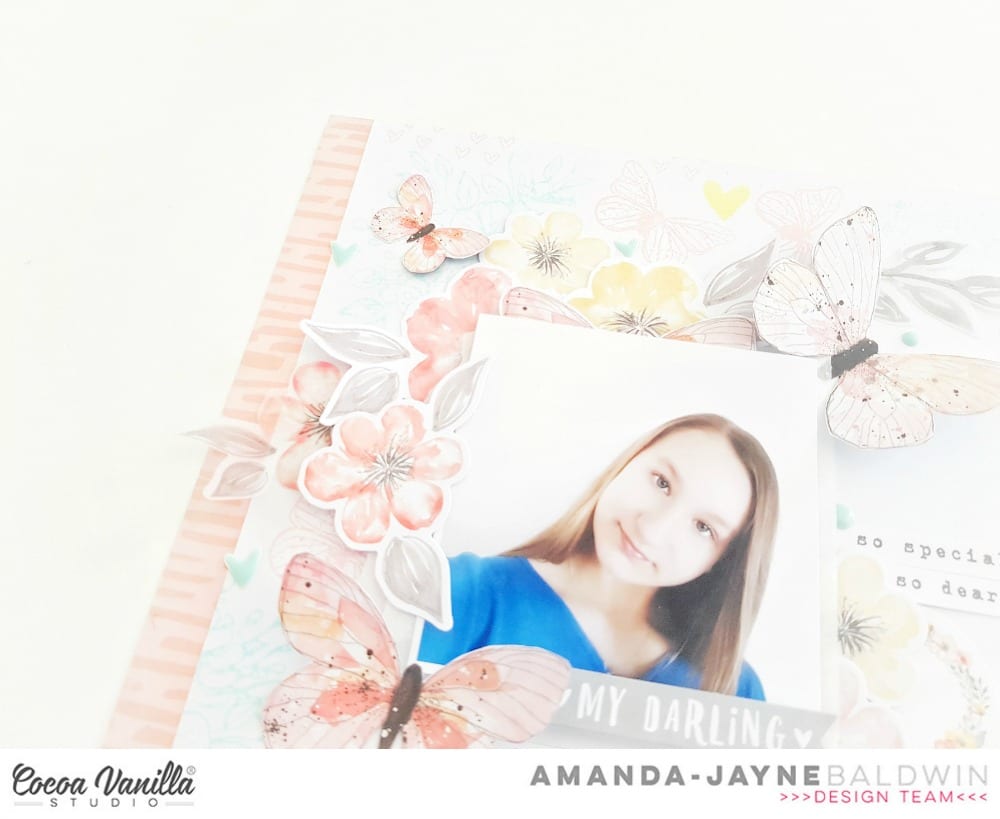
Aren't those layered embellishments the best?!
 I just adore how the blooms and fussy cut butterflies draw further attention to my cherished photograph! To complete the photo cluster, I add a few VELLUM ACCENTS butterflies, a scattering of ENAMEL hearts & dots, and some journaling with the typewriter font ACCESSORY STICKERS.


Beautiful!
For the lower right corner of my layout design, I embellish with a larger bloom CHIPBOARD STICKER, and the Sweet Thing fussy cut wreath from pattern paper, CV-MT006 TREASURE....


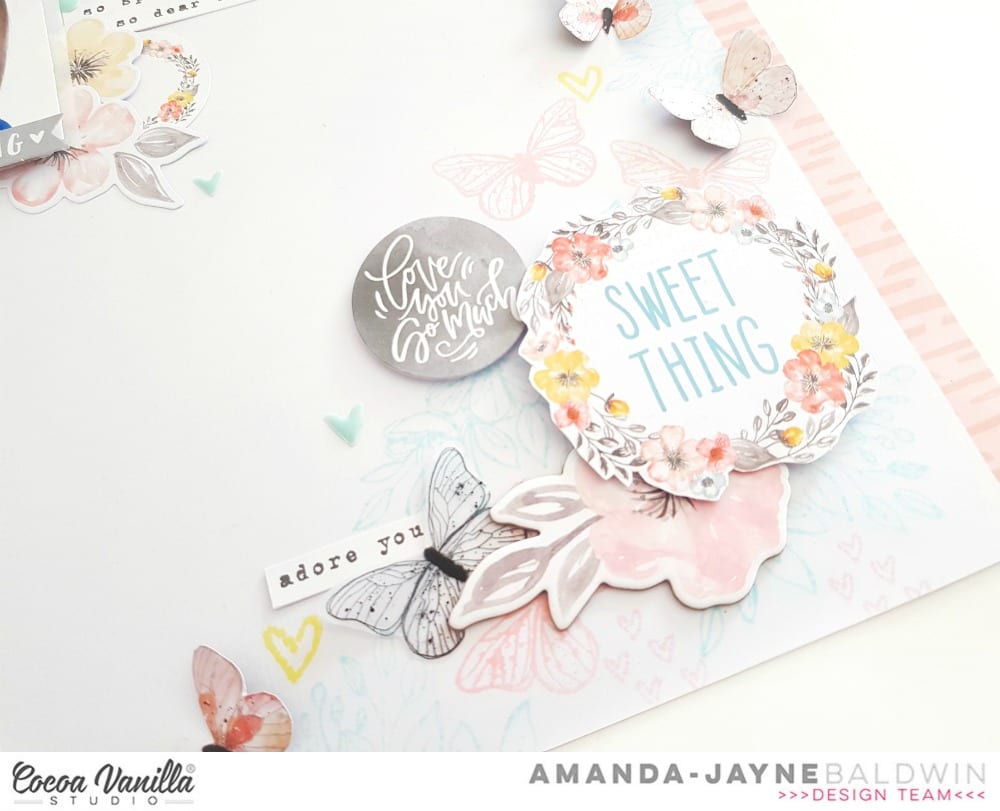
I tuck a VELLUM butterfly under the CHIPBOARD STICKER bloom, and add a few more of the fussy cut butterflies from the CV-MT003 GOSSAMER paper. I add in an extra typewriter font sentiment with more of the ACCESSORY STICKERS, & while I have these stickers out, I also use the fabulous "love you so much" circular sticker for an added point of interest.


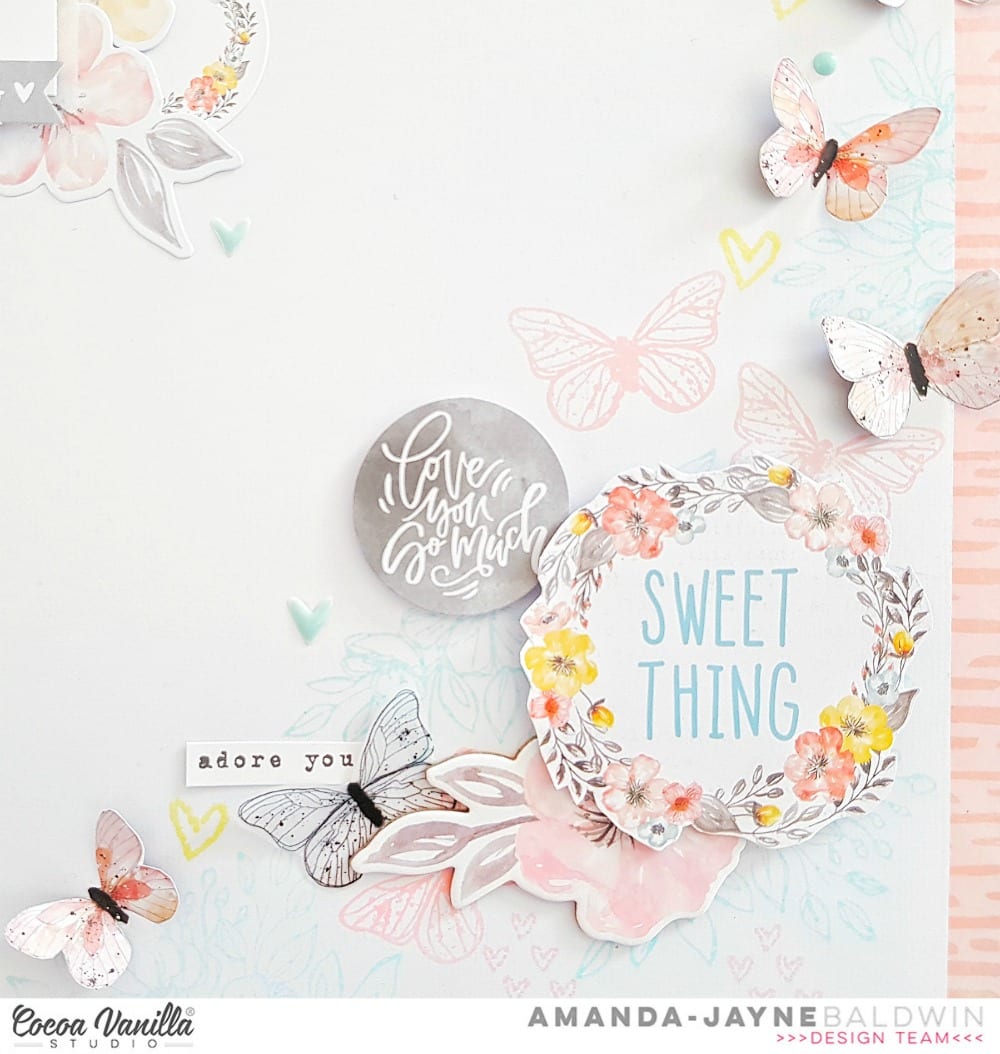
For finishing touches, I apply more of the ENAMEL hearts and dots.
Voila!
Simple, Elegant & Oh So Beautiful creating! I just LOVE how this turned out!
I hope I have inspired you to get creating with your Cocoa  Vanilla Studio supplies!

Thanks so much for joining me today,
til next time,
Happy Arty Days,
Amanda xo 

Technique Tuesday: August Memory Keepers & Fresh Cut Studio


Hi Friends! 

Welcome back for more stamp-endous fun with the
August Memory Keepers & Fresh Cut Studio new release from 


This month's featured stamp - The Story


How awesome is this?! 
Such a terrific stamp for all types of memory keeping - think pocket pages, TN pages, memory planners & more!

And let's not forget this month's featured die - Small Numbers Crafting Dies

Small Numbers Crafting Dies

How cute 'n' fun!

Here's what Technique Tuesday have to say about this fabulous crafting bundle...

 "The Story stamp set and Small Numbers crafting die bundle will help you get that documentation on your page layouts. List details of pictures using the prompts who, what, when, where and why from the journaling stamp set with numbers from the set of dies. You can add dates beside your photos using the small circle dies with numbers inside them. With two different sets of journaling line stamps you can keep your story brief or tell the entire tale.
If you like making bullet journals, this set of stamps and dies for making lists will give you tiny number dies and line stamps to create those lists. And this versatile stamp and die combo for journaling would also be terrific for documenting adventures in a travel notebook. Remember...it's important to tell your stories!"

Now I know you're probably thinking I'd use these items to make a few pages for my CTK Life Crafted Album or Traveler's Notebooks, but I wanted to demonstrate the versatility of these products, and make them work for my style -
 so I opted for a 12 x 12 scrapbook layout!

Here's what I created...

"Here Is The Story"


Oh.Em.Gee! How amazing is this?!!
Such a different look for these stamps & dies, and yet oh-so effective!
Here's a better look.....


Yep. Pure Awesome!!!
I've combined these stamps and dies with the Pinkfresh Studio Just A Lil Lovely collection & Liquid Watercolors in Sapphire, Aquamarine & Sky Blue. Such a terrific combination!


I stamped The Story ruled lines stamp beneath the pattern paper banner strips in a mid-blue ink, to add emphasis and interest to my photo cluster. I love the alternative use of this stamp - so cool! 


In the top section of my layout, I repeat stamped the stars, and numerals from The Story stamp in varying shades of blue ink. I love how it looks over the Pinkfresh Studio Liquid Watercolor base! SO good!


I used black ink for the title and journaling on the page, as well as the arrow icons. I found the black ink to be more striking and ensured my sentiments didn't get lost amongst the rest of the mixed media base. 


For the Small Numbers Crafting Dies, I used a mix of both smooth white cardstock & cork. I cut the plain 'spot' die in white card, and foam mounted these spots throughout the page for added interest and dimension. I featured the cork numbers around my photos to bring order and sequence to my photo cluster & journal spots. 

Bold, striking and oh-so Cool!!!

Simple creating made awesome with the August Memory Keepers & Fresh Cut Studio products from Technique Tuesday.


Thanks so much for visiting, 
til next time, 

Citrus Twist Kits: August Life Crafted Kit & Album


Hi Friends!

Welcome back for my final Design Team post for Citrus Twist Kits! 
I have had such an amazing 14 months designing for CTK, and wish Trina and the team all the very best for the future! 
Citrus Twist Kits will always hold a special place in my heart!

For today's post, I am sharing some more August Life Crafted: Chasing Rainbows Kit inspiration!
If you missed my scrapbook layout post earlier this month, you can go back and check it out HERE.

For today's post,  I am totally focusing on documenting the everyday stories in my Life Crafted Album. Nothing fancy or time consuming - just simple, beautiful everyday moments recorded!

Here's what I have created with the Chasing Rainbows Kit....

"This Kid"


How sweet is this?!
I've been going to scrap these photos for sometime now, but never really found the right collection to do it with. Until now! The designs on the exclusive pattern papers are similar to the one on my son's shirt, and partner perfectly! The cool blues & teal with the white base create such a refreshing, and modern look. A light & fun color palette for Summer pages. Love it! 
Here's how these pages look in my Life Crafted Album.....


To add emphasis to my photographs, I layered both of them on 3 x 4 note cards, and kept embellishments to a minimum. You'll spy a few tabs and hearts, and of course, those incredible printed cork stickers. The cork adds a touch of warmth & balance, and connects the color photograph to both pages. 
I used the vellum tape stickers for a tiny spot of journaling, and finished with the Turquoise Puffy Alphabet Stickers title.


Simple, but so effective! 

Next up, I created a page for my darling daughter, using some of the gorgeous florals in this month's kit....


Sigh! SO pretty! 
Another really simple design that only takes a minute to create. 
Here's how.....
Simply trim the pink floral pattern paper to 5" x 8". 
Adhere the 3" x 8" bookmark onto the pink floral paper, about half an inch from the left hand side. 


Next, back your photograph onto the yellow bloom 3" x 4" note card, and mount it to the bookmark with thick foam tape. 
Embellish with an acrylic heart, sentiment from the Digital Printable Cutapart Sheet, and that awesome Printed Cork adornment. 


Voila! 
Super pretty & with minimum fuss!
The Life Crafted Kits make memory keeping a breeze, especially for those of us who are time poor! 
Here's another double pager from my Life Crafted Album, recording the simple things in life....


Life's little pleasures, indeed! I absolutely LOVE the colors in this month's kit! So much variety, and a perfect mix of Summer blending into Fall! 


For the page on the left, I have used a 5" x 8" sheet of smooth white cardstock and layered it with note cards. I used the acetate ephemera for my title at the base of my page, and then embellished with printed cork, a chipboard sticker, and a vellum tape sentiment. 
For the page on the right, I  opted for a pattern paper base, which I mostly covered with smooth white cardstock. I oversized the bloom pattern tag from the Digital Printable Cutapart Sheet, & created a book mark to layer my photograph and embellishments onto. 
Here's a closer look for you.....


Such a simple, but oh so pretty page! 
And there you have it! 
Daily documenting made super easy, and really beautiful with the Life Crafted Kits & Albums!
I hope I have inspired you to dive into your kits, and start documenting those important everyday stories! 

Thanks so much for visiting, 
and for sharing my CTK journey (& joy!) with me! 


Technique Tuesday: August Guest Designer: Travel & Adventure Classic Products


Hi Friends!

Welcome back to the Happy Arty Days blog! 
I am super excited to be a Guest Designer this month for....


Yayyy!!! What an amazing opportunity! 
So honored to be creating for this fabulous company!
If you aren't familiar with their products, you can  see them all HERE
Soooooooo many incredible stamps, dies & memory keeping supplies! 

For today's post,  I am showcasing the Travel Buddy Clear Stamps which are currently available in a discounted bundle set with the Captions & Labels Crafting Dies. 
Here's a look at that amazing stamp set...


Awesome!!! 
Perfect for documenting all your travels & adventures! 

PLUS.....

There's a special FREE shipping offer!*

*From now through til Thursday 22nd August at midnight PDT, you can get free shipping on all the products in the Travel and Recreation section of the Technique Tuesday website (this includes the Travel Buddy stamp I'm featuring today - yay!).
If you already subscribe to the Technique Tuesday newsletters, they sent you the coupon code on Sunday 18th August. 
Not a subscriber, but want in on this special offer?
 Click HERE to sign up for their newsletters and they will send a coupon code to you right away!

Here's what I created with the Travel Buddy Clear Stamps....

"Enjoy The Journey"


Whoa!!!
Such an awesome adventure page!
I have combined the Technique Tuesday Travel Buddy Stamps with the Pinkfresh Studio: Out & About travel collection to create this layout. The two partner perfectly together and make for one amazing boy-gone-wild page!  
I've used the Travel Buddy Clear Stamps to create a super cool feature background, as well as to adorn my photo!
Here's a better look for you.....


You'll spy that I stamped all the images onto white cardstock in a variety of green & blue inks. I then cut them out with the coordinating cuts, and positioned them into vertical rows on my page. To secure them to my layout, I machine stitched each row of stamped images. 
Next, I embellished each row with a mix of the Out & About embellishments and or, more stamped images from the Travel Buddy Clear Stamps. 


I just LOVE how effective this looks! 
I lifted the edges of the Going Places globes which formed a wing like effect and added dimension & a lil more interest to them. For more dimension, I also attached some of the single stamped images with thick foam tape. 


I just adore that, It's A Big World stamp, and had to feature it on my photo cluster! I also tucked a couple other stamped images into the photo layers for good measure. SO cool!  


And there you have it! 
Simple, fun creating that looks amazing!
I hope my first Guest Designer post for Technique Tuesday has inspired you to get a lil inky today!

Thanks so much for visiting, 
til next time, 


Elle's Studio: August Kit is #1 BEST!


Hi Friends! 

Welcome back for more Elle's Studio inspiration! 
Today I am sharing another layout created with the fabulous August Kit & new release items! 
There are SO many awesome new elements & add ons to this month's kit, that I challenged myself to incorporate most of them into my layout! 

Here's what I created with them, 

"#BEST" 


Other: Blue & teal stamping ink, white tissue wrap.

Whoa! What a fun school themed page! 
It may not be 'back to school' in Australia where I live, but this theme in the August Kit works perfectly for any school occasion. Really versatile, and ideal for my sweet boy's photos. 
I started my layout with the Noteworthy repeat print 12" paper, and 1 1/2" strips of the Sunshine 6 x 6  Paper Stack. I butted these two strips together on the left hand side to create a feature point and anchor for my design. 


Next, I stamped up a mix of blue & teal stars with the Back To School Stamp. I used both types of stars, and positioned them to the right of the Sunshine paper strips. As I had planned to only use the left hand side of my page, I was to careful to avoid stamping further than the center of the page. 
I love the pop of color the stars add to the background! 

Design Tip: The use of tiny stamped icons, and or shapes, is a great alternative to enamel dots or sequins, especially for masculine pages.


The next step in creating my layout was to form the photo clusters & layers. For this, I used a mix of 3" x 4" journal cards & die cuts from the August Kit, 3" x 4" cuts from the Sunshine 6 x 6 Paper Stack papers, and the Back to School Puffy Stickers. The pencils and book stack embellishments were fussy cut from the note cards included in the Kit. At the base of the photo layers, I added a torn sheet of tissue wrap, followed by some foam tape. This added both texture & dimension to the clusters.  


To unify the two photo clusters, I used one of the Makes Me Smile Cork Circles as focal embellishment between them. This draws attention to both photos, and in turn, connects the images. 


You'll also spy the Notebook Puffy Alphabet Stickers travelling down left side of both clusters too. The use of A,B,C 1,2,3 is not only a fun way to incorporate more of the school theme, but it also an orderly pattern that subtly encourages further connection between both photos. 


For a finished look, I stamped the #1 from the Back to School Stamp and followed it with the # BEST acrylic from the Title Builder Vol.3 Acrylic set. 

And there you have it! 
A really effective looking layout from such a relatively simple design! 
I hope I have inspired you to get creating with the fabulous Elle's Studio August Kit and new releases today!

Thanks so much for visiting!
til next time, 


Shimmerz Paints: August Color Kitz Inspiration & Process Video!


Hi Shimmerz Friends & Fans!

Amanda here, & today I am sharing a lil inspiration 
(complete with process video) 
with our gorgeous August Color Kitz!


This month's Color Kitz is absolutely stunning! 
Such pretty colors! &  just check out that exclusive ice cream cut file!!!
Colorz featured are:

 Vibez Hermit the Frog
Coloringz Heidi Ho Blue
Inklingz Sunkissed
Shimmerz Pink

Plus Sprinkle Time! sequins from our friends at SpiegelMomScraps.

If you're super quick, you *might* be able to snare one still before they completely sell out!


I couldn't wait to get creating with this beautiful kit! 
Here's what I came up with.....

"Bloom & Grow"


Oh my heart! Isn't this so pretty!
And before you ask about the ice cream cut file, let me tell you that my moody cutting machine ate every single one of those ice cream cones! I know, right?! So frustrating!
On the upside, digital files keep forever, & I'll try cutting it again after I've updated my software, lol!
I've also opted for a 'clean look' mixed media page - lots of controlled painting for this sweet page!
Here's a closer look at my layout.... 

Whoa! So.much.pretty!!!
Turns out you don't have to use the cut file to maximize the awesomeness of this kit! 

I began my layout by painting a bunch of blooms and leaves from the Cocoa Vanilla Studio "Sophisticated" pattern paper (Midnight collection) using ALL the colors! 
Where's the Heidi Ho Blue, I hear you ask? 
Well, to create those darker green leaves I mixed Coloringz Heidi Ho Blue with Vibez Hermit the Frog - so you kinda get a bonus 'extra' color in your kit ;)
Once dry, I fussy cut all the florals and arranged onto the 12 x 12 white cardstock base.


Next, I sprayed some scrap paper with pure Coloringz Heidi Ho Blue. 
With this newly created blue paper, I punched a few butterflies, and even backed it to my photograph for added interest. 
In keeping with the butterfly adornments, I just couldn't resist using the beautiful


Aren't they the perfect embellishment?! 
You can shop them HERE

Here's a closer look at them on my layout....


Beauties, indeed! 
The pretty yellow & lime butterfly coordinates perfectly with the Vibez Hermit the Frog painted leaves. Love it!


For finishing touches, I add my title Bloom & Grow also from the Cocoa Vanilla Studio Midnight collection, & end with scattering lots of Spinkle Time! sequins onto my page....


So many lovelies to look at!


Absolutely gorgeous!!! 
And such a 'clean' approach to using paints on your projects! 
Wanna see how it all came together?

Please watch my process video HERE


I hope you enjoyed watching my process video
& feel inspired to get creating with your August Color Kitz! 


Thanks so  much for visiting!

til next time,