Elle's Studio: Tis The Season!


Hi Friends! 

It's time to bust out the Michael Buble music as "It's beginning to look a lot like Christmas!"
 I am so excited to be preparing for the Season of Giving! 
I just love the Holidays, and the new Elle's Studio 6 x 6 Paper Stack - 'Tis The Season is perfect for documenting all our stories with! 


Whether you trim this paper into pocket size note cards, create greeting cards, include it in your Document December albums, or even craft some Holiday decor, this paper pack is simply the best! 
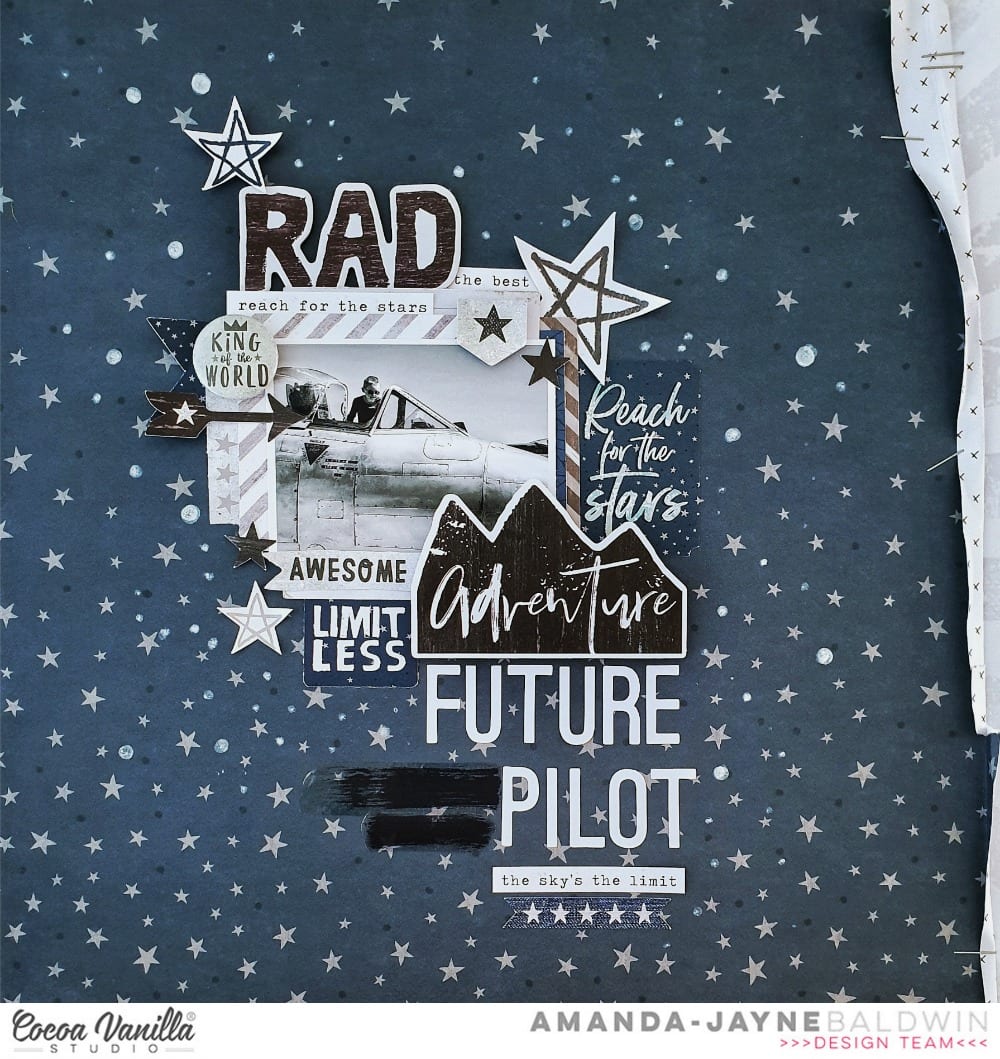
I used the 'Tis The Season papers for documenting my son's visit to see the Jolly Ole Elf himself! 

Here's my layout, 

"Merry & Bright" 

Ho! Ho! Ho! What could be merrier?! Such a cute photo! 

Other Supplies: Red Stamping Ink, SpiegelMom Scraps Red Rapture Sequins, White Tissue Paper. 

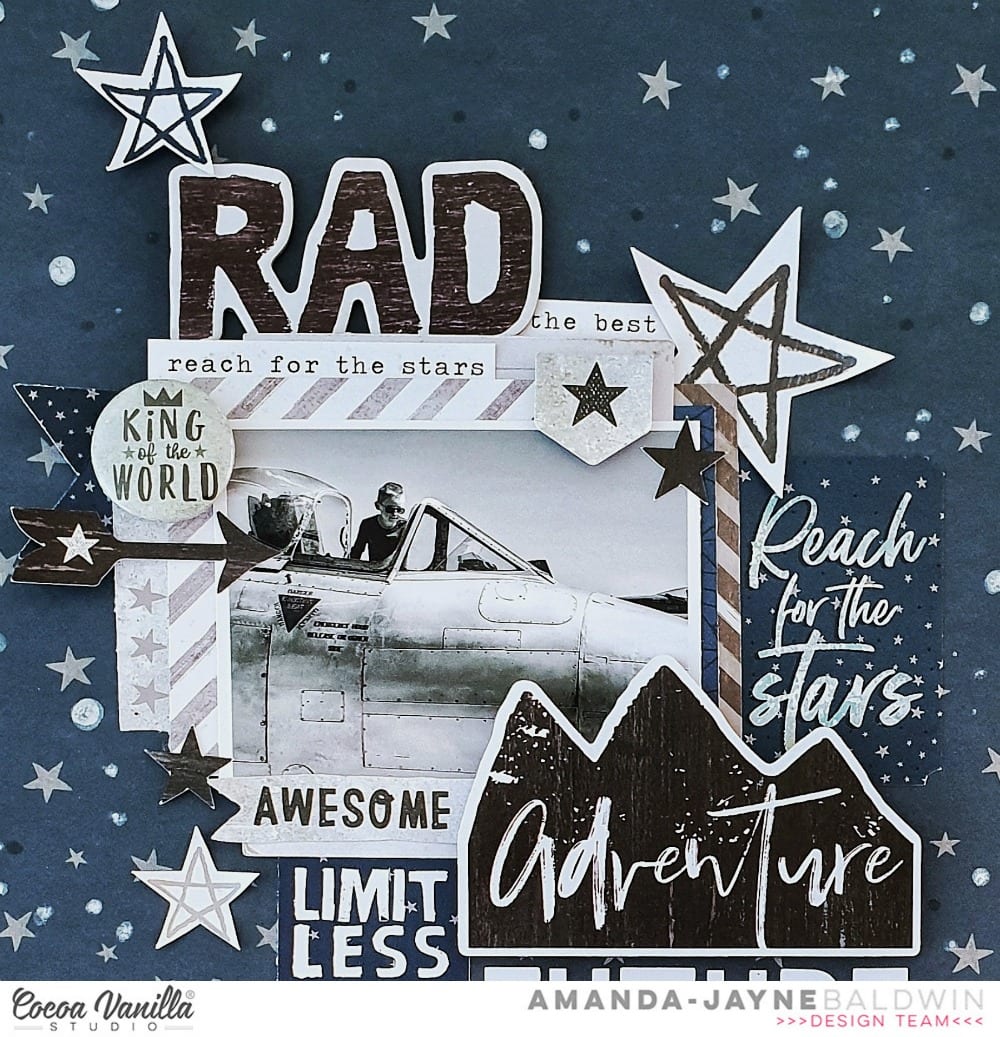
Let's take a closer look at my sweet Santa scrapbook page!


So adorable! And just look at all those pretty papers! 
So many gorgeous designs! 
It's well known that I like to maximize the 6 x 6 Paper Stack papers for 12 x 12 scrapbook pages, & for today's post, I really wanted to share my top 5 ideas on how to do this! 


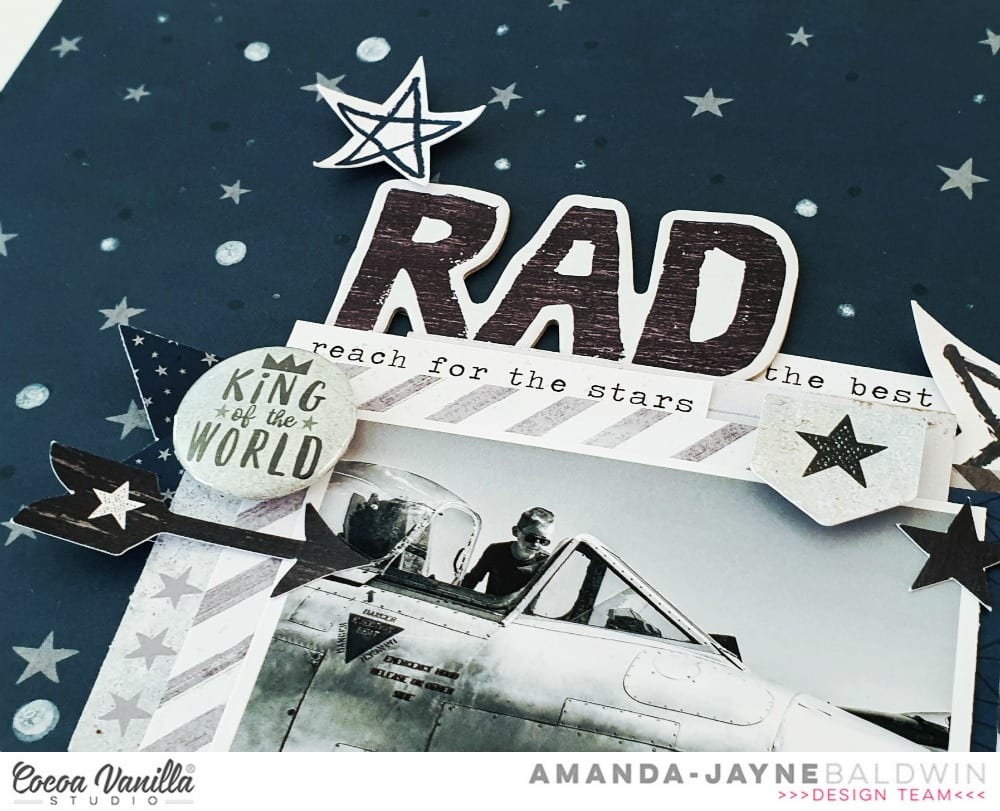
1. Use the bold pattern paper designs to matte your photographs onto! 
I always print my photos with a white border and tend to forget how important that pop of color is. A striking base for your photo/s will really direct your eye and draw attention to your most important part of the layout! That red beneath my photo is just stunning!!!


2. Create paper layers to mount your photograph onto!
Layered papers create texture, give shape &  add visual interest. They also give us the opportunity to mix and match colors and designs, adding greater elements to the overall design. You'll notice that I even add some white tissue wrap in between my paper layers to add further emphasis & interest to my pattern paper cluster!


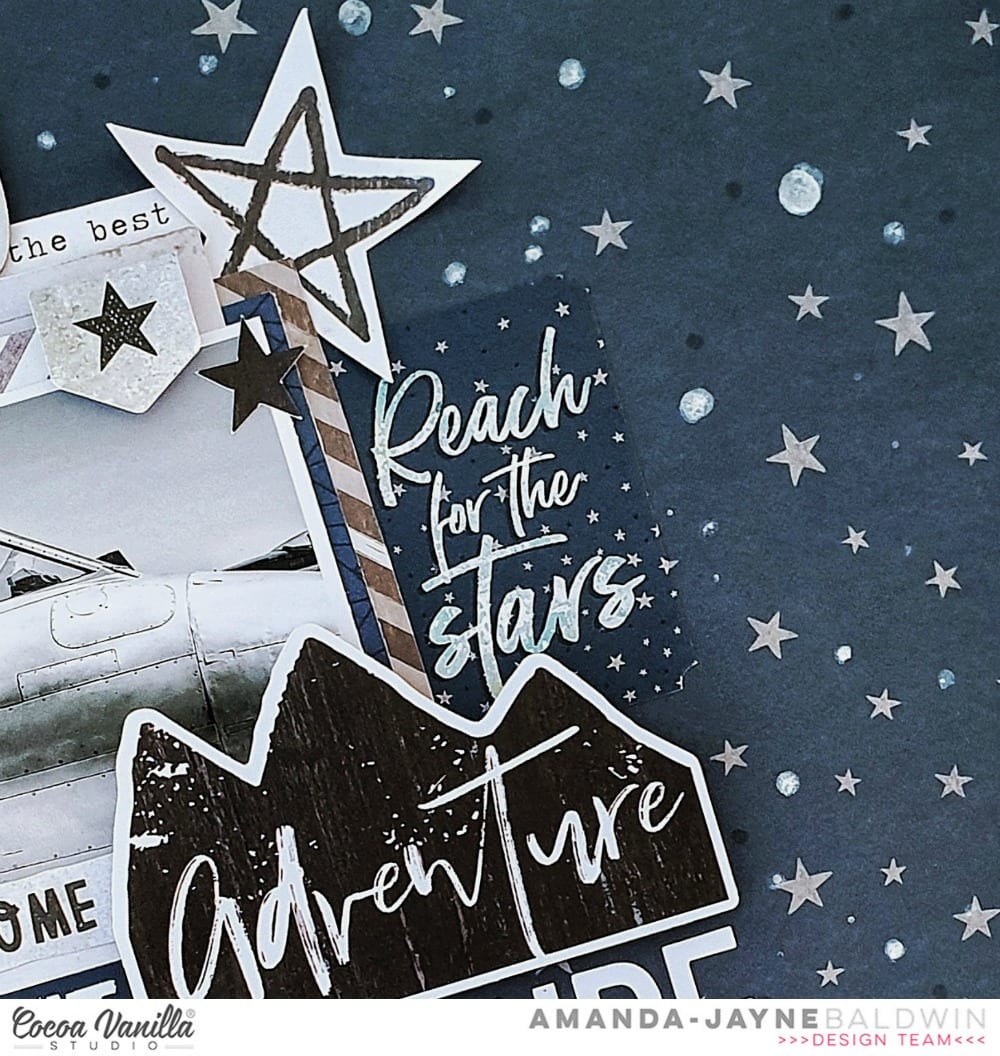
3. Pull out your punches, or favorite fussy cutting scissors, for some fun pattern paper shapes!
Think rows of pattern paper circles stitched together, concentric paper hearts or in today's example, layered dovetail banners! A really simple, but oh so effective, way to incorporate 6 x 6 papers into our projects!


4. Be an illusionist!
Create the impression of larger papers with careful cuts and clever paper placement! I did this two ways with the dovetail banners in my layout. 
Firstly, for the striped and wider looking banner, I diagonally cut the 6 x 6 paper from the top right corner to the bottom left corner. I then re-arranged the two cut triangles so that the longest lengths were vertical, and on opposite sides from one another. Next I overlapped one of the triangles over the other and taped it into place. You can't see the taped join because it's all hidden behind my photo cluster!  So cool! 
Secondly, I cut my thinner banners through the centers so that they became two pieces which I then shortened or lengthened beneath my photograph. 
The trick is just to make sure they align correctly ;)


5. Build 'em up! 
Connect your 6 x 6 papers together to build a longer or wider piece of paper! You'll see that I joined two sheets of the typed 'tis the season pattern paper to create a 6 x 12 sheet of paper. I also butted strips of papers together which I then tucked under the folded edge of the 6 x 12 paper. So clever! 

That's just a few of my fave ways to incorporate the smaller pattern papers into my creating. 
I hope it gives you some inspiration and ideas for the latest 6 inch 'Tis The Season Paper Stack.
How do you like to use your Elle's Studio 6 x 6 Paper Stack papers? 
Be sure to share your tips and creations with me in the Elle's Studio Facebook Group HERE. 

Thanks so much for stopping by today!
til next time, 


Shimmerz Paints: December Color Kitz!


Hi Friends! 
 I'm so super excited to be sharing more Shimmerz Paints inspiration with the brand new December Color Kitz! 
This month's kits are just stunning and look like this....


All the cozy Christmas feels with the new "Farmhouse December Color Kitz".
 This kit includes the following:
1 1oz bottle of Snow Storm Vibez
1 jar of Wed Wagon Shimmerz
1 jar of Run! Forest Shimmerz
1 package of exclusive Dotz "Cozy Christmas"
1 jar of Gold Glimmer Blingz


Make this season the sweetest ever with "The Sweet December Color Kit"


This Kit includes the following:
1 1 oz bottle of Frost Bite Vibez
1 jar of Pip-Pip Cherry-O Shimmerz
1 jar of Twinkle Twinkle Inklingz
1 package of exclusive Dotz "All I want for Christmas is You" Set
1 jar of Bubblegum Blast Shimmerz
1 exclusive Christmas Candy cut file created by Paige Taylor Evans

WOW!!! 
I'd be racing to the Shimmerz Paints store to shop these kits now - before it's too late! 
Shop both Color Kitz HERE
otz
Both kits are absolutely divine, and for today's inspiration (& process video) I am using the Sweet December Color Kit!
Here's my layout, 

"Magic of Christams"


Whoa! Isn't this pretty?!! 
Such gorgeous colors and those exclusive, All I Want For Christmas, Dotz are just the best!!!
You'll notice that I did miss using the beautiful Christmas Candy cut file (it wasn't quite available at the time I created this layout) but I did use another Paige Taylor Evans cut file from the Silhouette store. I think this different choice of cut file just demonstrates how versatile the month's colors are! So beautiful!

Let's take a closer look....


That Vibez Frost Bite blue has my heart! 
Such a stunning color to spray the cardstock base with! I also flicked this color around the layout to add more interest. Love it! 

For my cut file, I painted both the Shimmerz Bubblegum Blast and Pip Pip Cherry-o onto sheets of scrap paper. I used these pretty pink papers to fill the bow and berries. To add soft texture & dimension I foam mounted the cut file and layered it onto the super pretty Frost Bite base. This looks so effective!


The "All I Want For Christmas" Dots were too pretty to ignore, so I used all three of them on this page. Such a sweet adornment!
I also combined the Pretty Little Studio: Glitter & Ice collection with the SpiegelMom Scraps Winter Delight sequin mix for the 'scrapbook' element of the design. The Inklingz Twinkle Twinkle is the perfect amount of shimmer & shine to complete the look. 


So much pretty! 
You can see me create this pretty page over on the Shimmerz Paints channel HERE

https://youtu.be/MwROxXofLpA

Thanks so much for watching! 
I hope I have inspired you to get a lil painty today! 


And if you're adding extra paints into your cart, type AMANDA in the comments section of your store order to receive a FREE paint! Yay!!


Thanks so much for visiting! 
til next time, 


Cocoa Vanilla Studio: Boys Rule Inspiration!


Hi Friends!

Thanks so much for stopping by!
Today I am sharing a super cool  Cocoa Vanilla Studio scrapbook page with their super awesome BOYS RULE line! 
This collection is seriously cool & just rocks when it comes to scrapping the boys!  
But enough chatter, here's my scrapbook layout,

"Future Pilot"


Whoa!!! How awesome is this?! 
RAD, indeed!
I have featured the stunning CV-BR007 STAR FALL paper as my layout background, distressed & folded the right edge of this paper and stapled a trim of CV-BR009 GOOD TIMES behind it. This created a really raw, and edgy look which enhanced the masculinity of the overall design. The use of metal hardware (staples) not only attached the two papers, but also emphasized the rawness. 
Simple, but so effective!


I backed my sweet boy's photograph with a few cool layers of the MISCELLANY frames and die cuts, as well as some fussy cut labels from CV-BR006 BOY STUFF paper. To these layers, I inserted in a few ACCESSORY STICKER stars and words/phrases, and then attached this photo cluster to my page. With my focal point in place, I then tucked my CHIPBOARD PIECES title 'RAD' into the top of the photo layers.


Over my treasured photograph, I foam mounted a couple more ACCESSORY STICKERS that featured stars, plus added I that awesome 'king of the world' FLAIR BUTTON. So cool!!!


To the right side of the photo cluster, I tucked in the 'reach for the stars' ACCESSORY STICKER - both the print and the sentiment coordinated perfectly with my page design.


More ACCESSORY STICKERS are used to adorn the bottom left of my photo cluster, as well as a few die cuts. To complete the photo cluster I foam mounted & overlapped that fabulous 'adventure' CHIPBOARD PIECE. Awesome!
For my title to be noticed on such a dark paper, I dove into my COCOA VANILLA STUDIO: COLOUR ME HAPPY stash and used the plain white ALPHABET STICKERS. I embellished around my title with more of the ACCESSORY STICKERS as well as two of the brush stroke CLEAR STICKERS. A few dots of white paint completed the page.


Simple, and yet so epic!!!
Scrapping the boys is made super easy (& totally awesome) with the fabulous 
BOYS RULE collection!
Thanks so much for visiting - I hope I have inspired you to get creating today!
til next time,

Elle's Studio: More November Kit Inspiration!


Hi Friends!

Welcome back for a lil more Elle's Studio November Kit & new releases inspiration!
There is so much wonder and joy in this world, 
and for today's post I wanted to document something (and someone) that I am truly grateful for! 
With this 'thankful' theme in mind, I looked out the Elle's Studio Grateful Journaling Tags, as well as a few of the Thanksgiving inspired items in this month's kit to create my page.
Here's what I came up with....

"Love This Moment"


Oh I'm so very Grateful for this moment! 

Other Supplies: Bazzill Cardstock - Marshmallow, Staz On ink - Black, SpiegelMom Scraps Sequins- Into The Woods & That Summer Feelin'. 

Let's take a closer look at this sweet page!


Such an awesome page for my sweet boy - so very thankful for him! 
As I was creating a masculine page, I opted for a bold color scheme and an uncomplicated design. The green trim at the top of the page was created from the 6 x 6 Tis The Season Paper Stack, and matched that of the Give Thanks note card - perfect! 
To hide the join where I butted these two strips of paper together, I overlaid a strip of one of the 6 x 4 note cards in blue. The blue really popped against the forest green color and in turn, created the ideal position to anchor my photo cluster from. 
Such a fun way to use the 6 x 4 note cards if you're not a pocket page memory keeper!  


As soon as I saw the Grateful Journaling Tags, I knew I had to use one of them to mount my photo onto. However, the white tag really needed a pop of color to draw attention into my darling boy's photograph. To achieve this, I arranged a few of the 3 x 4 note cards beneath the Grateful Journaling Tag & ensured that the colorful trims were peeking beneath the tag. I foam mounted the photo cluster for some gentle dimension, and then tucked in a variety of embellishments into those note card layers. 


The circular Christmas Die Cut Labels added both shape and form to the photo cluster. I combined these labels with a few of the Tiny Holiday Blank Sticker Labels, and then tucked one the Tiny Holiday Sticker Labels (favorite view)  under my photograph. 


To complete the cluster, I added a mix of the Holiday Puffy Stickers in coordinating colors, and a couple of the die cuts from the November Kit.
The 'counting every blessing' puffy sticker is the perfect descriptor as to how I feel about this moment. So very blessed!
The stamps this month are so amazing that I had to use both of them on my layout. I started by repeat stamping the 'this was so good' phrase, as well as the tiny star from the Let's Eat Stamp.  


Next, I took the 'favorite photo' stamp from the Say Cheese Stamp set and applied it to a blue Die Cut Label - which I also stapled and foam mounted for added interest. I used the fabulous Jane Alphabet Stickers in Navy for my title, and even used a few of the asterisks from this sticker sheet too! Again, the pop of blue really adds that point of interest to the layout! 
To support the confetti-like stamped stars, I embellished with a few sequins from my SpiegelMemScraps sequins stash.  
My layout could have been completed here but, with such a cool and crisp design, I felt it needed something else.... cue the Wood Veneer Phrases! 
The wood veneer was the perfect addition. This embellishment added warmth, balance and even new texture to the page. Never under estimate the value of a good embellishment! 
Simple. Bold. Striking! 
A beautiful Thankful themed layout for my darling boy's album! 

I hope I have inspired you to get creating with this month's kit and amazing new products! 

Thanks so much for visiting today!
til next time,


Technique Tuesday: November Memory Keepers Studio


Hi Friends! 

Welcome back for more inspiration with the fabulous November edition of
Memory Keepers Stamps & Fresh Cut Studio Dies 
from 


The month of November is all about documenting those joyful birthday memories and milestones. Here's a look at this month's amazing bundle...

Scrapbook Birthday Stamp Set & Large Happy Birthday Crafting Dies


What an amazing stamp & die set! 
Here's what Technique Tuesday has to say about them...

"The cake, the presents, the party...birthdays are such fun! 
This Scrapbook Birthday stamp set with Large Happy Birthday crafting dies bundle has everything you need to create scrapbook pages for those piles of photos you have from these special events. These happy birthday stamps and dies for titles and captions can be put together to say just the right thing for your page layout. Color the open lettering in the stamps to match your project and add sparkle to die cut words with glitter paper. These big birthday stamps and dies will do dual duty when you use them on birthday cards and party favors!"

Here's what I created with this amazing set, 

"Happy Birthday"

Party time, indeed! So.much.fun!!!
Such a terrific stamp and die set for documenting those happy birthday moments! 
I couldn't resist using a lil sparkly silver glitter cardstock for the Large Happy Birthday Crafting Dies - ideal for this sweet page of my darling girl's 13th birthday! 
The Crate Paper Hooray collection and the Shimmerz Paints: Happy Birthday Dotz were a perfect match with the Scrapbook Birthday stamp set with Large Happy Birthday crafting dies too!
Let's take a closer look at my layout....


That glitter title is errrrything! And as usual the Technique Tuesday dies cut like butter! 
Super smooth and precise on every single cut! LOVE!!!

Speaking of precise, how crisp are those Scrapbook Birthday Clear Stamps?!! 
For this page, I repeat stamped quite a few of the words in a variety of inks that complimented the Hooray collection. I love how the colored inks created such fun and playful impression with the Birthday Stamps! 


The sprinkled glitter stars make a great alternative to sequins or enamel dots, and really add that finishing touch!
Awesome!!! 
I see a whole lot of birthday cards and invitations being made in my near future too! 
I hope I have inspired you to get creating with the 

Great news!
This bundle is on sale this month AND you can save even more by becoming a
Click HERE for more information. 

Thanks so much for visiting! 
til next time, 


Hip Kit Club: Beautiful FALL Layout & Process Video


Hi  Friends! 

Welcome back for more Hip Kit Club: October Kit inspiration! 
Today I am sharing a really beautiful and elegant Fall themed page featuring one of our subscriber exclusive cut files, fussy cut pieces and those amazing Vellum Die Cut Leaves from the October 2019 Main Kit. 
There are so many gorgeous papers and embellishments in this month's kits, and I just couldn't resist using quite a few of them, as well as drawing on the stunning colors that feature throughout all the kits. 
But enough chatter, let's get straight into it!

Here's my layout, 

"Beautiful FALL"

HKC_AmandaBaldwin_Nov12th_BLOG_01

Beautiful, indeed! 
Those colors are just errrything!!!  
Such a classic & elegant Fall page that not only captures the colors of the season, but also the joy it brings! I couldn't be more grateful for my two children - so very blessed! 
 Here's better view of my scrapbook page...

HKC_AmandaBaldwin_Nov12th_BLOG_03

Like the subjects in my Fall photo, the colors in this month's kits totally have my heart! 
Inspired by my treasured photograph and the very whimsical trees on pattern paper #7 from the Pink Paislee: Paige Evans Truly Grateful collection, I knew I just had to create a pink and blue Fall page. I started by fussy cutting a bunch of those gorgeous trees from paper #7 courtesy of the October 2019 Main Kit, as well as backing the Beautiful FALL cut file with the Bazzill Typhoon Cardstock from the October 2019 Cardstock Kit
While I was in a fussy cutting mood, you'll spy that I also cut along the scallop edge of Truly Grateful pattern paper #4 (also from the Main Kit), and then repeated this fussy cutting on a strip of that gorgeous Bazzill Typhoon Cardstock. 

HKC_AmandaBaldwin_Nov12th_BLOG_06

I machine stitched those two scallop trims together at the top of my Bazzill Avalanche Cardstock base, and then embellished the top left corner with HKC Exclusive Cozy Up Die Cuts from the Main Kit and Cozy Up Cardstock Stickers from the Embellishment Kit. 

HKC_AmandaBaldwin_Nov12th_BLOG_05

The bulk of my layout occurs in the second third of the page and is a myriad of those gorgeous colors, patterns and textures. I combined lots of those paper #7 trees with the similar styled HKC Exclusive Cozy Up Chipboard Stickers to create a whimsical forest appearance. I fussy cut & adhered the Pinkfresh Studio: Just A Lil Lovely: Chit Chat banners slightly below the center, and then foam mounted my darling photo over the top trim of them. 
For a striking title, I not only backed the cut file with the one dominant blue color, I also embellished it with a complementary colored chipboard sticker bow. This clever use of color really pops and brings attention to both my photo and it's title. Perfect!

HKC_AmandaBaldwin_Nov12th_BLOG_07

I trimmed each 'side' of the cut file with those stunning Pretty Little Studio: Indian Summer: Vellum Die Cut Leaves and added some machine threads and HKC Exclusive Cosy Up Chipboard Stickers to complete the look. 

HKC_AmandaBaldwin_Nov12th_BLOG_04

A really striking and BeautiFALL page! 
You can see more of this layout, including how it all came together, in my process video HERE. 
Thanks so much for watching! 
I hope I have inspired you to get creating with our amazing October Kits and Digital Cut Files! 

Til next time,


AMANDA BALDWIN-01.png

Cocoa Vanilla Studio: The Sweet Life!


Hi Friends!

Welcome back for some super pretty Cocoa Vanilla Studio: UNFORGETTABLE inspiration! 
This week the Design Team have been asked to create scrapbook pages that feature pattern paper as the background - so no white cardstock! 
We're aptly calling it 'white out' week! 
Here's what I came up with.....

"The Sweet Life" 


Sweet indeed! What a delightful page!
You'll spy that I used the beautiful woodgrain paper, CV-UF008 NATURAL BEAUTY as my background paper. However, once I started looking at all those pretty papers I just couldn't stop at one - so.much.gorgeousness! Naturally, there are lots of pretty pattern papers featured on my layout today! 
Let's take a better look....

Isn't this just gorgeous?!! 
And truly, life couldn't be any sweeter with my two darlings!

To the top of my layout, I added a one inch strip of that divine floral, CV-UF001 GLORIOUS. This paper makes me swoon every single time I lay eyes on it! Such a stunning floral design! And speaking of florals, I used that coordinating floral swag DIE CUT EPHEMERA piece to embellish the GLORIOUS trim, and act as an anchor for my title and overall design.


My large title is a digital cut file courtesy of Cut To You, and I have backed it with a few of the 6 x 8 PAPER PAD papers. 'The Sweet Life'  papers happen to be the smaller variation of the B-side designs to CV-UF003 GARLAND and CV-UF005 LACEWING. Love!!! 
The 6 x 8 PAPER PAD is the perfect choice for backing cut files with!


I embellished my larger title with a few carefully selected pieces, the first of which was my photo cluster. I tucked my photo just beneath the edge of my title and attached them together with the 'treasured' ACCESSORY STICKER. I used another sticker beneath my photo, as well as a DIE CUT EPHEMERA tab to support my photograph. 
Here's a closer look for you...


The Cocoa Vanilla Studio FLAIR BUTTONS are always amazing, and I added that sweet camera one to complete the look.


To balance my black & white photo on such a colourful page, and create that second point of interest to the title, I foam mounted that sweet DIE CUT EPHEMERA camera embellishment. Subtle, simple but so effective!


In keeping with the rule of three, and the sweet camera embellishments, I also featured the pretty black camera ACCESSORY STICKER. So cute!


The final adornment to that big title is the fussy cut the florals from pattern paper, CV-UF003 GARLAND. I foam mounted them just below the title, and ensured that they reflected the swag at the top of the page too. This really added that wow factor to my overall design.
The CV-UF008 NATURAL BEAUTY paper is so stunning that I had to use both sides of it. The pretty B-side (that striking black & white foliage print) trims the base of my layout. I ensured that the GARLAND floral arrangement overlapped this trim & in turn, created a more cohesive design. For a polished look I added the 'best things in life...' sentiment ACCESSORY STICKER and a good sprinkle of ENAMEL DOTS.
And there you have it! 
Beautiful, classic creating that highlights the gorgeous UNFORGETTABLE pattern papers!
I hope I have inspired you to use more pattern papers in your projects this week!
Thanks so much for stopping by today!
til next time,