Showing posts with label Christmas. Show all posts

Hip Kit Club: Merry Everything Inspiration!


 Hi Creative Friends! 

I hope you all had a very Merry Christmas!!!

Today I am sharing my take on the Hip Kit Club's Weekly Challenge! This time it's a super fun color challenge.... 

Both the November & December Hip Kits are brimming with these divine colors, and I couldn't wait to get creating for this challenge!

I have been so smitten by the super cute Russian Nesting Dolls featured in the November Hip Kits, that I decided to make some of my own for today's layout. 

Here's what I crafted,

"Merry & Bright" 


Oh how adorable is this?!!! So cute 'n' fun! Those Russian Nesting Dolls are the BEST chipboard stickers I've ever seen! Love 'em! With so many beautiful pattern papers in the November 2020 Main Kit, and the challenge colors in mind, I just had to feature them for my larger, fussy cut & hand stitched Russian Dolls. 

Let's take a closer look at them...
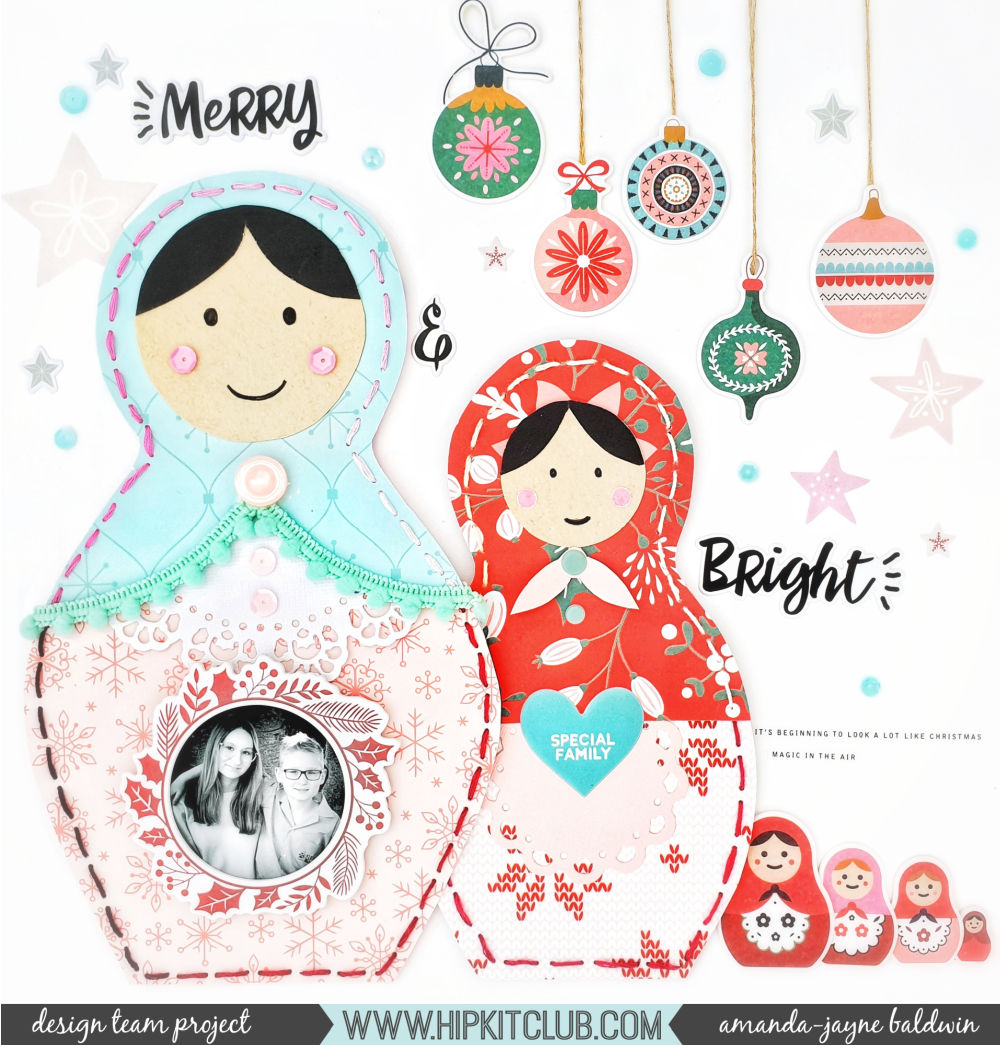
 

 SO super cute!!! I quickly made up a doll template by drawing a bowling skittle with a circle on top. I traced around these templates and cut out all the pattern paper pieces in red, blue & pink papers. For the doily aprons, I used a metal die from my stash & cut out both a White and a Quartz doily courtesy of the November Cardstock Kit. 

 For the doll faces, I used Light Kraft Cardstock from the October 2020 Cardstock Kit, and drew in the eyes and mouths. I fussy cut out the doll hair from a black 3" x 4" journal card from the November 2020 Pocket Life Kit. For the larger doll, I used pink sequins for her cheeks and for the smaller one, I used a hole punched on some pink paper, both of which are from the November Main Kit. So simple, and yet such a fun use of these supplies! 


As the pattern papers are so detailed, I opted for a chunky straight stitch to outline my dolls, and give them even more of that handmade feel. I embellished them with a few supplies from my sewing box, as well as those sweet blue Puffy Stickers. 
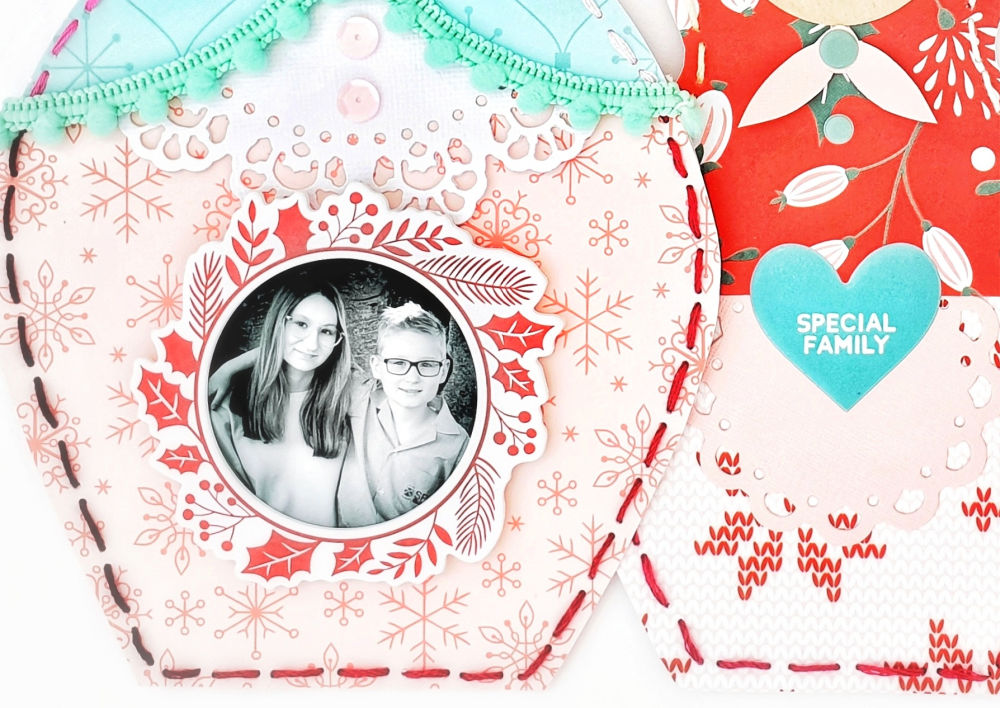
 As the largest nesting doll always holds all the 'babies' inside, it seemed only fitting that my large doll feature my babies on it. I framed my children's photograph with that striking Merry Everything Chipboard Sticker Wreath, and foam mounted it onto my doll. So sweet! 

 Surrounding my Russian Nesting Dolls, and completing my scene, are more of the Merry Everything Chipboard  Stickers. This time, I've backed the stickers with golden twine, and created the appearance of hanging ornaments - so cool! I used the Merry Everything Puffy Phrase Stickers for my layout title, and then filled the remaining white space with a mix of star stickers, and vellum from the November Embellishment Kit

For finishing touches, I added some sequins from the Main Kit too. Love it! 

The November Hip Kits are really stunning!

I hope my Russian Nesting Dolls page has inspired you to get a little creative with your Hip Kits, and play along with this week's challenge! Please be sure to share your projects with us in the Hip Kit Club Group HERE - we truly love seeing what everyone creates with the beautifully curated Hip Kits!

Thanks so much for visiting!

Til next time, 

Happy Arty Days, 

Amanda xo

Elle's Studio: December Kit & New Releases Inspiration!


Hi Friends! 

Welcome back for more Elle's Studio awesomeness with the December Kit & new releases!

It might be the last kit of the 2020, but let me tell you, it's going to make your crafty projects a December to Remember! 

Check out these fabulous new products....

December Kit

Oh, how good is this?! Loving all the Christmas, Winter & New Year's elements especially!

The Add-On items are going to amaze you....

Whoa!!! 
So.much.awesomeness!!! 
I can't even begin to pick a favorite here - all so fabulous!

And the Digital products don't disappoint either!


Love it all!!! 


I couldn't resist getting into the Festive Spirit, and sharing a lil Christmas love...

"'Tis the Season"


So fun and playful! Love this! A joyful moment, indeed! 

Other Supplies: Bazzill Cardstock - Avalanche, Clear Crystals, & Sewing Machine Stitching. 

Let's take a closer look....


The mix of Fa La La & Christmas Basics 6.5" x 8" papers with the new December Kit is so good! 
I fussy cut my papers to create the illusion of  mistletoe hanging on my layout. I really love how effective this looks! 


The die cuts included in the December 2020 Kit were perfect for embellishing around my mistletoe with!


How cute are the bow and cork tag?! Adore!


So magical, indeed! Love this Christmas page! 

My second layout is all about my super son, 

"My Bright Star"


How bright & fun!!!


I've mixed the Stitched Stars Wood Veneers with some fussy cut stars from the December 2020 Kit, and opted for a really bold color scheme. 


Acetate alphas are always for the win!


Such a super cool page for my super star! 

I hope my projects have inspired you! 

Thanks so much for visiting, 
til next time,

Hip Kit Club: Christmas Cardmaking!


Hi Friends! 

Welcome back for more Hip Kit Club inspiration!

 I can't wait to share my super cute, mood board inspired, Christmas cards with you all! My November 2020 Hip Kits have just arrived, and let me tell you, they are even more beautiful in real life! Super stunning! I couldn't resist using them instantly - but before I share my cards, here's a quick look at the December mood board.....


Wow, so pretty! Really gorgeous for the Holidays! 

I was particularly inspired by the colors, Christmas & Winter themes and the sense of magic and wonder!  Here's the card trio this mood board inspired....


Oh, how festive and fun! Adore these!


When it comes to creating quick & pretty cards, layering is the key! The 3"x6" note cards in the November 2020 Pocket Life Kit were the perfect size to mimic the new slim line card trend, and I used them to form the base layers for all 3 of my cards. 


To support these slim bases, I trimmed my exclusive Hip Kit Club: Merry Everything pattern papers to 6.5" x 7",  scored them at 3.5" and folded to create my 3.5" x 6.5" slim line style cards. I have featured the B sides of pattern papers, All Wrapped Up!, Jolly Good Sweater, & PomPoms - which you can see more closely in the November 2020 Paper Kit HERE.

I foam mounted the 3"x6" notecards to their pattern paper cards, and then embellished each note card with one of the tags included in Pocket Life Kit Cardstock Die Cuts pack. For added dimension and to really make the layered look more noticeable, I also foam mounted the tags.

When it came to dressing up my tags, I opted for a variety of Chipboard Stickers (from the November Embellishment Kit) as they not only looked amazing, but also, continued to build up my layers with their shape & dimension.

 For finishing touches I embellished around my layered focal clusters with Cardstock Stickers and those sparkly sequins from the November Main Scrapbook Kit.

Simple. Beautiful. And oh so easy to create! 

Make these cards, and a ton more Festive Greetings with your November & or, December 2020 Hip Kits! 

I hope my post today has inspired you! Thanks so much for looking!

til next time,

Happy Arty Days, Amanda xo

Elle's Studio: CAS Christmas Cards with NEW Crafting Die Sets


 Hi Friends! 

Welcome back for more Elle's Studio awesomeness!

Today I am sharing the most beautiful CAS Christmas Cards! 

And, the best part? 

They're super quick & easy to re-create! And, thanks to the all new Elle's Studio Steel Crafting Dies you'll be able to whip them up in a matter of minutes! Let me tell you, these new Die Sets are serious game changers!  

But enough chatter, here's the clean & simple cards for you...


Wow! Aren't they stunning?! Clean And Simple Christmas Cards for the win!  

Other Supplies: Bazzill Cardstock - Avalanche (2 sheets), Crystals, Button & Twine. 

To create these cards, I simply trimmed my first sheet of cardstock into two  5" x 8" pieces, scored and folded at the 4" mark to create to white card bases. For my two larger cards, I trimmed the cardstock into two 5 1/2" x 8 1/2"  pieces, and then scored and folded at the 4 1/4" mark.

Elle's Studio suggests that you, 
"Use the dies to cut your layers, then add your sentiment and you have a beautiful card created in no time! You could also use this die to create shaker cards, add wood veneer or stamped sentiments, and MORE!"
And that's exactly how I made my sweet and simple cards! 
No fancy tricks, or time wasting with measurements - those amazing Steel Craft Dies did all the hard work for me!


The fabulous Layered Card Metal Die made cutting a mix of pattern paper layers for my cards a dream! The dies cut so quickly, and with such precision! Between you & me, I'm partial to the faux stitched metal dies - no more machine stitching, but the same authentic look! Yay! Time (& maybe even a lil patience) saving at it's best! Thankyou, Elle! 
I just loved the combination of the Fa La La and Christmas Basics 6 x 8.5inch Paper Stack papers together, and when layered with the Document December 2020 Kit note cards - well, I think the results speak for themselves! SO pretty!  

Here's a closer look at all my CAS Christmas Cards....


The super cute Pocket, Frame & Flip Up Metal Die was perfect for adding tabs to my slightly larger cards, and those polaroid style frames to my smaller ones. 


To add more interest, I foam mounted a couple of my card layers, and then added a few carefully chosen embellishments for finishing touches. I loved the pink and red cards, but I couldn't resist a lil Christmas green too...


The same CAS cards, just a mint and forest green color palette. So elegant! 


Doesn't that faux stitching look amazing?! And let's no forget that scallop die - so intricate & yet it still cut through the paper like butter! LOVE!


Very crisp & elegant for Christmas!

So what are you waiting for? Grab yourself the Layered Card Metal Die, Pocket, Frame & Flip Up Metal Die & Document December products from the Elle's Studio shop HERE, and make one, or several Christmas cards in a matter of minutes! Happy Crafting & Happy Holidays! 
Amanda xo 


Elle's Studio: Document December Album Preparation


 Hi Friends! 

Welcome back for more Elle's Studio inspiration!

Can you believe it's already November?! Where has this year gone? 

Time to start prepping our Elle's Studio Document December albums! 

Last year I used this super cute 4 x 4inch album which I really loved,

 Except, sometimes I found myself wanting just a bit more space to document the story. 

So, this year I'm opting for a larger 6.5 x 9inch album (Citrus Twist Kits: Life Crafted Album) so that I can have a mix of pockets, TN pages and even mini scrapbook pages! 

To help me prepare for the upcoming Season, I have already downloaded and printed the 

Elle's Studio: Document December Prompts Printable

 and placed it inside my album cover to help keep me inspired! 

This is such a helpful lil printable, and best of all, you can get pick one up in the Document December section of the shop for FREE here! 

I've also printed a few of the Merry November 2020 Printables to include in this year's album too! Having printed a few note cards and base pages will really help me to save time in putting my album together during the Festive season! 


SO cute already! Love it!

And because I just couldn't resist putting a few pretties together, 

here's a sneaky peek at my opening page too...


LOVE!!!

You'll spy that I'm really channeling the pink and red again this year, so needless to say my album preparation has also included color sorting my supplies! It's bound to save me time, right?

I hope my sneaky peek has inspired you to get thinking and preparing your DD 2020 album! 
Haven't got your supplies organized yet?

Thanks so much for visiting, 
til next time, 

Elle's Studio: November Kit & New Releases Inspiration!


 Hi Friends! 

Welcome back for more Elle's Studio amazingness! 

I say it every month, but truly, you're going to swoon when you see how fabulous this month's exclusive Kit and new releases are! Check them out...

November Kit


Oh my stars! Told you it was good!!!

& the new releases are just as spectacular...

W.O.W!!!

& let's not forget the awesome monthly digitals! 


LOVE!!!

Yep, it's another month of creative bliss at Elle's Studio! 


Now for a couple of projects to inspire you with...

First up, a super cute & playful 12 x 12" Christmas page, 

"Merry & Bright"


So.much.fun!!!

Other Supplies: Bazzill Cardstock - Avalanche, Spiegelmom Scraps Sequins & baker's twine. 

Let's take a closer look at this Festive page!


Fa La La, this page literally sings Holiday Cheer! 
With such a fun & silly Christmas photograph, it seemed only fitting to create a really playful page! 

Need I mention, those Acrylic Christmas Light Bulbs?!
Could they get any cuter?! So adorable for December documenting! 


The crisp candy cane and peppermint color scheme really enhances the layout, and with so many cool embellishments to decorate with - well, it was as much fun to make as it looks! 
I offset the freshness of this design with that divine Merry & Bright Wood Veneer title. 
The warmth & richness of this veneer creates both balance and interest to the eye! 
Another of my 'must-have' items this month! 


All these pretty embellishments teamed with the November Kit and that cute candy cane pattern Fa La La paper make this page perfection!

My second page is an 8.5 x 11" number, and is also Christmas themed....

"Oh What Fun!"


Oh what fun, indeed!

Other Supplies: Bazzill Cardstock - Avalanche, Black, Pink & Red stamping ink, sewing machine, & sequins. 
Here's a better look at this pretty in pink Christmas tree page...


Sigh! This is just divine! 

One of my daughter's favorite Christmas gifts last year was that tiny blush pink Christmas tree. She really loves pink, and I wanted to document this for her personal album.
Her tree inspired me to fussy cut my own from the pink polka dot Christmas Basics pattern paper. I machine stitched it into place and decorated it with my photo, sequin baubles, Very Merry Christmas Chipboard Stickers and the Christmas Baking Stamp sprinkles - so effective! 


That striking red title, 'Oh, what fun!' is one of the November Kit 3 x 4" note cards that I trimmed up & stitched into place. So cool!


This really is a magical page!
I'm thinking a smaller version would look terrific in this years DD album! 


SO fun!


I hope my projects have inspired you! 
Please visit the Elle's Studio blog tomorrow for more of my inspirational ideas with the November Kit!

Thanks so much for stopping by, 
til next time,