Showing posts with label Silhouette Cut file. Show all posts

SpiegelMom Scraps: Captured Layout & Process Video


Hi Friends!

Welcome back to the Happy Arty Days blog! 
Today I am super excited to be sharing another sparkly creation for the SpiegelMom Scraps, Sparklers Design Team!

Here's a quick look see at my project....

"Captured" 

Oh isn't this pretty?!!

You'll spy the following SpiegelMomScraps sequins on this layout....
&

You can shop ALL the lovely sequins HERE
& remember: code AMANDA15 will save you 15% off! Yay!!!

I teamed these pretties with the beautiful Cocoa Vanilla Studio: Unforgettable collection, to create my lovely Fall themed layout. 

Wanna know more?
Please stop by my channel to watch the process video for this pretty page....


Thanks so much for watching & subscribing to my channel - your support means so much! 

I hope I have inspired you to get creating!
til next time, 


Pebbles: Spooky Boo & Pumpkins Theme Post!


Hi Friends!

Welcome back for more Pebbles Halloween inspiration, with the super cute Spooky Boo! collection!
Today I am sharing my take on the Pebbles DT assignment: pumpkins theme! 
 Hope you like it....

"Trick Or Treat: Boo!"


Eeek! Isn't this the cutest for Halloween?! 
Totally Spook-tacular! & just check out all those amazing pumpkins!

And here's how easy it is to recreate this page....

1. Mount an 11" x 11" sheet of white cardstock onto pattern paper, Sweet Tooth.


2. Use your digital cutting machine to cut out the Paige Evans' Pumpkin Wreath cut file in white cardstock. Back the pumpkins with pattern papers Hocus Pocus, & the reverse side of Sweet Tooth. Leave a few of the cut pumpkins 'open' and without any backing, too.


3. Use watercolor paints to outline a few orange & yellow circles in the center of the background, as shown above. Add a few tiny splatters for interest.


4. While the paint dries, attach your spooky Halloween photograph to the Pumpkin Wreath cut file.

5. Position wreath onto the background paper and painted circles, then glue into place.


6. Embellish the photo cluster (& bottom right quadrant of the layout) with Cardstock Shapes die cuts, and 6 x 12 Accent Stickers. You'll spy lots of pumpkins here too!


7. Continue to embellish this quadrant with more stickers, including the fabulous Spooky Boo Puffy Stickers.


8. Use the Maggie Thickers to add a title - BOO! & add a few more Puffy Stickers for good measure!

Voila!


A really BOO-tiful Halloween memory documented, and featuring all.the.pumpkin.things!!!
Here's a few close ups for you....


Pure pumpkin perfection!!!


I just adore the the super cute mummy and skeleton Accent Stickers here - adorable!


SO much spooky fun!
I hope I have inspired you to document your Halloween memories with the fabulous Spooky Boo! collection.
Thanks so much for visiting,
til next time, 
Happy Arty Days, 
Amanda xo


OTHER SUPPLIES:

Cocoa Vanilla Studio: Wanderlust


Hi Creative Friends!

Welcome back for more Cocoa Vanilla Studio awesomeness!
 Today I am sharing a super fun, BIG title, BIG impact, boy layout with the fabulous new 
BOYS RULE collection.  
Here's my layout,

"Wanderlust"


Yay! I love a big title, and backed with the awesome BOYS RULE papers - well, it just doesn't get any better than this! Love it! And speaking of love, how cute is my little adventurer in the photo?! Such a cool lil guy! One Of A Kind, indeed!
My layout begins with the reverse side of pattern paper, CV-BR008 ENTITLED for the base. I trim white cardstock to 11"x11" and stitch it to the base. Next, I cut the Paige Evans Wanderlust cut file from the Silhouette Store, enlarging it to 11 1/2" high. I back the letters with what looks like lots of different papers; but it's actually ALL from pattern paper CV-BR004 FUN & GAMES. How cool is that?! I love the varying designs within the one paper - SO many creative possibilities!

Here's a closer look....


Loving all those cool patterns! The woodgrain hyphen is from the reverse side of this paper too! So much awesome from one sheet of paper! To add to it's impact, I embellish the large pattern paper title with CHIPBOARD PIECES and DIE CUT & MISCELLANY EPHEMERA.


I also machine stitch the black sentiment tags onto the layout. Lots of messy threads, texture and a little bit of 'raw' on this otherwise clean design.


How cool is that CHIPBOARD PIECES skull n crossbones icon?!! All kinds of awesome!
Let's take a closer look at my photo cluster.....


You'll spy that I have layered my photo onto a combination of MISCELLANY & DIE CUT EPHEMERA. Between these layers, I slide a few ACCESSORY STICKERS too! But it's the FLAIR BUTTON adorning my photo that I just can't get enough of! King Of The World - just perfect!


Below my photo I also include  the 'boy' CLEAR STICKER, and that awesome die cut too!


For finishing touches, I add more random cotton threads, and those dimensional black drops. Simple. Striking & Oh-so-fun!
I am absolutely loving creating with the new BOYS RULE line, & I am sure you will too!
Thanks so much for visiting today,
til next time,

Happy Arty Days, 
Amanda xo

Pinkfresh Studio: Summer is....Simple & Sweet!


Hi Creative Friends! 
Welcome back to the Happy Arty Days blog!
Today I am super excited to share my first creations with the gorgeous new 
From it's soft pastel colors, to the florals and lemons, this collection is ALL the dreamy Summer vibes! I LOVE it all! 
Documenting those Summer Memories never looked so pretty!
But enough chatter, let's see what I am talking about,

Here's what I've created......
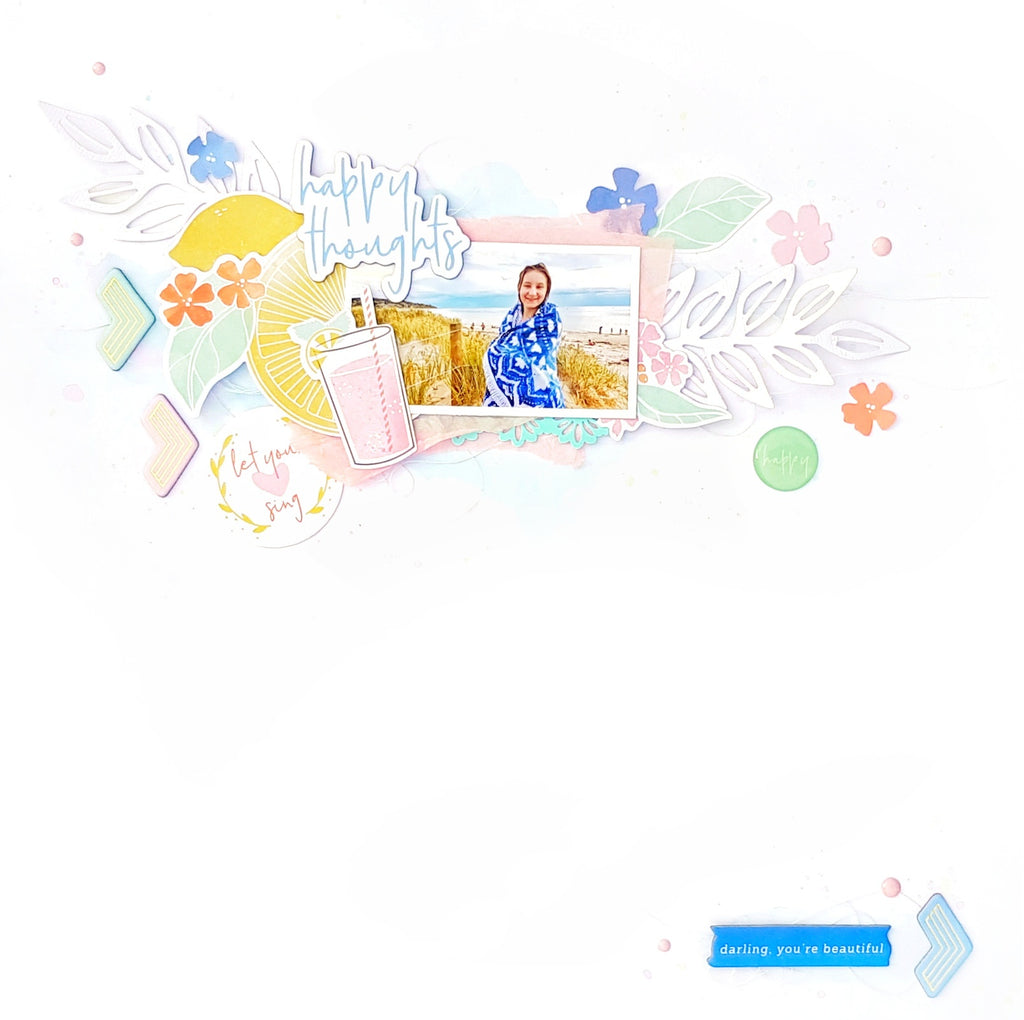
"Happy Thoughts"

*Sigh* Isn't this dreamy?! 
Such a soft and pretty page to highlight those beach memories! All the Happy Thoughts for this moment - so precious! I adore pages that feature large amounts of white space and just a pop of color to draw you in! Inspired by both the blue in my photograph, and in the Simple & Sweet collection, I decided to create the softest blue color wash beneath my photo cluster. To do this, I start my layout with white watercolor cardstock and apply a very small amount of highly diluted Pinkfresh Studio Liquid Watercolors: Sky Blue with my paintbrush. I added the tiniest amount of diluted Bubblegum Pink droplets to this base and allow to dry. I love the subtly of this type of watercolor painting. It doesn't draw your attention away from my photo; instead it gently enhances! 
Here's a closer view for you......


SO pretty!!!
Once it's dry, I begin to build up my layers onto which my photograph will be positioned. I start with a couple cut file / die cut leaf flourishes in white cardstock. These are just an added textural element to my otherwise very clean design. Onto the leaves, I add a variety of EPHEMERA lemons and floral DIE CUTS. I also add a small section of border punched, hand colored (with Liquid Watercolors in Aquamarine) trim, as well as a few sheets of pink tissue wrap. I position my photo on top of the tissue layers, and continue to embellish. I use the CHIPBOARD STICKERS Happy Thoughts sticker as my title, as well as the CHIPBOARD chevron arrows to adorn my page. A few more pieces of EPHEMERA to decorate the photo cluster, as well as white cotton thread for more of that gentle texture!  


For a more polished look, I embellish with soft pink ENAMEL DOTS & that divine mint green happy EPOXY STICKER. So.much.prettiness!!!
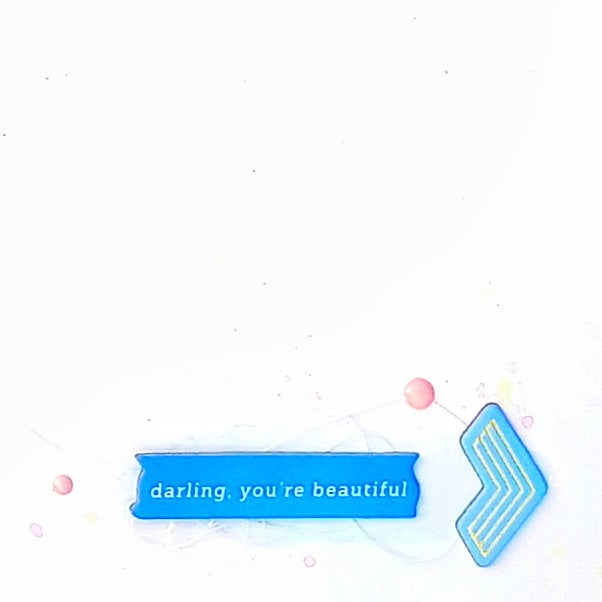
To complete my page as well as add more balance to my design, I include a few page defining details to the bottom right hand side of my layout.....


The CHIPBOARD STICKER sentiment was the perfect lil spot of journaling, and the chevron, cotton thread & ENAMEL DOTS brought it all together! 
Simple. Sweet. Summer. 
Love it! 

My second layout is less simple and more about the sweet - the Summer sweet treats that is! 
"Sweet Memories"


Nothing more dreamy and delicious than Summer Gelati! 
And how divine is that cut file ice cream cone?!! Adore!
For this fun and fresh page, I use the reverse side of pattern paper GOOD THINGS for my 12" x 12" base. With such a bright and playful design, this paper is just perfect for my sweet subject! 
I trim white cardstock to 11" x 11" and machine stitch it onto the GOOD THINGS base. Next I create that super sweet ice cream feature.....
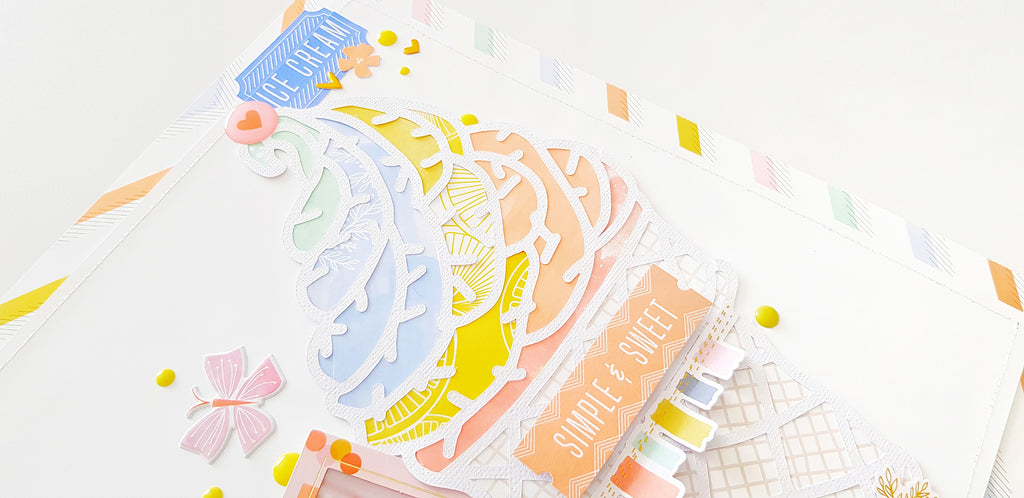

The cut file is called Ice Cream Cone & is from Paige Evans in the Silhouette Store, but there are plenty of ice cream digital cut files that would work for this type of layout (and if you don't have a cutting machine, you could simply draw your design on the reverse side of the paper & then fussy cut it out ;)  ) 
To back the cut file, I use the reverse side of pattern paper SWEET LIFE to create the appearance of a 'waffle style' cone. So cool! For the soft serve section, I use a mix of colors from pattern paper HAPPY LIFE.  I just love how this looks! 
I embellish the soft serve with a faux 'cherry on top' EPOXY STICKER, and trim the EPHEMERA ticket so it only reads ICECREAM , and glue it into place. Next, I decorate the cone with die cut EPHEMERA. I use foam dots to make my Simple & Sweet subtitle pop! Super cute!
I align my large cut file ice cream so it is positioned directly beneath the chevron arrow in the GOOD THINGS base. This subtle detail creates balance and harmony in my layout design, and compensates for the over sized, out of proportion ice cream. 
 

I use the fabulous STITCHED FRAMES with FOIL ACCENTS to highlight my sweet photograph, and embellish it with a few EPHEMERA blooms. I tuck my framed photo into the side center of my ice cream and then build the remainder of my layout around this focal focal point. 
With so much color already on the page, I opt for the White Mini Alpha PUFFY STICKERS for my project title. The white on white look is so clean and fresh, and it really creates such interest against all the pastel colors. Perfect! 


I complete the page with the EPHEMERA sentiment, and tiny die cut ice cream, a few GOLDEN ACCENTS PUFFY STICKERS, and a good sprinkle of yellow ENAMEL DOTS (cos sprinkles and ice cream are the perfect match!) 

And there you have it! 
My deliciously Simple & Sweet take on Summer! 
I hope my Summer themed pages have inspired you to get documenting those sweet moments! 

Thanks so much for visiting, 
til next time, 

Happy Arty Days, 
Amanda xo 

Cocoa Vanilla Studio: Cherished Moments


Hi Everyone! 

Today I am finally sharing my layout for the Cocoa Vanilla Studio team up with CSI  - Color.Stories.Inspiration challenge blog!
If you haven't already read, Cocoa Vanilla Studio is sponsoring CSI for the month of June!
 Yay!
 So be sure to play along with the challenge to go in the draw to win an awesome Cocoa Vanilla Studio prize!
Here's what the challenge looks like....

Isn't this sweet?!
 As soon as I saw that image, I immediately thought of our gorgeous Bohemian Dream collection! I was also inspired by the ballerina, white background and those sparkles too!
Let's see how I solved the case! 
Here's what I created...
"You Are Amazing"


Beautiful, cherished moments indeed! Oh so pretty!
One of her first ever ballet performances; she was so magical!
I have used a Paige Evans cut file from the Silhouette Store, and backed it with some of my all time favourite Cocoa Vanilla Studio papers. I've positioned my photo and supporting layers in the center, keeping it as the focal point of my design. 
I tend to do this a lot. I believe that my layouts should always enhance my memories & photograph/s, not steal away from them.
 Let's take a closer look at it all....


How precious!
You'll spy that I have l created lots of pretty layers beneath my darling photograph, using up scraps from the 6 x 6 PAPER PAD, and even a left over 3 x 4" card from pattern paper CV-BD004 BEAUTIFUL MESS. I've also tucked in an ACCESSORY STICKER or three, and embellished my photo with DIE CUT EPHEMERA.  So pretty! Sparkle & Shine! 
If you look closely, you'll also spy those tiny star sparkles - they're actually left over sequins from her gorgeous tutu! Adding even the tiniest memorabilia element to a layout makes it super special for the recipient. I know my daughter will love this small but meaningful detail!
Here's a closer look at the top of that photo cluster, and those pretty pattern papers.....


Gorgeousness! 
I love the mix of patterns and the varying tones of blues and purples that I've used to back the cut file with. That divine polka dot outer layer is the reverse side of pattern paper CV-B001 ABUNDANT, and it's safe to say that it is an absolute favourite of mine!


Travelling towards the center, the next layer or ring of pattern papers is CV-BD002 GYPSY HEART. This paler blue softens the overall base appearance and adds a gentle touch. You'll also spy a little journaling in the top left hand corner, using a cut out word from pattern paper CV-BD006 BOHO BITS, CHIPBOARD ACCENT STICKER, & even some of those sweet typewriter font ACCESSORY STICKERS. A few carefully chosen words that best describe this cherished moment! Love it!


The pattern paper in the center of the cut file is the B side of CV-BD005 DREAMER, & is all kinds of purple prettiness!
Below my photograph I include a sweet sentiment, Live A Colourful Life, from the ACCESSORY STICKERS. I also use ACCESSORY STICKERS, CHIPBOARD ACCENT STICKERS  and even a fussy cut word from pattern paper, CV-BD006 BOHO BITS to continue journaling this special moment. To keep my design balanced, I apply these items to the bottom right hand side of my layout. Here's a last look for you.......


Oh so stunning!
I hope the 'clean' look not only compliments the challenge image, but enhances her youth and innocence too! Such a beautiful memory of my sweet girl!
And there you have it! 
That's how I solved the case (with a big help from the gorgeous Bohemian Dream) this month at Color.Stories.Inspiration! Be sure to play along and share your beautiful projects! You could just win an amazing prize ;) 

Thanks so much for visiting today,
til next time,

Happy Arty Days, 
Amanda xo 

Cocoa Vanilla Studio: Wild At Heart: LOVE YOU!


Hello Friends!

 I have a gorgeous floral layout to share with you here, &
 on the Cocoa Vanilla Studio blog today!
I just adore florals, and the ones in the Wild At Heart collection just make me swoon!!! 
SO pretty!
But enough chatter, here's what I've created....

"Love You"


Told you those florals were pretty!!! No fancy layout design required when the papers are this gorgeous! 
Let's take a closer look.........


Simple. Beautiful. And just oh-so stunning!
Wild At Heart really has my heart!
I have used my favourite floral pattern paper, CV-WH009 MEMENTO, for the base of my layout, and used it's coordinating CHIPBOARD FRAME to enhance my sweet photograph! 
You'll also spy floral paper,CV-WH007 GROW WILD as the pretty backing to that 'string art' dream catcher cut file. I selected this paper as it has a #samebutdifferent look to the MEMENTO paper, and it coordinates beautifully! 
The center heart is pieced with the B-side of pattern paper CV-WH001 LUSCIOUS -
 so pretty, and it really pops against the indigo blue! 
Here's a closer view.....


I just love that dream catcher cut file! 
I have made it appear as string art, by cutting the mosaic lines thinner, & connecting these 'strings' with ENAMEL DOTS (SPARKLES) beads. I have added a soft mixed media element beneath the dream catcher with watercolour splatter, and finished it all off with a sweet 'Wild at Heart' CHIPBOARD ACCENT STICKER

* Please note: This cut file is one I have edited from the Silhouette Store. *

I have positioned my photograph cluster just over the right side of the dream catcher, to enhance the connection and flow through my design....


To avoid 'blending' my frame into the dream catcher, I have layered the LUSCIOUS paper beneath my framed photo to add warmth and contrast. 
There's also two cuts from CV-WH006 FUSSY CUTS paper in this layering, as well as a delicate doily (from my stash). That gorgeous CHIPBOARD FRAME is also embellished with a DIE CUT EPHEMERA banner, so lovely!
Speaking of lovely, how about that LOVE YOU title?!!


The CHIPBOARD ACCENT STICKER title is just divine! 
I have also embellished it with a super cute FLAIR BUTTON that appears to have a similar pink 'wash' look to it, which also coordinates with the soft mixed media element of my page too!


When it comes to florals, and all the pretty things,
Wild At Heart is definitely my go to collection! 
So very beautiful and perfect for memory keeping my sweet girl!

Hope my layout has inspired you today!
Thanks so much for visiting!
til next time,

Cocoa Vanilla Studio: That's My Boy!


Hi Creative Friends!

I am super excited to be sharing another awesome cool kid layout with our fabulous You ROCK collection for Cocoa Vanilla Studio!
When it comes to my Mister A for Awesome, I just can't go past You ROCK! It's all things BOY! Love it!
Here's a look at my latest scrapbook layout this fabulous line,
"That's My Boy"

Isn't this awesome?!!
I love how fun and playful these colours and patterns are together! I have mounted my white cardstock on patterned paper, CV-YR003 THIS WAY  - I adore the bright triangles pattern, so much fun!
The large view master die cut that my photo is mounted on is a cut file from the Silhouette Store. It was totally inspired by a similar, smaller DIE CUT EPHEMERA piece in this collection.  I have backed this cut file with the reverse sides of CV-YR002 IN LINE & CV-YR009 GALACTIC, really drawing on the bright, happy colours from the collection. Such fun vibes!
Speaking of fun vibes, just check out all the awesome embellishments on this layout - SO cool!!!  Let's take a closer look....

Oh yes!!!!
The DIE CUT EPHEMERA is always a favourite of mine! I mean seriously, could it get any cooler?!
You'll notice that I have snipped both my target pieces into half, and positioned them around the top left, and bottom right corners of my page to encourage the diagonal flow of the design! I have then layered them with more embellishments - love it! More ephemera stars as well as ENAMEL SHAPES further enhance the flow of my layout across the page.

WOOD VENEER SHAPES & FLAIR BUTTONS are perfect additions to any scrapbook layout, but I just love how they add dimension and interest to this particular design.
Here's a view of the other embellished corner......

Boy Oh Boy, indeed!
That VENEER really adds warmth and balance to all the white and brights!
And honestly, that FLAIR really is awesome!!!
The playful font and colours on the flair coordinate perfectly with the THIS WAY pattern paper base. You'll also spy a complimenting CHIPBOARD ACCENT STICKER star or two!
Such a striking page that's so easily put together!
The final feature of this cool kid page is the DIE CUT EPHEMERA title and subtitles.
Here's a better look at them.....


For added impact, I mounted my That's My Boy title ephemera on foam dots. I love that extra dimension for titles! The No.1 ephemera adorning my sweet boy's photo is also mounted on foam too, because after all, he's our No.1 Boy for sure! The You Rock ephemera completes the layout - almost as a final statement to my Mister A.

And there you have it!
 My latest scrapbook page with the awesome You ROCK collection!

I hope I have inspired you to get creating!
Thanks so much for visiting and leaving a comment!
til next time,

Cocoa Vanilla Studio: Wild At Heart: Easter Theme


Hi Cocoa Vanilla Lovelies!!!

I am super excited to be sharing my Easter theme layout for Cocoa Vanilla Studio with you all today!
I am still totally crushing on their Wild At Heart collection, and have combined it with a Silhouette Store cut file for my scrapbook layout. The photo I am scrapping is from last year's Easter Hunt when my son discovered Peter Rabbit in Mr McGreggor's vegetable patch - so cute!
But enough chatter, let's get straight into the good stuff!

"Easter"


Isn't that photo just the sweetest?!!! A happy Easter memory for sure!
And how about that stunning background paper?!! I've used pattern paper, CV-WH002 - ARTISAN, and I just love the instant mixed media look it offers! Those watercolour swatches are just divine!  A beautiful painterly background without all the drying time - perfection!

I've paper pieced my cut file with a few pretty Wild At Heart papers too.....


Super pretty, huh?! You'll spy CV-WH001 LUSCIOUSCV-WH003 MARIPOSA, & CV-WH007 GROW WILD. The marble pattern on the reverse side of GROW WILD was ideal for backing my Easter eggs onto! Love how they turned out! I also supported the cut file with a ton of foam to really make it 'pop' off the page, and embellished it with some gorgeous blooms and butterflies from the DIE CUT EPHEMERA pack. 
Beneath my Easter title, you'll also notice a sweet butterfly FLAIR BUTTON
here's a closer look....


It's no secret that I heart all the Cocoa Vanilla Studio FLAIR BUTTONS, but this butterfly one is just sooooo pretty! Love it! Best Ever, indeed!
That Best Ever! is actually a sticker from the ACCESSORY STICKERS that I have backed with cardstock and mounted on foam dots. I often use my stickers as an alternate to ephemera pieces, & the sentiment on this sticker worked beautifully with my happy Easter story.
To bring everything together, I've mounted my sweet photograph with two DIE CUT EPHEMERA frames (that just happen to coordinate with the papers in my Easter title), & then mounted a CHIPBOARD FRAME , that matches my base paper (ARTISAN)over my photograph. This really brings unity to the overall design, and provides balance as well.


The TOGETHER Happiness RIGHT HERE sentiments are from the pattern paper, CV-WH006 FUSSY CUTS. and the type writer words are more awesome stickers from the ACCESSORY STICKERS sheet. 
Here's a closer look at the FUSSY CUTS .....

So much pretty going on here!


For finishing touches I added a few more DIE CUT EPHEMERA pieces, and voila! Page complete!
I just love how everything coordinates together so beautifully - perfection!
I hope you liked seeing my Easter theme page,
& feel inspired to scrapbook your Easter memories with Cocoa Vanilla Studio!

Thanks so much for visiting,
til next time,

Happy Arty Days, 
Amanda xo