Pages

Sunday, 27 January 2019

Pinkfresh Studio: Everyday Musings Scrapbook Layout & Process Video!

Image result for pinkfresh studio everyday musings

Hi Friends! 

I am SO super dee duper excited to be sharing my very first 
Video Education Team layout for 

Image result for pinkfresh studio logo

& even better, it's with the gorgeous new Everyday Musings collection!
Yay!!! So.much.gorgeousness! 

Rather than rave about how incredibly gorgeous this new line is, I'm going to let the pics do all the talking!
Here's a quick look at my first layout, 

"So Happy We're Here"


Sigh! Isn't this divine!?!!
So very beatutiful! 

Let's take a closer look....


Everyday Musings is just stunning!!!
You'll also spy the Pinkfresh Studio Liquid Watercolors and Geo Floral Background metal die too!
Love it!!!


That floral background die is SO detailed & intricate!!! 


Nawww!!! My 2 cuties! So very cherished indeed! 

See more of this loveliness on the Pinkfresh Studio channel HERE. 

https://youtu.be/4yW5xbMjZFQ

I hope you enjoy watching my video!
Thanks so much for stopping by today!

til next time, 

Cocoa Vanilla Studio: Happy Together!

Hi Friends!

Welcome back for more Cocoa Vanilla Studio inspiration!
 Today's layout is inspired by Valentine's Day and features the beautiful Midnight collection!

Also, it's a very rare moment when hubby & I get in front of the camera at the same time - 
so I just had to make the most of this photo! 
So endearing to document our happy union!
 And today we celebrate our wedding anniversary - 
so a very special layout and post for me personally, too!
But enough of the gushy stuff, here's my loved up layout,

"Happy Together"


So very happy together! The sweetest! Happy Anniversary to us!

Isn't this pretty?! I've featured the divine script pattern from the reverse side of paper, CV-MN005 MOONLIGHT as my background. I used pattern paper, CV-MN002 SHINE BRIGHT for the cut file heart, and paper pieced the linked hearts with assorted pink papers from the 6 x 8" PAPER PAD. I use these same 6 x 8" papers as layers beneath my cherished photograph. So beautiful!

Note: The cut file featured is a free one from The Cut Shoppe & is called With Love.
Here's a closer look at my layout.......


Sigh! Such a happy moment documented!

Before I attached the cut file heart, I added lots of paint splatters and even lightly coloured a few of the pattern paper edges. That fabulous title is part CHIPBOARD PIECES & part CARDSTOCK TITLES - I just love how they coordinate so perfectly together!


I foam mounted the 'together' die cut title for added dimension and to better match it's CHIPBOARD counterpart.
Speaking of titles, you'll also spy that I used the DIE CUT EPHEMERA subtitle, XOXO at the top of the heart.


Such pretty details! This title was also foam mounted for extra dimension, before being layered onto the heart cut file. I tucked a DIE CUT EPHEMERA & ACCESSORY STICKER bloom beneath it all too. SO gorgeous! Lots of pretty paint splatters and Cocoa Vanilla Studio sequins as well!


There are so many lovely embellishments in this collection, and I couldn't resist layering a few of them together! I adorn my photo cluster with DIE CUT EPHEMERA, CHIPBOARD PIECES & some ACCESSORY STICKERS too. Aren't the hand drawn hearts and blooms divine?!!


Such a simple page design, and yet oh-so-beautiful! It really is a dream to create with the Midnight collection!
I hope my layout has inspired you to get creating with Midnight today!

Thanks so much for visiting,
til next time, 


Tuesday, 22 January 2019

The Cut Shoppe: Fresh Squeezed Summer Layout!


Hi Friends! 
Welcome back to the Happy Arty Days blog! 

Today I am sharing a bright & colorful layout for
The Cut Shoppe!
At the moment it's Summer break in my part of the world - 
think balmy sunsets at the beach and sipping ice cold lemonade! 
My favorite time of year!

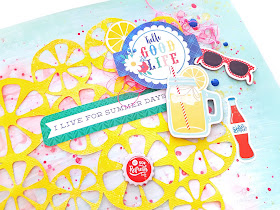
For today's layout I am sharing a lil Summer sunshine & warmth with the

"Summer Days"


Whoa, talk about a burst of sunshine! 
This layout is a pop of bright, fun colors and just screams all things Summer! Yay! 

How totally awesome is the Fresh Squeezed cut file?! 
It comes in 2 sizes in the one download too (12 x 12" & 8.5 x 11")! Ideal for all your paper crafting needs!
For today's layout I have cut mine in the 8.5 x 11" size.
Here's a closer look at it.....


Love it! You can get the Fresh Squeezed file from The Cut Shoppe HERE 

For this layout, the Fresh Squeezed file was cut in white cardstock, which I hand colored with Shimmerz Paints. I actually used three shades of yellow paint: Spritz: Chick-a-Dee, Vibez: Sunset Strip & Coloringz: Lil' Yellow Skool Bus. These colors coordinate & blend together beautifully - they really make the Freshly Squeezed cut file 'pop'! 


Instead of backing the lemons with pattern papers, I choose to support the file with a messy, mixed media base. I paint a layer of white gesso, and while it's still wet I add a very watery layer of peachy pink watercolor paint. This creates subtle color for beneath the cut file. I also add lots of pretty paint splatters and droplets in the yellows which I sprayed my cut file with, as well as Shimmerz: Royal Red & Bubblegum Blast too! Messy never looked so pretty! 


I use Echo Park's Good Day Sunshine collection for my layout, as the colors in this collection compliment my photo beautifully (& there may just be a lemon ephemera or two in this line too!)
Here's a few close ups for you.....


So happy together, indeed! Summer break is the BEST!!!
I embellish the cut file with a mix of die cut ephemera, cardstock stickers, chipboard stickers and lots of enamel dots! 


Such a bright & fun page! 
The Fresh Squeezed cut file is perfect for documenting our Summer memories with! 
I hope you feel inspired by my creating today, 
& that my page brings some warmth to my Northern Hemisphere friends :)

& check out more amazing designs in The Cut Shoppe while you're there!

Needing Shimmerz Paints?
Pop my name AMANDA in the comments section of your store order HERE
& you'll receive a FREE paint!
(no minimum spend, not valid with any other promos/code, & code has unlimited use)
Yay for free paint!

Thanks so much for stopping by today,
til next time,


Monday, 21 January 2019

Citrus Twist Kits: Let's Get Digital!


Hi Friends! 


I hope you're loving all the fabulous inspiration with the new 
I am SO excited by this new fresh look for memory keeping, 
but I am also very much a 12 x 12 scrapbooker by heart! 
So even though this month's Digital Cut Files are perfectly created for your Life Crafted album
I've edited the size of the Retro Circle Border digital file for today's post and created this.....

"Good Vibes Only"


Oh wow!!!
You can see that Life Crafted is very much for the 12 x 12 scrappers too! 

CTK Supplies: Life Crafted January 2019 Kit - Fresh Starts, Scrapbook Add On Kit, January 2019 This Is Life "New Beginnings" Stamp, Subscriber Exclusive Digital Cut File - Retro Circle Border, Subscriber Exclusive 2019 January Printable.  

Other Supplies: Shimmerz Paints: Vibez - Jeni Be Bleu, Hermit the Frog, & Deep Blue Sea, Umbrella Crafts Premium Dye Ink - Green, Versa Ink - Lime, & Bakers Twine. 

TIP: 
To download any of the CTK Subscriber Exclusive Digitals or Printables, you must be signed into your CTK account, before selecting the Subscriber Workshop tab. Once you've done this, scroll down the page and click the item you wish to download. 

To create this amazing layout I start by enlarging the digital file, and replicating it. This is so I have two sets of circles to work with. Before I remove the Retro Circles Borders from my cutting mat, I treat them with a few sprays of Shimmerz Vibez - as shown below.....


Lots of messy fun here! 
You'll notice that I have washi tape on the sides of my cardstock, the purpose is two fold. 
1. My mat isn't quite as sticky as I'd like it to be, so the washi tape aids to keep my cardstock in position and, 
2. It also aids against paper warping when I add all that paint. 
Once dry, I remove the Retro Circles Borders cuts, as well as the negatives. Be sure to keep the negatives, as I use quite a few of these left over circles on the left hand side of my layout.


I use pretty pattern papers from both kits to trim the top and base of my layout. Next, I glue 95% of one Retro Circle Border to my page, trimming away the excess along the right hand side of my layout. Using the gorgeous leaves stamps included in the "This Is Life" New Beginnings Stamp, I add lots of lime and green foliage to the layout base. Those stamped leaves are really something! Such beautiful details! 


Next, I glue down the left over 'negative cuts' from the Retro Circles Borders, and foam mount the odd one or two. I just love how effective this looks! With circles as a dominant shape in my design, it seemed a no brainer to use the circular frame from the Dear Lizzy Die Cut Shapes (included in the Scrapbook Add On Kit) for my sweet girl's photo. I also needed an accent color - something with a lil warmth to balance and cut through all those cool greens and blues. The answer was that fabulous golden Hello Love chipboard sticker. This is from the CTK exclusives included in the Life Crafted - Fresh Starts Kit. And even better, it's a circle too! Love it! 


I fussy cut a few of the Dear Lizzy Die Cut Shapes so that they better suit my design. In particular, the Good Vibes Only title piece. I have snipped away the cacti so it now mimics my stamping and flatters my photo! For finishing touches, I also add that pretty green tag from the Subscriber Exclusives for January and the Tiny Word Stickers from the Life Crafted Kit. 


Simple. Beautiful. Life Crafted! 

I hope my layout has inspired you today! 
Life Crafted is all about you and your stories - so craft it your way! 
I can't wait to see what you create! 
Be sure to share your projects with these beautiful kits & Subscriber Exclusive Digitals & Printables in the Citrus Twist Kits Facebook Fan Page HERE! 

Thanks so much for visiting today! 
'til next time, 


Wednesday, 16 January 2019

Elle's Studio: Happy Heart Stamp Spotlight!


Hi Friends!

Welcome back for even more Elle's Studio inspiration!
 Today I am sharing more of the Happy Heart Stamp LOVE!!!
We all know that Elle's Studio offer premium, high end, clear stamps but this latest stamp is my absolute, hands down, number one new favorite!!!!
And here's exactly why...


Oh.my.heart!!! Stamping never looked so impressive! 
Absolutely sensational!


Other Supplies: White Bazzill cardstock, Umbrella Crafts Premium Dye Ink - Red, Umbrella Crafts Premium Dye Ink - Purple, Ranger Ink: Tim Holtz Distress Ink - Picked Raspberry, Staz On - Black, Shimmerz Paints Vibez - Princess, Sweet Heart & Razzeldazzel Berry, White Tissue Paper. 


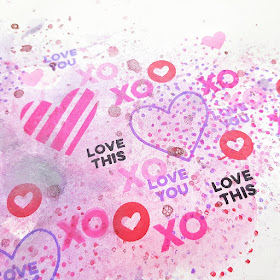
Here's a better look at that stamped background for you.....


Ahh-MAZING! Happy heart, indeed! 
I start this background by applying shimmering ink sprays in pinks and purples with the packaging technique. I also apply them to form a triangle shape, and fade out as they reach the edge of the left hand side. I use these very same colors to add splatters and droplets too!
Once dry, I take the confetti / polka dot like stamp and repeat stamp it in red, purple and raspberry inks. I pay particular attention to the edges of my mixed media color work, so it creates the appearance of even more paint splatters. 


Next, I apply the larger heart stamps around the painty edges, using raspberry ink for the striped heart & purple ink for the open heart. Using the same purple ink, I repeat stamp the Love You sentiment, and for added interest, I even print it inside two of the open hearts. 


I repeat stamp the XO with the raspberry ink, ensuring that it's bold in some prints and really faded out in others. The heart icon stamp is applied in the same fashion, but with red stamp ink instead. 
I have kept to the same red, purple & raspberry inks as this type of stamping can get a lil messy, and I don't want my background to distract from my photo! Using similar and like colors in mixed media backgrounds aids to soften the busy appearance. The colors tend to compliment each other and blend more. 
For a more noticeable print, & to cut through all that sweet color work, I use black ink for the Love This stamp. So striking! 


I also ink up the Wood Veneer Hearts, and strategically arrange them around my photograph so that they repeat the triangular form of the mixed media background. Repeating patterns, shape and form is very aesthetically pleasing on the eye. Repetition in this layout design avoids the mixed media base from appearing too messy or over done. 

My photo is backed with blue & purple papers from the 6 x 6 All My Heart Paper Stack, some distressed white tissue paper, a label, tag and sticker or two from the January Kit and new releases. I've kept the layering simple as there's quite enough visual stimulation with that amazing stamped background. 


For finishing touches, I apply the Black Puffy Alphabet Stickers for my rather apt title, #lovefiercely
Lol, his face says it all! 


Stamping magic!!! 

Looking for more Happy Heart Stamp inspiration?
ALL my Elle's Studio projects for January have featured this incredible stamp! 
You can see them here & even here
Yep, I told it is my number one fave stamp!!!

I hope I have inspired you to get your ink on! 

Thanks so much for visiting, 

Monday, 14 January 2019

Elle's Studio: Love You Layout!

Hi Everyone! 

Welcome back for more Elle's Studio awesomeness!

The January 2019 Kit and New Releases are SO incredibly awesome!
I just haven't been able to stop creating with them!
Visit my previous post HERE to see ALL the new things
(and what I created for New Release Day!)

Here's a super fun mixed media layout I've created using my fave new Happy Heart Stamp,

"LOVE YOU"


Oh.my.heart!!! Love you more than words can say!
What a precious page!


Other Supplies: AC - Pale Pink Cardstock, Jo Sonja's White Gesso, Shimmerz Paints: Spritz - Ruby & Cotton Candy, Vibez: Quit Yer Winen, Umbrella Crafts Premium Dye Ink - Red, Tim Holtz Distress Ink - Picked Raspberry, MME Enamel Dots & Decorative Brads, Baker's Twine. 


So many beautiful details to this layout - let's take a closer look.....


WOW!!!
The January Kit is amazing, but the Add On items are totally swoon worthy!
I can't decide what I love most - SO good!!!
From the Love You Acrylic, to the striking black & white So Loved Shipping Tags and the Sweetheart Puffy Stickers -  I am in memory keeping heaven! 
And let's not even get me started on the incredible Happy Heart Stamp!!! LOVE!


Speaking of incredible stamps, I used the fabulous Large Jane Alphabet - Solid Stamp with Raspberry ink to fill the printed Love You tag. So cool!


The January Kit and exclusive Add Ons are so perfect for Valentine's / Happy Hearts Day creating! 
That mixed media base is all kinds of awesome! 
Repeat stamping for the win!!!
or

I hope you enjoyed seeing my layout today, 
I may have another Happy Heart Stamp layout for you in a few days time - 
so be sure to check back for more Elle's Studio inspiration!

Thanks so much for visiting today. 
til next time, 

Saturday, 12 January 2019

Citrus Twist Kits: 3 to Inspire with the New Life Crafted Kit!


Hi Friends! 

Welcome back for more memory keeping inspiration with a new edition of the 
Citrus Twist Kits 
3 - to - Inspire challenge! 
 I am so super excited to be sharing more of our amazing Life Crafted Kit! 
This new look kit has me swooning! 

Life Crafted "Fresh Starts" Kit - January 2019


I love this new look & fun approach to everyday documenting, 
but I also still love my 12 x 12 style of scrapbooking! 
So for today's challenge, I am also incorporating how I use Life Crafted for 12 x 12 layouts too! Yay! 

Here are the items you'll need to feature in your creating to play along:

1. Stamping There are four fabulous CTK stamps this month, and one's an exclusive included in the Life Crafted kit. Have fun & get inky! 

2. Stickers - There are some fabulous stickers in both the Life Crafted Kit and the Scrapbooking Add On Kit! I'm especially loving the Tiny Word Stickers in the Life Crafted Kit.  

3. Ephemera -  Again, you'll find them in both kits, or you could make your own from our monthly printable cut aparts! Yayyy! 

Such a fun & easy challenge for you to play along with! 
Here's what I've created using both our Life Crafted & Scrapbooking Add On Kits, 

"Hey Boy, You ROCK"


How awesome is this?!! Such a fun page for my cool kid!
I use the white cardstock and Shine Bright paper from the Scrapbooking Add On kit for the 12" elements in my layout. I layer my photo onto the exclusive Life Crafted pattern papers, and ephemera and then go wild with embellishing! 


The "THIS" stamp is from the exclusive Fresh Starts stamp set in the Life Crafted Kit. I repeat stamp it for maximum impact - so striking & tons of fun too! 
For the stickers element, I feature a mix of stickers from both kits but I am really crushing on the Tiny Word Stickers in the Life Crafted Kit - so good!


How cool are those faux enamel dots?! They're actually the inner circles from the O's in the Black Puffy Alphas Stickers in the Life Crafted Kit. Perfect! 
Speaking of alphas, here's a closer look at that super, mixed font title.....


So.much. awewsomeness!!!
You can see that the Scrapbooking Add On Kit has been carefully curated to compliment the Life Crafted Kit so we can enjoy the best of both memory keeping options! Yay! Love it! 

And because I really do LOVE it, I couldn't help myself... 
I've made a second layout for today's challenge, 

"Fresh Start"


Whoa! Another super boy page for my Mister A for Awesome! 
Again, I have combined both the Life Crafted & Scrapbooking Add-On Kits to create my scrapbook layout. I have also featured the Life Crafted Travelers Notebook Stamp; a new fave of mine! 


Those layers!!! 


The L shaped design of this layout is really eye catching, and I adore the split title! To add even more interest to it, I machine stitched it into place! Oh, and that title? It's from the exclusive CTK ephemera in the Life Crafted Kit! 


The Dear Lizzy Puffy Stickers in the Scrapbooking Add On Kit were the perfect adornment for this journal cluster! & yes, I'm still crushing on those Tiny Word Stickers - could you tell? lol! 
Such an awesome page for my sweet boy!

And there you have it! 
My takes on today's 3 - To - Inspire challenge! 
(& a look at how I am combining both kits to meet my 12 x 12 scarpbook layout needs!)
Now it's your turn! 
I can't wait to see your creations with this challenge! 
Be sure to share them with us in the Facebook CTK Fans Page HERE - we LOVE seeing your work! 

Haven't ordered your kits yet? 
Visit the store HERE to get started!

Thanks so much for stopping by today, 
til next time,