Pages

Wednesday, 28 November 2018

Shimmerz Paints: A Special Delivery for Christmas!

Hi Creative Friends! 

Welcome back for more colorful, Shimmerz Paints inspiration! 
Today I am sharing my take on the Shimmerz Paints November Color Challenge. 
This month's challenge has a Winter Wonderland theme to it - so it's all our fave icicle colors and shimmering delights! 
My color of choice is the gorgeous Texturez: Patina color, and here's why.......

"Merry Christmas"


Oh.my.heart! Isn't this just divine?!!
Meet out special delivery, ( and a lil early) Christmas present - our new mini Dachshund puppy! 
Isn't he just adorable?!! Puppy Love!
& talk about a one color wonder! 
Texturez Patina is just sensational!!! A perfect color for all your Christmas creations!
I've applied it around the border of my white cardstock base, using a repeat snowflake pattern and palette knife. Once dry, I then add two larger snowflake stencils with the pretty light green Patina color. LOVE!!! 


Texturez paints are just incredible! 
They boast the sheen of our Dazzlerz paints with an added textural element. 
Think Dazzlerz with a coarse, sand like substance within them. 
So gritty, dimensional and WOW!
You can check out ALL the fabulous Texturez Colors HERE

Let's take a closer look at that amazing Patina color.....


So.much.gorgeousness!!!
I've teamed our pretty mint Patina with Crate Paper's Fa La La collection, and let's just say, it's a match made in heaven! 
I just adore the fresh mint, white and red color scheme! Beautiful!


Just look at all that dimension! Stunning!


That grittyness is a texture lover's dream! 
And the color intensity is all kinds of awesomeness! So vibrant! 


We're All About The Color, and Texturez Patina is all that and more! 
I hope I have inspired you to add this amazing color to your mixed media kit!

Wanna know more about this awesome color?
Visit the Education Team channel HERE to watch my process video. 

& REMEMBER: Type AMANDA in the comments section of your Shimmerz Paints Store order to receive a FREE paint! Yay! 


Thanks so much for visiting
til next time, 

Happy Arty Days, 
Amanda xo 


Tuesday, 27 November 2018

Cocoa Vanilla Studio: Our Happy Story

Hi Creative Friends! 

Welcome back for more memory keeping inspiration! 
Today I'm sharing my take on the Cocoa Vanilla Studio multi photo theme week;
using our delightful new Midnight collection. 
I just love the blue hues and indigo in this collection - so beautiful! 
Needless to say, I just had to create a monochromatic page with it all! 
But enough chatter, here's my layout with more than one photograph......

"Our Happy Story"


*Sigh!* Oh-so-beautiful!
And what a happy story this is! 
All our Christmas wishes have come early this year with the arrival of our new miniature dachshund puppy! Yay!!! All the feels for this happy moment! 
And don't those CV-MN007 INKY DEPTHS blues make it even more lovely?! There are just SO many beautiful creative possibilities with the Midnight collection!

My layout begins with gluing one inch paper strips of pattern paper, CV-MN01 BLOOM & GROW (reverse side), on both sides of the white cardstock base. I then apply lots of inky blue splatters and droplets to the white cardstock base. Next, I remove the large die cut from CV-MN018 LARGE DIE CUT & BACKING KIT, and snip it in half. I back this half die with my favourite paper, CV-MN007 INKY DEPTHS & foam mount it to the top center of my layout design. Awesome!

To this fabulous die cut feature, I layer my super adorable puppy pictures....


You'll spot DIE CUT EPHEMERA frames beneath both my photographs, as well as an INKY DEPTHS layer from the 6x8 PAPER PAD. I foam mount the over hanging edges, and tuck the blue watercolor wash CLEAR STICKERS beneath my photos too! 
I embellish my multi photo cluster with DIE CUT EPHEMERA, & an ACCESSORY STICKER or two.....


I use the CARDSTOCK TITLES to form my title, Our Happy Story, which I layer over my photos as well. I love the midnight blues, and this title just enhances my monochromatic look! I add subtle journaling around the photos with those gorgeous sentiment stickers from the ACCESSORY STICKER sheet. Perfect! 
Here's another view for you......


So much gorgeousness! 
Who would've known that blue is my favourite colour?!! 
And seriously, how cute is our new addition? We've called him Maxwell, and he is just as divine in nature, as he is in appearance - puppy LOVE!!!

Moving down the page, you'll spy more inky splatters, CLEAR STICKERS, ACCESSORY STICKERS & even a CHIPBOARD PIECES mason jar filled with hearts....


Oh my heart!!! Could it get any sweeter than this?!!
I'm loving the CLEAR STICKERS in the Midnight collection - so versatile & the quality is amazing! Those navy crosses are so effective that they don't even look like stickers - incredible!!!


The sweetest thing, indeed!
The mason jars filled with hearts are the perfect ending to this happy story - all the love for little Maxwell the Miniature Dachshund! To bring even more attention to the CHIPBOARD PIECES one, I've foam mounted the DIE CUT EPHEMERA heart onto it. I've also tucked in a couple stickers beneath it, as well as that directional arrow from the CLEAR STICKERS.


Such a happy moment, beautifully documented with the Cocoa Vanilla Studio Midnight collection!
I hope you've enjoyed seeing my take on the multi photo theme 
& that my layout has inspired you to get creating too!

Thanks so much for visiting today,
til next time, 

Happy Arty Days, 
Amanda xo

Monday, 26 November 2018

Pebbles: Cozy & Bright Christmas Cardmaking!

Hi Friends!

Welcome back for more Pebbles inspiration with the gorgeous new Cozy & Bright collection!
As we head into December, it's time to start getting all those beautiful Christmas cards created and ready to write! 
Today I'm sharing a super quick & simple tutorial on how to make a set of beautiful cards in next to no time!
Here's a little look at my completed cards.....


Oh aren't these the sweetest?!! So super cute!
I can't help but sing, "Have a Holly Jolly Christmas, It's the best time of the year..."
I may have put the Christmas Carols on while I created these pretty cards ;) It really is my most favorite Holiday!
But enough chatter, 
here's how easy it is to recreate these lovely cards...


Start with two sheets of white Bazzill cardstock and trim each sheet 6" x 8". Score and fold each cut to create a total of 4 card bases (repeat this process for as many cards as you need). Use the Cozy & Bright Washi Tapes to border the front of each card - as shown above.


Using the reverse side of pattern paper Warm And Cozy, trim 4 rectangles each measuring 3 1/2" x 5 1/2". Add a 1 inch thick ribbon 1/2" from the base of each rectangle.


Foam mount the Warm And Cozy rectangles and adhere to card fronts.


Use the Cozy & Bright 6 x 6 Paper Pad & punch out 4 large circles . Select an ephemera sentiment, and foam mount onto the large cirlces.


Glue the circle sentiments to the card fronts.


Embellish with  more Cardstock Shapes Ephemera, and an Embellished Brad.
Note: I prefer to remove the pins from the back of my brads and adhere them with foam dots, creating a flair button appearance.


So simple, and yet, oh so pretty!!!
Here's a better look at my Cozy & Bright card set....


SO cute!!!


Absolutely adorable and oh so easy to make!!! You could easily make a dozen of these sweet cards at your next craft afternoon and be prepared for the Season of Giving!
I hope I have inspired you! 
Happy Holidays & thanks so much for visiting!
til next time, 

Happy Arty Days,
Amanda xo


OTHER SUPPLIES:

Saturday, 24 November 2018

The Cut Shoppe: Hello, Let's Chat Glam Girl!

Hi Everyone! 

Welcome back for more The Cut Shoppe inspiration!!!

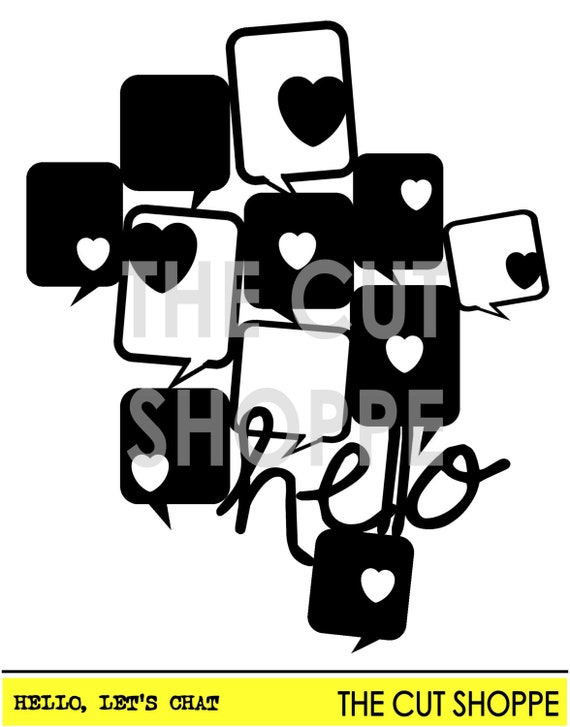
Today I am featuring the fabulous Hello Let's Chat digital cut file 
& let's just say, it's perfection for teen girls!!!
Here's what I've created with it today....

"Glam Girl"


Well, Hello Glam girl, indeed! 
Such a fun & playful page for my not so little girl! 
I have combined the Echo Park's Fashionista with the My Mind's Eye Glam Girl collections to create this teen scene layout. 
I cut the file in white cardstock, attach it to my page with lots of foam dots, and finish it off with lots of embellishments. SO pretty! Raising the cut file with foam dots really makes it stand out against that soft mint background.
Let's have a closer look at this amazing cut file!

Hello, Let's Chat looks like this.....

image 0

So awesome, huh?! I can see a ton of possibilities with this file too!

Here's a closer look at my layout, and all those sweet embellishments.....


 I choose to back a few of the speech bubbles with pattern papers, and of course, my fun photo! 
This cut file is ideal for memory keeping all our conversations, texts and phone pics! She looks way too grown up in that mirror selfie - I blinked, and all of a sudden she wasn't little anymore. So glad that I document her stories to remember all our days! 
Here's another view for you....


I layer ephemera pieces onto some of the other speech bubbles, as well as cute brads, gold sequins and even some puffy sticker hearts! You'll also spot some typewriter font sentiments around the cut file. 


Loving that hello - it's such a fun font to compliment the speech bubbles with! 


Gorgeous, girly and so much fun!!!
I hope my layout has inspired you to go cut the Hello, Let's Chat file today! 

Thanks so much for visiting, 
til next time, 

Happy Arty Days, 
Amanda xo 

https://www.instagram.com/happy_arty_days/

Tuesday, 20 November 2018

Citrus Twist Kits: More November Kit Inspiration!


Hi Friends! 

Welcome back for more Citrus Twist Kits November Kits inspiration!

I just ADORE everything in this month's kits - it's all SO lovely!
If you missed the release, here's a quick look at the two main kits...

Sunshine In My Soul Scrapbook Kit


So gorgeous, huh?!!! 


LOVE all the CTK exclusives!!!

If you're super lucky there may be just one or two left in the store  - you can check HERE!

And here's more of my creations with them......

"THIS."


Oh.my.heart!!! La la love this! 
From that beautiful photo of my parents with my children, to those gorgeous PL kit exclusives - this page makes me smile! 
It's created entirely with the Pocket Life Kit, the only 'extras' you'll spy are 12" white cardstock, machine stitching, and the Shimmerz Bubblegum Blast paint from my stash. Everything else on my layout is from this kit. Pretty amazing, huh?!! 
Such a gorgeous kit! The exclusive papers and ephemera totally win me over every month - SO good!
Here's a few close ups for you....


That pretty border trim has been created by cutting 1/2" x 8" strips from the 6" x 8" papers. I simply  machine stitch them into place - such a great way to showcase a smaller pattern paper on 12" page.
Loving those ephemera tags and labels too!!! 
But it's the photo cluster that really has my heart....


This is SO super pretty!!! 
So many beautiful, luscious layers in that photo cluster!
You'll also spy lots more ephemera pieces, a few chipboard stickers and even those soft green puffy alpha stickers - LOVE!!!!

My second layout is a lot more soft and subtle..... 

"Wonderful"


Yes, this happened!!!
Meet our newest family addition - a miniature Dachshund pup! 
Isn't he the sweetest?! 
I have combined the Paige Evans Whimsical pieces with the PL Kit exclusives to create this soft, clean and innocent look for our new boy. 
I just love the cascading embellishments design!
Here's a closer look.....


OMGosh! Isn't he adorable?!!
I am in love - actually, we all are! 
The soft blue and cream color scheme is so pretty, and I love the foil accents! 
The stamping is courtesy of the CTK Conversation Starter Vol.2 stamp, & I think it pretty much sums up our feelings, this lights my world!
Just about perfect.....


Another beautiful moment documented with this month's lovely kits!

I hope my layouts have inspired you to get creating too! 
For all your memory keeping supplies, be sure to visit the Citrus Twist Kits store HERE

Thanks so much for stopping by today! 
til next time, 

Happy Arty Days, 
Amanda xo  

Monday, 19 November 2018

Pinkfresh Studio: Holiday Vibes Inspiration!

Hi Creatives! 

Welcome back for more Pinkfresh Studio: Holiday Vibes scrapbook collection inspiration! 
Today I have 2 very different but oh so stunning,
Christmas Cheer layouts to share with you! 
First up is this soft & subtle, snowflake inspired design...

"Ho, Ho, Ho!"


Pardon the pun, but this is Snow, much fun!
I just instantly fell in love with pattern paper, LET IT SNOW & knew I'd make a feature of it! I love how soft and pretty this is!
And how super cute is my mini Santa in the photo?! 
I use the LET IT SNOW  paper as the 12" x 12" base, and then layer it with an 11" x 11" white cardstock background. I then use more white cardstock to cut out the free cut file called Fancy Floral (it's from The Cut Shoppe), and back the outer ring of flowers with more LET IT SNOW paper. With such a geometric look to them, these 'fancy florals' make excellent faux snowflakes and look really effective! Using the same pattern paper, I also 'fill' the inner section of the cut file, and then adhere it to the white background. 


With such a soft look, I embellish the fancy floral snowflakes with WOOD & EPOXY BUTTONS, snowflake DIE CUTS, ENAMEL DOTS, a PUFFY STICKER & a few gold sequins (from my stash) to prevent them from blending into the background. Such a fun & decorative way to create interest!
 

I embellish the inner section with that very cool, Ho, Ho, Ho! CHIPBOARD ALPHAS STICKERS title - love the pop of bright blue against the icicle blue, LET IT SNOW! 
With the bright red Santa hat, my photo is easily identified on the page. To avoid over embellishing it & I decide to adorn it with a pale blue CHIPBOARD STICKERS frame and embellish with just the one WOOD & EPOXY BUTTON. 
Here's a better look at it......


What a cutie! 
 I scatter a few snowflake DIE CUTS & a CHIPBOARD STICKER around this sweet framed image. For finishing touches, I add the Just Believe CHIPBOARD STICKER sentiment. Simple. Sweet & oh-snow-Christmassy! 


Love it! 

Next up, I have this very festive layout with our gorgeous Holiday Vibes collection....
"Xmas Cheer"


O' Christmas Tree, O' Christmas Tree!
Told you it was festive!
This time I've created a really bright, bold & playful layout to celebrate the Season! 
Inspired by the Christmas Tree in my daughter's Christmas Parade artwork, & the trending layered 'flaps' look, I've created this stunning feature tree in the center of my page. I have used 1 1/2" wide strips of the B-sides of pattern papers LOVE & PEACE and VERY MERRY, & arranged them to resemble the 'triangle' tree shape. I stitch them into place with my sewing machine, and then use fringing scissors to create a Fir tree appearance. SO cool!  
I use the 25 ephemera DIE CUT for the base of the tree trunk, and then decorate the tree with all the Christmas trimmings! 

Let's take a closer look....


So many gorgeous details & embellishments!
From the gold star atop of the Tree, to the DIE CUT tree lights & ornaments, and those oh-so shiny EPOXY STICKERS and ENAMEL DOTS, this Christmas Tree is just divine! 
With such a striking main feature, I really needed to make sure that my sweet photos didn't get lost amongst it all! To help define them, I place both photos into CHIPBOARD STICKERS frames and position them on an angle to create extra interest. I also embellish them with those very sweet & super cute Winter birdy DIE CUTS. And lastly, to really attract your eye, I position the COLOR DIPPED WOOD ALPHA STICKERS titles above each frame so that you see the photographs as you read the title. 
Speaking of titles, how lovely is the banner subtitle, Christmas Family Traditions?!
 

I love the layered banners look, and just look at those packages under the tree!!!
Such a super fun & adorable layout! 

Whether you like the softer, more subtle, snowy Christmas or
 prefer the bright & bold festivities, the Holiday Vibes collection is bound to impress!  
Be sure to leave me a comment below to tell me which one was your favorite! 
Either way, I hope I have inspired you to start documenting the Reason for the Season
 and celebrate all the Christmas Stories! 

Thanks so much for stopping by today!
Merry Christmas!